

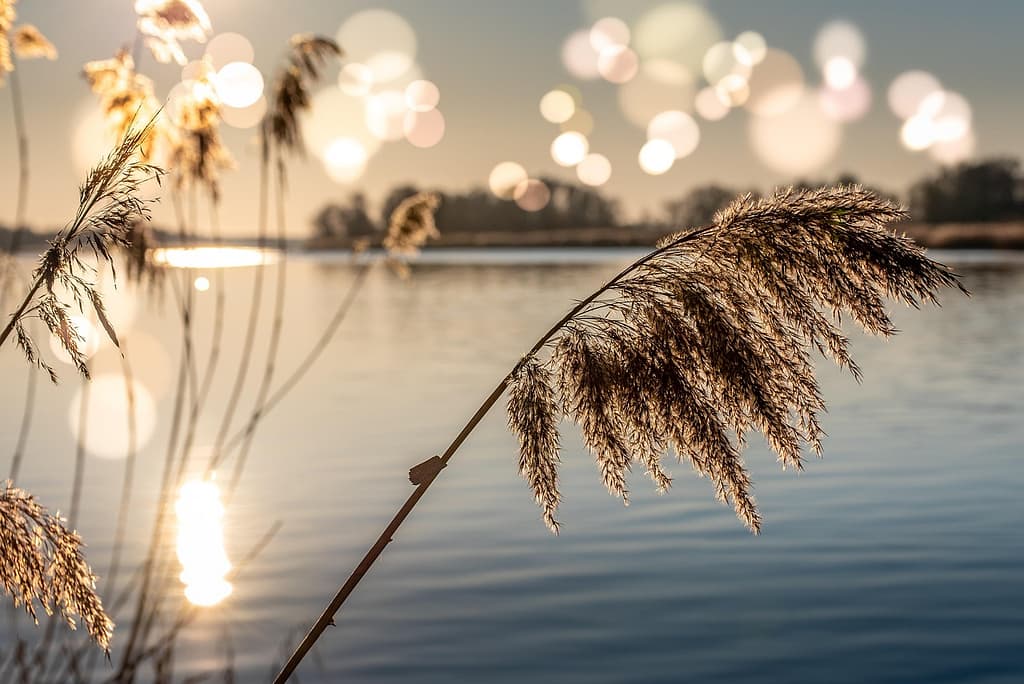
In the world of photography, few effects feel as magical as bokeh. It transforms ordinary scenes into ethereal compositions full of softness, light, and emotion. While bokeh is commonly associated with portraiture or macro photography, it has found a compelling role in landscape photography with bokeh, where the blend of sharp subjects and velvety backgrounds creates both artistic depth and visual storytelling.
Definition of Bokeh
The term “bokeh” (from the Japanese word boke, meaning blur or haze) refers to the aesthetic quality of the out-of-focus areas in an image. It’s not just blur — it’s the character of that blur: smooth, creamy, and pleasing to the eye.
Bokeh is shaped by:
- Lens aperture (wider apertures = more blur)
- Aperture blade design (rounder blades = smoother bokeh)
- Light sources in the background (small highlights often turn into soft orbs of light)
When photographers talk about good bokeh, they’re describing blur that feels natural and helps guide the viewer’s attention — not distract from it.
“Bokeh is not just about blur. It’s about emotion — how softness transforms light into atmosphere.”
— Ansel K. Rowe, Landscape Photographer
Bokeh vs Sharpness: Traditional Landscape vs Creative Blur
Traditionally, landscape photography strives for maximum sharpness. Photographers use narrow apertures (like f/11 or f/16) to ensure everything from the foreground rock to the distant mountain is in focus. This style emphasizes detail and scale.
However, landscape photography with bokeh breaks that rule — intentionally introducing selective focus to:
- Highlight a specific subject (like a flower, tree branch, or stone)
- Soften distracting backgrounds
- Convey depth or intimacy
This creative approach is part art, part technique. Instead of focusing purely on documentation, it’s about expression. By allowing parts of the image to fade softly away, you draw attention to what matters most — the story within the frame.
Here’s a quick comparison:
| Style | Aperture | Depth of Field | Focus Goal | Mood/Effect |
| Traditional Landscape | f/11–f/16 | Deep (everything sharp) | Entire scene | Realistic, detailed |
| Landscape with Bokeh | f/1.8–f/4 | Shallow (selective focus) | Foreground subject | Dreamy, emotional, painterly |
Benefits & Creative Uses of Bokeh in Landscapes
Bokeh in landscapes is about more than just blur — it’s about composition control and visual storytelling. Below are the primary benefits:
- Subject Emphasis:
You can make a flower, rock, or tree pop by keeping it sharp while softly blurring the surrounding environment. - Mood Creation:
Smooth blur evokes calmness and serenity. Perfect for sunrise, misty forests, or twilight scenes. - Simplicity in Complexity:
Landscapes often contain clutter (branches, leaves, people). Bokeh simplifies the frame by reducing distractions. - Atmospheric Storytelling:
Background light sources like water reflections, sunset flares, or city lights become glowing orbs that enhance atmosphere. - Depth & Dimension:
When you use selective focus effectively, it gives your photo a 3D feel, leading the viewer’s eyes from sharp subject to soft background.
Pro Tip: Try positioning your main subject (like a flower) about 1–2 meters from a faraway background. Use a wide aperture (f/2.8 or lower) and focus carefully on the subject — you’ll instantly notice how the background melts into smooth color and light gradients.
Gear and Lens Choices for Landscape Photography with Bokeh
Creating breathtaking landscape photography with bokeh begins long before pressing the shutter. The tools you use — your camera body, lens, and even small accessories — play a huge role in how beautifully your background blur renders. Understanding how each component affects bokeh helps you make smarter choices and achieve consistent, artistic results.
Camera Bodies and Sensor Considerations
When it comes to bokeh, your camera sensor size is one of the most influential factors.
- Full-frame cameras (e.g., Canon R6, Nikon Z6, Sony A7 series) naturally produce shallower depth of field at the same aperture compared to APS-C or Micro Four Thirds cameras. This means you can achieve stronger blur without extreme apertures.
- APS-C cameras (like Fuji X-T5, Canon R7) can still deliver beautiful bokeh, but you’ll need to move closer to your subject or use a longer lens to mimic full-frame effects.
- Micro Four Thirds systems (e.g., Olympus, Panasonic) have smaller sensors, making it harder to get deep bokeh, but with fast primes (f/1.2 or f/1.4), it’s achievable.
Pro Tip:
If you’re serious about bokeh in landscapes, prioritize a large sensor camera with excellent low-light performance. It allows you to use wider apertures without sacrificing image quality.
Comparison Table — Sensor Size vs Bokeh Potential
| Sensor Type | Bokeh Strength | Lens Options | Best Use Case |
| Full Frame | ★★★★★ | Many f/1.2–f/2.8 primes | Professional landscapes |
| APS-C | ★★★★☆ | Affordable telephotos | Hobbyists & pros alike |
| Micro 4/3 | ★★★☆☆ | Some f/1.2 lenses available | Compact travel setups |
Lens Types That Help Produce Bokeh
Not all lenses are created equal when it comes to producing pleasing background blur. The lens is where most of the “bokeh magic” happens.
1. Fast Prime Lenses (f/1.2 – f/2.8):
These are the kings of bokeh. Lenses like the 50mm f/1.8, 85mm f/1.4, or 135mm f/2 produce smooth, circular highlights and creamy blur. They also perform exceptionally well in low-light landscape scenes.
2. Telephoto Lenses (70–200mm):
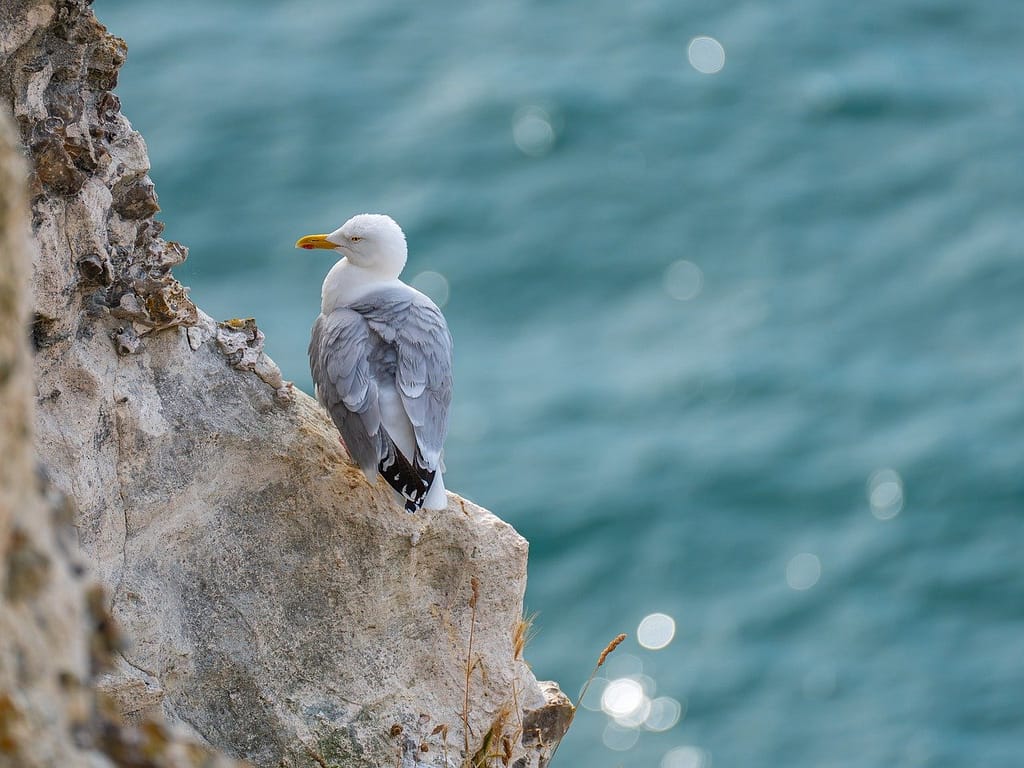
Even at moderate apertures (f/4), telephotos compress perspective, making the background appear closer and blurrier. Perfect for isolating a single tree or mountain ridge against a distant background.
3. Wide-Angle Lenses with Fast Apertures (24mm f/1.4 or 35mm f/1.8):
These are trickier for bokeh because wide lenses have naturally deeper depth of field. However, when used close to a subject (e.g., a flower in the foreground), they can create foreground sharpness + background blur beautifully.
4. Macro Lenses:
Often overlooked for landscapes, macro lenses allow you to capture small foreground details (like dew drops or moss) while turning the background into a smooth color wash.
Quick Fact:
The Nikon 105mm f/1.4E and Sony 135mm f/1.8 GM are often praised by professionals for their “buttery” bokeh and near-perfect edge transitions.
Choosing Aperture Blades, Focal Length & Background Distance
The look of your bokeh is shaped by three core factors:
- Aperture Shape
- Focal Length
- Distance Relationships
Let’s break it down:
- Aperture Blades:
The more rounded the aperture blades, the smoother your bokeh highlights will appear. Lenses with 9 or more rounded blades create circular, non-distracting blur.
- Example: Canon RF 85mm f/1.2L uses 9 blades — producing perfect circular highlights.
- Example: Canon RF 85mm f/1.2L uses 9 blades — producing perfect circular highlights.
- Focal Length:
Longer lenses (like 85mm–200mm) compress the scene, making backgrounds blurrier. For dreamy landscapes, a 135mm prime is often a sweet spot. - Background Distance:
The further the background is from your subject, the stronger the bokeh effect. Move your subject (like a branch or stone) away from the horizon or distant trees for maximum softness.
Example Setup:
Lens: 85mm f/1.8
Subject distance: 2 meters
Background distance: 50+ meters
Result: Foreground detail sharp; background melts into smooth tones and light.
Accessories That Help Create Bokeh Landscapes
While lenses and cameras do most of the work, a few small tools make your workflow smoother and your results sharper.
- Tripod: Essential when using wide apertures in low light. Keeps the subject tack-sharp even at slower shutter speeds.
- Remote Shutter Release or Timer: Eliminates camera shake — crucial for maintaining foreground sharpness.
- ND (Neutral Density) Filters: Allow you to shoot at wide apertures even in bright daylight by reducing light intake.
- Polarizing Filter: Enhances contrast and reduces glare on water or foliage, making the bokeh appear more colorful and defined.
- Lens Hood: Prevents stray light from hitting your lens and causing unwanted bokeh flares or ghosting.
Pro Tip Box:
✅ Always check your lens’ “minimum focusing distance.”
The closer your lens can focus, the more control you’ll have over how dramatically the background blurs. A 50mm f/1.8 that focuses at 0.3m can produce far more impactful bokeh than one limited to 0.5m.
Key Takeaway:
Investing in the right lens matters more than having the most expensive camera. Even a budget-friendly 50mm f/1.8 lens on a mid-range body can create mesmerizing landscape photography with bokeh — if you understand how to use distance, light, and aperture to your advantage.
Camera Settings & Techniques for Achieving Bokeh in Landscape Photography
Mastering landscape photography with bokeh is as much about settings and technique as it is about gear. Understanding how to control your aperture, distance, and light will help you consistently achieve that soft, dreamy blur — without losing detail in your main subject.
Below, we’ll break down the most effective camera settings, shooting methods, and composition tactics for creating artistic bokeh in landscape scenes.
Aperture Priority vs Manual Mode
When shooting for bokeh, your choice of camera mode matters. Both Aperture Priority (A or Av) and Manual Mode (M) have benefits depending on how much control you want.
- Aperture Priority Mode (A/Av):
Perfect for beginners or fast-paced lighting conditions. You simply select your desired aperture (e.g., f/2.8), and the camera automatically adjusts shutter speed and ISO. This lets you focus on composition and depth of field. - Manual Mode (M):
Gives complete control over all exposure variables — essential when light changes quickly (sunrise or sunset). In Manual Mode, you can fine-tune every setting to achieve both the right exposure and desired bokeh intensity.
Pro Tip:
Start in Aperture Priority when learning bokeh control. Once you’re comfortable predicting exposure, switch to Manual to refine consistency and creative freedom.
Ideal Aperture, Shutter Speed & ISO for Bokeh
Getting great bokeh starts with your aperture — the size of the lens opening that controls depth of field.
| Setting | Recommended Range | Effect on Bokeh |
| Aperture | f/1.2 – f/4 | Wider apertures (f/1.2–f/2.8) produce stronger background blur |
| Shutter Speed | 1/60s – 1/250s (tripod use below 1/60s) | Prevents motion blur while maintaining exposure |
| ISO | 100–400 | Keeps image noise low, preserving smooth blur transitions |
A general formula for landscape bokeh:
Use a wide aperture (f/2.8 or below) + place subject close to camera + keep background distant = beautiful bokeh and strong depth separation.
Example Setup:
Aperture: f/2.8
Shutter: 1/200s
ISO: 200
Focal Length: 85mm
Distance to subject: 1.5m
Result: Foreground leaf or flower sharp, background melts into buttery blur.
Focusing and Depth of Field Control
In traditional landscapes, you focus at the hyperfocal distance to keep everything sharp. But for landscape photography with bokeh, you do the opposite — focus exactly where you want sharpness and let everything else softly fade.
Here’s how to do it effectively:
- Use Single-Point Focus (AF-S or One-Shot AF)
Select a single focus point manually, and place it directly over your subject. This prevents your camera from auto-focusing on the background. - Switch to Manual Focus for Precision
Especially useful when shooting through foliage or close-up subjects. Zoom in using your LCD’s Live View and fine-tune your focus. - Understand Depth of Field (DoF)
The closer you are to the subject and the wider your aperture, the thinner your depth of field.
Example: At f/1.8, focusing on a flower 1m away might give you only a few centimeters of sharpness. Small focus errors can ruin the shot — so check carefully. - Use Focus Peaking (Mirrorless Users)
This highlights in-focus areas in real-time — a lifesaver for achieving tack-sharp subjects while maintaining background softness.
Distance and Composition Tricks
Creating soft, beautiful bokeh isn’t just about camera settings — it’s about positioning. The relationship between your camera, subject, and background is what truly defines the strength of the blur.
Key Distance Principles:
| Element | Description | How It Affects Bokeh |
| Subject Distance (Camera → Subject) | How close you are to your focus point | Closer distance = stronger background blur |
| Background Distance (Subject → Background) | How far the background is from your subject | Greater distance = smoother bokeh |
| Focal Length | Longer lenses compress background | More compression = creamier bokeh |
Example Scenario:
Imagine photographing a single wildflower against distant mountains.
- Move in close to the flower.
- Use an 85mm or 135mm lens at f/2.8.
- Focus precisely on the petals.
The background mountains will transform into a soft, colorful wash — instantly giving you that cinematic look.
Composition Tip:
Use foreground-to-background layering:
- Foreground (sharp subject)
- Middle ground (slightly blurred elements)
- Background (fully soft)
This creates a three-dimensional feel, guiding the viewer’s eyes smoothly through the frame.
Light and Timing for Bokeh Effects
Light plays a huge role in how your bokeh looks. Shooting at the right time can make the difference between a flat blur and a glowing masterpiece.
Best Times to Shoot for Bokeh Landscapes:
- Golden Hour (Sunrise/Sunset):
Soft, warm light enhances background highlights and adds depth to your blur. - Blue Hour:
The cool tones before sunrise or after sunset create mystical, painterly backgrounds. - Backlighting:
Position your subject between the camera and the light source. This creates glowing edges and beautiful circular bokeh from background highlights. - Dappled Light:
When sunlight filters through trees or leaves, it produces tiny specular highlights — perfect for circular bokeh patterns.
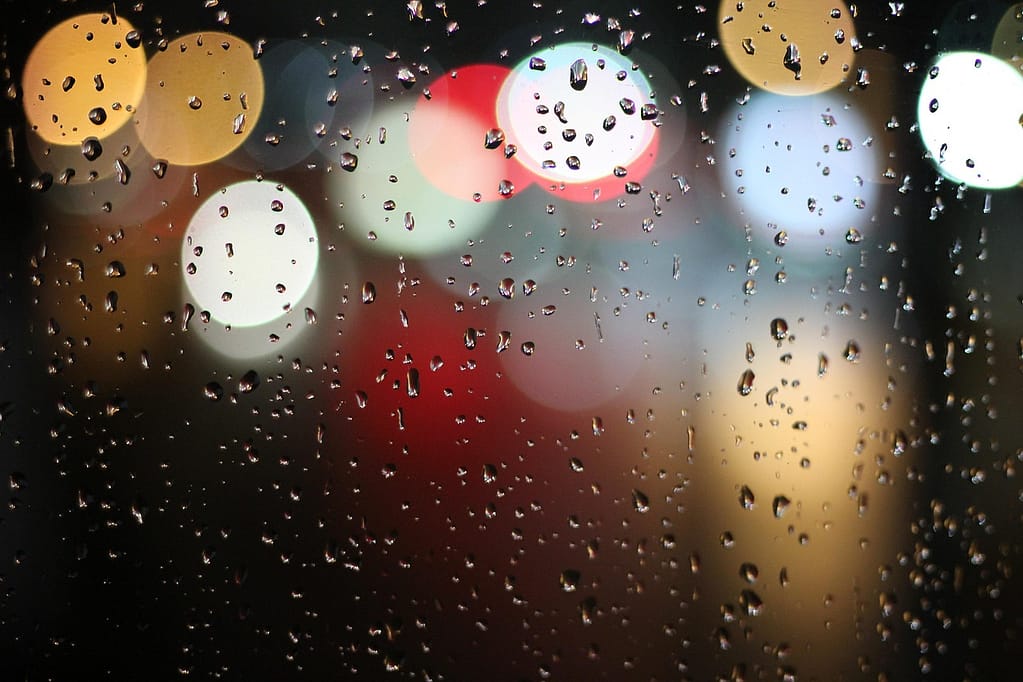
💡 Tip: Try photographing morning dew or rain droplets with the sun behind them — you’ll see dozens of glowing orbs that look like fairy lights in your landscape.
When to Use Bokeh vs Full Focus
Not every landscape benefits from bokeh. Knowing when to use blur and when to maintain sharpness is key to effective storytelling.
Use Bokeh When:
- You want to emphasize a subject in a busy environment.
- The background is distracting or cluttered.
- You’re shooting close-up nature scenes like flowers, mushrooms, or rocks.
- You want to create mood or emotion rather than detail.
Use Full Focus When:
- The background is essential to the story (e.g., majestic mountains, sunsets).
- The scene’s scale or texture is the focus.
- You’re shooting for panoramic compositions that need edge-to-edge detail.
🎯 Rule of Thumb:
Use bokeh to simplify and guide the eye. Use sharpness to inform and describe.
Quick Recap — Bokeh Settings Formula for Landscapes:
- Mode: Aperture Priority (Av)
- Aperture: f/2.8 or wider
- Focus: Manual or single point on foreground subject
- Distance: Close to subject, far from background
- Lighting: Backlit or golden hour
When combined, these steps create that irresistible depth and dreamlike softness that define professional-level landscape photography with bokeh.
Compositional Approaches & Creative Ideas for Landscape Photography with Bokeh
Composition is the artistic core of landscape photography with bokeh.
While camera settings determine how your background blurs, composition determines why it matters. Great bokeh isn’t just about creamy blur — it’s about using it intentionally to strengthen the story of your photo.
In this section, you’ll learn how to compose with depth, shape, and light to create visually powerful landscapes with bokeh.
1. Using Foreground Elements for Depth and Framing
One of the most effective techniques for achieving bokeh in landscape scenes is incorporating foreground interest. This adds a sense of scale and depth, turning a flat scene into a layered one.
How to Do It:
- Place a subject close to your lens — such as wildflowers, grass, or branches — and focus beyond it.
- Open your aperture (f/2.8 or wider) so the foreground becomes softly blurred, framing your main subject.
- Alternatively, focus on the foreground and let the background dissolve into smooth bokeh.
Example:
A field of lavender in the foreground, with a mountain in the distance. Focus on one lavender stalk up close — the others melt into purple blur, framing the sharp stalk beautifully.
Pro Tip:
Use leading lines from blurred foreground elements (like grass or fences) to draw the viewer’s eyes into the sharp area of your image.
2. Rule of Thirds — Simplify with Blur
The rule of thirds is a timeless composition technique that works brilliantly with bokeh. By placing your subject on one-third of the frame, and letting the rest blur into the background, you create balance and visual harmony.
How to Apply It:
- Position the main subject (e.g., a tree, rock, or flower) on the left or right third line.
- Allow the background bokeh to fill the other two-thirds.
- This gives your image negative space and a cinematic feel.
Why It Works:
Human eyes are naturally drawn to sharpness and contrast. By using bokeh strategically, you guide attention precisely where you want it — the subject sitting at the power points of the frame.
3. Layering: Foreground, Midground, and Background
In traditional landscape photography, you strive for sharp detail across all layers. But in bokeh-based landscapes, layering helps you control visual depth.
How to Structure a Bokeh Layered Composition:
| Layer | Focus | Typical Subject | Effect |
| Foreground | Sharp | Grass, flowers, rocks | Main subject with crisp focus |
| Midground | Soft | Trees, hills | Smooth transition blur |
| Background | Very soft | Mountains, sky | Creamy bokeh that isolates subject |
Example Idea:
Focus on a small patch of moss or flowers (foreground). Keep the trees behind softly diffused, and let the far mountains melt completely. The result is a layered, dreamlike scene that still tells a landscape story.
Pro Tip:
Try moving just a few steps forward or backward — even small changes in distance can drastically alter the balance between sharpness and blur.
4. Creating Leading Lines Through Blur
Bokeh can guide the eye just like sharp lines can.
Use blur gradients — where parts of the image gradually move from sharp to soft — to subtly lead viewers toward your focal point.
Ideas for Natural Leading Lines with Bokeh:
- Curved paths or dirt roads that start sharp and fade softly into the background.
- Flower rows where the closest blooms are in focus and the rest dissolve beautifully.
- Sunlit tree tunnels, where bokeh circles form a glowing corridor effect.
💡 Creative insight: Leading lines don’t always need to be “lines.” Even color gradients or light patterns within bokeh can create movement.
5. Playing with Light and Background Highlights
Light transforms ordinary blur into magical bokeh orbs. When your background has tiny highlights — such as sunlight through trees or reflections off water — a wide aperture turns them into beautiful glowing circles.
Best Sources of Bokeh Highlights:
- Dew drops or raindrops on leaves.
- Sunlight filtering through branches.
- Water reflections in rivers or lakes.
- City lights (for night landscapes).
- Metallic or reflective surfaces catching sunset rays.
Example Scene:
During golden hour, photograph a wildflower field with the sun behind it. Each sparkle of light becomes a circular bokeh spot — creating a golden, fairytale-like atmosphere.
“Light is the brush, and bokeh is the paint that shapes emotion in landscape photography.”
6. Symmetry and Minimalism in Bokeh Landscapes
Sometimes less is more.
A minimalist composition, where a single subject stands against a soft, blurred background, can create immense emotional power.
Tips for Minimalist Bokeh Landscapes:
- Use negative space — wide, blurred backgrounds of sky or field.
- Isolate one strong subject, like a lone tree or flower.
- Keep colors simple and harmonious.
- Choose gentle light (sunrise, overcast days) to avoid harsh contrasts.
Example Idea:
A single daisy sharply focused in front of a softly glowing meadow — simple, peaceful, yet captivating.
7. Incorporating Motion and Storytelling
You can use bokeh to tell stories, not just to beautify scenes.
Try blending motion with blur for artistic results.
Creative Ideas:
- Slow shutter bokeh: Capture moving water or grass swaying in the breeze while maintaining background blur.
- Rain or snow scenes: Wide apertures make falling particles glow softly.
- Windy fields: Let the movement of out-of-focus plants add texture to your background.
This technique bridges realism and abstraction — showing the essence of a landscape rather than every detail.
8. Color Harmony in Bokeh Landscapes
Color plays a huge role in how your bokeh feels. Complementary or analogous tones can make the blur look painterly and cohesive.
| Color Scheme | Emotion | Example Scene |
| Warm (gold/orange) | Comfort, nostalgia | Sunset field with golden bokeh |
| Cool (blue/green) | Calm, serenity | Forest stream with cool bokeh light |
| Mixed tones | Energy, contrast | Autumn leaves with blue sky bokeh |
Pro Tip:
When editing, slightly reduce clarity or contrast in the background bokeh areas. This enhances smoothness and ensures your subject stands out naturally.
9. Creative Angles for Bokeh Effects
Experiment with your camera position.
Shooting from low angles or side angles often enhances bokeh strength by changing how light hits your lens.
Angle Techniques:
- Low Angle: Get close to the ground and shoot upward to capture blurred foliage or light circles behind your subject.
- High Angle: Shoot downward for soft background transitions — great for textures like moss or stones.
- Diagonal Composition: Tilt your frame slightly to create dynamic tension and motion within blur gradients.
🎥 Think cinematic: Low-angle bokeh shots often mimic the shallow depth seen in professional film cinematography.
Summary — Key Compositional Takeaways for Landscape Bokeh:
- Layer your scene (foreground → background blur).
- Use foreground framing and rule of thirds for balance.
- Exploit background highlights and lighting for glowing orbs.
- Keep compositions clean and intentional.
- Use bokeh not as decoration, but as storytelling.
Best Lenses for Landscape Photography with Bokeh
When it comes to mastering landscape photography with bokeh, your choice of lens can make or break your image.
While camera bodies control exposure and focusing precision, lenses define the quality, shape, and character of bokeh. The right lens can turn an ordinary blur into a creamy, cinematic background that elevates your composition from snapshot to fine art.
In this section, we’ll explore the best lens types, focal lengths, aperture ranges, and real-world recommendations for capturing stunning bokeh in your landscape scenes.
1. Prime vs Zoom Lenses: Which Is Better for Bokeh?
Let’s start with the classic debate — prime vs zoom. Both can achieve bokeh, but they do it differently.
| Lens Type | Pros for Bokeh | Limitations |
| Prime Lens (Fixed Focal Length) | – Wider maximum apertures (f/1.2–f/2.8) – Sharper optical quality – Creamier, smoother bokeh | – Fixed focal length limits flexibility – Requires moving physically for framing |
| Zoom Lens | – Versatility in framing and perspective – Great for compressing backgrounds at telephoto ranges | – Smaller max aperture (f/4–f/5.6 in budget models) – Slightly harsher bokeh at long focal lengths |
Verdict:
If your main goal is beautiful, dreamy background blur, go with prime lenses.
If you prefer flexibility and shooting from varying distances, a telephoto zoom like a 70–200mm f/2.8 is an excellent all-rounder.
2. Ideal Focal Lengths for Landscape Bokeh
Focal length directly affects how strong and smooth your bokeh appears. Longer lenses compress the background, making blur more pronounced.
Here’s a breakdown of how different focal lengths perform in landscape photography with bokeh:
| Focal Length | Effect on Bokeh | Best Use Case |
| 35mm – 50mm | Moderate blur, natural perspective | Environmental landscapes, foreground focus |
| 85mm – 105mm | Strong background compression, soft blur | Isolating subjects like trees or flowers |
| 135mm – 200mm | Very creamy, professional-looking bokeh | Distant subjects, layered compositions |
| 300mm+ | Extreme background flattening | Creative telephoto landscapes, abstract bokeh scenes |
🎯 Pro Tip: For beginners, an 85mm f/1.8 or 50mm f/1.4 offers the best balance of affordability, weight, and bokeh quality.
3. Aperture and Bokeh Quality
The wider the aperture, the creamier the bokeh — but that’s only part of the story.
Lens design, optical coatings, and diaphragm blade shape all influence the look of your bokeh.
| Feature | How It Affects Bokeh |
| Aperture Size | Wider (f/1.2–f/2.8) = stronger background blur |
| Diaphragm Blades | More blades (9–11) = rounder, smoother bokeh circles |
| Optical Design | Fewer elements often produce cleaner transitions |
| Coatings | Reduce chromatic aberration and harsh bokeh edges |
Example:
- A 50mm f/1.2 lens produces deep, circular bokeh balls with glowing edges.
- A kit zoom lens at f/4.5 produces more geometric, polygonal bokeh that feels less smooth.
Quick Rule of Thumb:
Look for lenses with f/2.8 or wider aperture and 9 or more aperture blades for the most pleasing bokeh.
4. Top Lenses for Landscape Photography with Bokeh (By Brand)
Here’s a curated list of industry-favorite lenses renowned for delivering incredible bokeh in landscape and nature scenes.
📸 Canon
- Canon RF 85mm f/1.2L USM – The king of creamy background separation.
- Canon RF 50mm f/1.2L USM – Superb for environmental landscapes and portraits.
- Canon EF 70-200mm f/2.8L IS III – Versatile telephoto with rich color and soft compression.
📷 Nikon
- Nikon Z 85mm f/1.8 S – Razor-sharp subject isolation and buttery blur.
- Nikon 105mm f/1.4E ED – A true “bokeh beast,” perfect for dreamlike landscapes.
- Nikon Z 70-200mm f/2.8 VR S – Professional lens for distant landscape compression.
📷 Sony
- Sony FE 85mm f/1.4 GM – Legendary portrait lens with cinematic background melt.
- Sony FE 135mm f/1.8 GM – Sharp, vivid, and delivers painterly bokeh in outdoor scenes.
- Sony 70-200mm f/2.8 GM OSS II – Lightweight, versatile telephoto for both portraits and scenic isolation.
📷 Fujifilm (APS-C)
- Fujinon XF 56mm f/1.2 R WR – Compact and excellent for bokeh landscapes.
- Fujinon XF 90mm f/2 R LM WR – Crisp and smooth, ideal for artistic isolation.
📷 Sigma / Tamron (Budget Alternatives)
- Sigma 85mm f/1.4 DG DN Art – Outstanding optical quality for half the price of OEM lenses.
- Tamron 70-180mm f/2.8 Di III VXD – Lightweight, affordable, and surprisingly smooth bokeh.
5. Bokeh Character: The Artistic Signature of Lenses
Not all bokeh looks the same. Each lens produces its own bokeh character, depending on optical design.
| Bokeh Type | Visual Effect | Ideal Scenario |
| Creamy (Gaussian blur) | Smooth, uniform background | Dreamy nature shots |
| Swirly bokeh | Background appears to spiral around subject | Artistic, vintage lenses |
| Soap bubble bokeh | Bokeh circles have bright edges | Creative retro look |
| Cat’s-eye bokeh | Oval shapes near frame edges | Adds motion or vignette feel |
Example:
- The Helios 44-2 58mm f/2, a vintage Russian lens, is famous for its swirly bokeh, perfect for artistic landscapes.
- The Sony 135mm GM, by contrast, produces creamy Gaussian blur, ideal for high-end professional use.
🎨 Think of each lens as having a “bokeh signature.” The right choice depends on whether you want a natural painterly softness or a stylized, creative look.
6. Using Extension Tubes or Close-Up Filters for Extra Bokeh
Want more blur without buying a new lens? Try these inexpensive accessories:
- Extension Tubes: Attach between the camera and lens to allow closer focusing — increasing background separation and enhancing blur.
- Close-Up Filters: Screw onto your lens like a filter; great for creating macro-like compositions with intense background bokeh.
These tools work especially well on 50mm or 85mm primes, turning simple landscapes into intimate, detail-rich compositions.
7. Real-World Comparison — Lens Bokeh Test (Example)
Here’s an example test comparing three lenses for landscape photography with bokeh (using the same composition and lighting):
| Lens | Aperture | Background Blur | Edge Smoothness | Overall Bokeh Score |
| 50mm f/1.8 | f/1.8 | Moderate | Slight edge rings | 7/10 |
| 85mm f/1.4 | f/1.4 | Deep, smooth | Soft edge falloff | 9/10 |
| 135mm f/2 | f/2 | Exceptional compression | Velvety smooth | 10/10 |
Conclusion:
While the 50mm offers a natural perspective, the 85mm and 135mm primes deliver the best balance of depth compression and bokeh smoothness for landscape work.
8. Pro Tips for Choosing Your Bokeh Lens
- Start with an 85mm f/1.8 — light, affordable, and optically stunning.
- Prioritize aperture and blade count over zoom range.
- Avoid ultrawide lenses (<24mm) for bokeh; their depth of field is too deep.
- Test bokeh shapes by photographing distant lights at night — it reveals the lens’s “bokeh character.”
- Rent before you buy — many photographers discover their favorite lens through hands-on comparison.
9. Quick Lens Buying Guide (Summary Table)
| Budget | Recommended Lenses | Notes |
| Beginner ($200–$500) | Canon 50mm f/1.8 STM, Nikon 50mm f/1.8G, Sony 50mm f/1.8 | Affordable and bright |
| Intermediate ($500–$1200) | Sigma 85mm f/1.4 Art, Tamron 70-180mm f/2.8 | Great balance of quality & cost |
| Professional ($1200+) | Canon RF 85mm f/1.2L, Sony 135mm f/1.8 GM, Nikon 105mm f/1.4E | Industry-leading bokeh and color |
Final Thoughts on Lenses:
To master landscape photography with bokeh, think beyond sharpness — focus on bokeh character, compression, and emotion. The perfect lens is the one that complements your vision and turns ordinary backgrounds into soft, atmospheric canvases that amplify your subject.
Lighting, Timing & Weather for Capturing Bokeh Landscapes
Light is the soul of landscape photography — and when it comes to landscape photography with bokeh, light does more than illuminate your scene; it sculpts it. The way light interacts with your subject and background determines how your bokeh looks — whether it’s soft, glowing, or filled with shimmering orbs.
Choosing the right lighting conditions, time of day, and weather environment can make a massive difference in the mood and quality of your landscape bokeh shots.
1. The Role of Light in Bokeh Creation
Bokeh is essentially the visual representation of how your lens renders out-of-focus light. So, the more contrast and highlights you have in your background, the more pronounced your bokeh will be.
Why Light Matters:
- Bright points of light turn into glowing circles (bokeh balls).
- Soft, diffused light makes blur transitions smoother.
- Directional light enhances depth and separation between subject and background.
In short:
Light defines the texture of your bokeh — harsh light creates hard-edged circles, while diffused light creates velvety gradients.
2. Best Times of Day for Landscape Photography with Bokeh
Timing is everything. Different times of the day offer unique light qualities that directly affect bokeh.
| Time of Day | Lighting Characteristics | Bokeh Effect | Ideal Scene Type |
| Golden Hour (Sunrise/Sunset) | Warm, directional, low-angle sunlight | Golden glowing orbs and soft backgrounds | Flowers, fields, portraits in nature |
| Blue Hour (Dawn/Dusk) | Cool, even light | Subtle, pastel-colored bokeh | Lakes, misty hills, night transitions |
| Midday (Sunny) | Harsh, direct light | High contrast bokeh, harder edges | Backlit leaves, water reflections |
| Overcast | Diffused light, low contrast | Smooth, painterly blur | Forests, close-up nature scenes |
| Night | Artificial or specular lights | Distinct, colorful bokeh balls | Urban landscapes, bridges, light trails |
🌤️ Pro Tip:
The best time for most bokeh landscapes is during golden hour, when the sun’s low angle produces warm tones, rich highlights, and long shadows — the perfect recipe for layered, dreamy backgrounds.
3. Direction of Light — Front, Side, or Backlighting?
The direction of light changes how your bokeh forms and how your subject appears. Here’s how each type affects your photo:
| Lighting Direction | Description | Bokeh Impact | Ideal Usage |
| Frontlight | Light hits subject directly | Even exposure but flatter bokeh | Good for bright, detailed scenes |
| Sidelight | Light comes from one side | Creates depth and texture in blur | Adds mood and dimension |
| Backlight | Light behind the subject | Creates glowing halos and strong bokeh circles | Perfect for magical, glowing scenes |
Example:
Shoot a tree branch during sunset with the sun behind it — each glint of sunlight filtering through the leaves becomes a radiant circle of golden bokeh.
✨ Backlighting is the most powerful light setup for landscape photography with bokeh — it produces luminous, cinematic backgrounds that feel alive.
4. Weather Conditions That Enhance Bokeh
Weather is an underrated but powerful tool in shaping your bokeh aesthetics. Certain weather conditions can add sparkle, diffusion, or natural filters that enhance the effect.
Best Weather for Bokeh Landscapes:
- Sunny with haze or mist – Softens background details while keeping highlights glowing.
- After rain or dew – Water droplets act as tiny lenses, creating dozens of miniature bokeh points.
- Foggy mornings – Gentle diffusion adds atmosphere and separates the subject beautifully.
- Light snowfall – Falling snow turns into soft orbs under backlight, ideal for winter scenes.
- Partly cloudy – The changing light gives dynamic variation in bokeh patterns.
🌦️ Creative Tip:
Try photographing during drizzle or just after a storm. Wet foliage and puddles reflect light beautifully, turning ordinary landscapes into shimmering canvases of soft bokeh.
5. Harnessing Natural and Artificial Light Sources
Bokeh isn’t just about natural sunlight — artificial lights can create equally mesmerizing effects, especially during twilight or nighttime.
Natural Light Sources:
- Sunlight through trees
- Reflections from water or snow
- Firelight or candles for creative experiments
Artificial Light Sources:
- Street lamps
- Car headlights
- Festive lights (string or LED)
- City skylines
Example Setup:
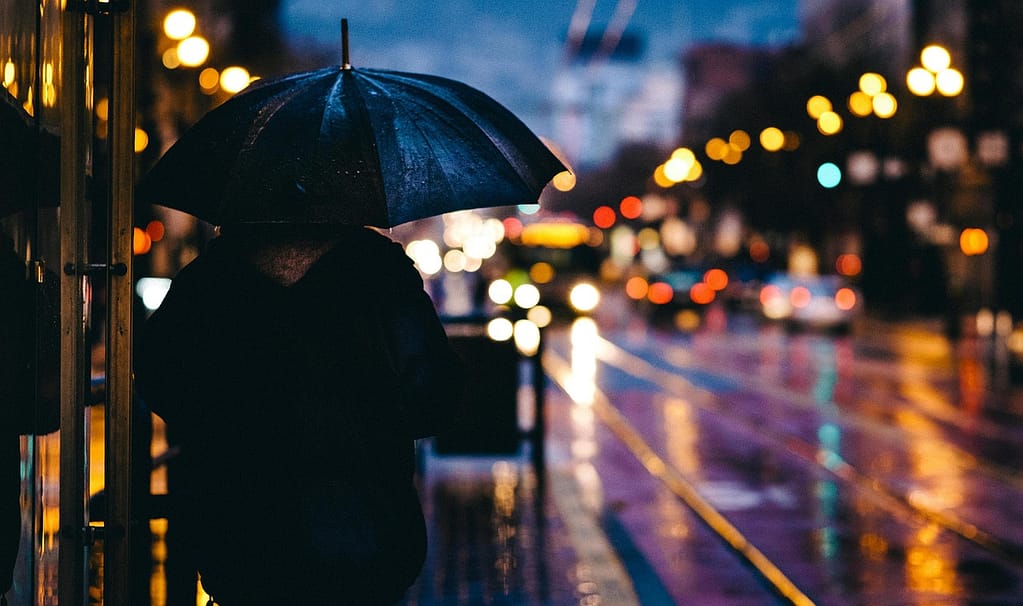
Shoot a city park at twilight with blurred streetlights in the background — you’ll capture a colorful mix of warm orange and cool blue bokeh lights blending naturally with the ambient glow.
6. Using Shadows and Contrast to Shape Bokeh
Bokeh thrives on contrast. The interplay between bright and dark areas helps your lens render those dreamy, circular highlights.
How to Control Contrast for Better Bokeh:
- Position subjects where light hits selectively (like through leaves or windows).
- Avoid flat, evenly lit scenes — they reduce depth and bokeh visibility.
- Look for patterns of dappled light or backlit textures that sparkle.
Case Study Example:
A photo of wildflowers shot through sunlit branches at 6 PM — the small pockets of bright light filtering through create hundreds of glowing circles, turning a simple scene into a magical tapestry of golden bokeh.
7. Filters and Accessories for Managing Light
To master light control for bokeh, consider a few essential tools:
| Accessory | Purpose | Benefit for Bokeh |
| ND Filter (Neutral Density) | Reduces light entering lens | Enables wide apertures even in daylight |
| Polarizing Filter | Cuts glare and reflections | Deepens color contrast, enhances clarity |
| Lens Hood | Blocks stray light | Prevents flare, preserves clean bokeh circles |
| Reflector or Diffuser | Controls direction and softness of light | Adds balance between highlights and shadows |
Pro Tip:
Use a ND filter on bright afternoons. It lets you shoot at f/1.8 or f/2.8 — wide enough for stunning bokeh — without overexposing your image.
8. The Magic of Golden Hour Bokeh
Golden hour deserves its own spotlight — it’s the holy grail for capturing stunning bokeh landscapes.
Why Golden Hour Works Best:
- The sunlight is low and diffused, enhancing warm hues.
- Shadows stretch longer, increasing scene depth.
- The sky’s orange glow creates natural color harmony with your subject.
- Dust particles and mist reflect light, multiplying bokeh highlights.
Quick Setup Example:
Location: Field of tall grass
Time: 6:30 PM (sunset)
Settings: f/2.8, ISO 200, 1/250s
Technique: Focus on one grass stalk facing the sun.
Result: A glowing, golden orb-filled background that feels alive and painterly.
🌇 Quote:
“Golden hour isn’t just light — it’s emotion. It’s when landscapes breathe and bokeh sings.”
9. Shooting at Night — City and Low-Light Bokeh

When the sun goes down, city lights and artificial illumination open a whole new realm for landscape photographers. The bokeh you can create at night is bold, colorful, and full of contrast.
Tips for Night Bokeh Landscapes:
- Use tripod and manual focus for precision.
- Shoot wide open (f/1.4–f/2.8) to maximize blur and light intake.
- Use longer focal lengths (85mm–135mm) to compress light sources.
- Experiment with neon reflections, wet streets, or bridges.
Example Scene:
Photograph a riverfront cityscape — focus on a sharp foreground element like a railing, and let the distant city lights melt into glowing bokeh orbs reflected in the water.
10. Summary — Lighting & Weather Essentials for Landscape Bokeh
| Factor | Ideal Condition | Bokeh Benefit |
| Time of Day | Golden Hour or Twilight | Soft, glowing, natural highlights |
| Light Direction | Backlight | Creates luminous circles and depth |
| Weather | Mist, dew, or light rain | Adds reflections and sparkle |
| Accessories | ND Filter, Lens Hood | Enhances exposure control and bokeh purity |
| Light Source | Natural + Artificial mix | Creative color variety |
Final Thought:
In landscape photography with bokeh, light isn’t just illumination — it’s texture, emotion, and rhythm. When you master the dance between sunlight, weather, and shadows, your landscapes will transform from static images into living, breathing compositions that glow with atmosphere.
Post-Processing Techniques for Enhancing Bokeh in Landscapes

Even the best in-camera bokeh can be elevated through careful post-processing. The goal is not to “fake” bokeh but to refine and enhance what you’ve already captured — improving depth, clarity, and color harmony while keeping your image natural.
Whether you’re using Adobe Lightroom, Photoshop, or free tools like GIMP or Luminar Neo, post-processing helps you sculpt the light, fine-tune focus transitions, and amplify that soft, cinematic glow that defines landscape photography with bokeh.
1. Start with a Clean Base Image
Before enhancing bokeh, begin with a balanced exposure and clean composition.
Basic Adjustments Checklist:
- White Balance: Match the lighting mood (warm for golden hour, cool for misty mornings).
- Exposure & Contrast: Slightly lower overall contrast to preserve soft tonal transitions.
- Highlights & Shadows: Recover details in bright spots while keeping the background smooth.
- Clarity & Texture: Reduce slightly (-10 to -20 in Lightroom) to soften the scene without losing subject detail.
💡 Tip: Over-sharpening is the enemy of bokeh. Keep global sharpness minimal — reserve detailed sharpening for your subject only.
2. Isolate the Subject and Background
To control where your bokeh shines, you’ll need to separate the subject from the background using selective adjustments.
Tools to Use:
- Radial Filter / Masking Tool (Lightroom)
- Layer Masks (Photoshop)
- AI Subject Selection (Luminar, ON1 Photo RAW)
Steps:
- Select your subject (a tree, flower, rock, etc.).
- Slightly increase sharpness, clarity, and exposure on the subject.
- For the background, reduce sharpness, lower clarity, and slightly increase contrast.
- Add a gentle Gaussian blur (2–3px) in Photoshop if needed for extra depth.
This selective workflow creates the illusion of a larger aperture — accentuating your bokeh without making it look artificial.
3. Enhance Bokeh Highlights for More Glow
One of the most effective ways to boost bokeh aesthetics is to enhance the light orbs in the background.
Steps (Lightroom/Photoshop):
- Locate the bokeh circles or highlights in the background.
- Use the Brush Tool to paint over each highlight softly.
- Increase Exposure (+0.2–0.5) and Saturation (+5–10) for gentle glow.
- Optionally, add a soft white or warm tone overlay using a new layer in Photoshop (set blend mode to Soft Light or Screen).
Result: Your image gets that subtle “glittering” quality without losing realism.
🎨 Pro Tip: Try using Lightroom’s “Dehaze” slider negatively (-10 to -20). This diffuses the light and enhances the soft, misty bokeh effect.
4. Color Grading for Dreamy Bokeh Landscapes
Color grading sets the emotional tone of your photo. For bokeh landscapes, softer and harmonious tones work best.
Recommended Color Palettes:
- Golden & Amber — ideal for sunrise/sunset scenes.
- Teal & Orange — works great for city landscapes at dusk.
- Pastel Greens & Blues — suits foggy forests or riverside shots.
- Muted Purples & Pinks — dreamy aesthetic for evening skies.
| Color Scheme | Emotion | Ideal Lighting |
| Warm Golden | Joyful, Inviting | Golden hour |
| Cool Blue | Peaceful, Moody | Blue hour |
| Teal-Orange | Modern, Cinematic | Twilight |
| Soft Pastels | Dreamy, Magical | Overcast or misty |
Editing Tools for Color Grading:
- HSL Panel (Hue/Saturation/Luminance) – Adjust individual tones.
- Split Toning / Color Grading Tool – Add warm tones to highlights and cool tones to shadows.
- Curves – Create smooth tonal contrast and gentle fade.
🧠 Pro Tip: Keep the background hues slightly warmer than the subject. Warm colors tend to “push back,” enhancing the depth and separation needed for strong bokeh.
5. Adjusting Depth and Focus Transitions
Bokeh is all about depth perception — the gradual blur from foreground to background. You can enhance this transition digitally.
In Lightroom:
- Use the Gradient Tool from the bottom upward (foreground) and top downward (sky/background).
- Reduce Sharpness (-30) and Clarity (-20) progressively.
- Adjust Exposure (+0.2–0.3) near the focal plane for added separation.
In Photoshop:
- Apply Lens Blur Filter with a Depth Map created from a mask.
- Keep the blur strength between 10–30 pixels for realism.
- Add a subtle Vignette to focus the eye on your main subject.
6. Adding Artificial Bokeh (Optional)
Sometimes, especially in flat-light conditions, your image may lack visible bokeh circles. You can creatively add artificial bokeh — but do it tastefully.
How to Add Artificial Bokeh (Photoshop or Luminar):
- Create a new layer.
- Paint small, soft white or colored dots using a soft round brush.
- Apply Gaussian Blur (15–30px) to diffuse them.
- Lower opacity (20–40%) and set blend mode to Overlay or Soft Light.
Result: A subtle sparkle effect that mimics real lens bokeh — great for enhancing reflections, rain scenes, or city lights.
⚠️ Caution: Avoid overdoing it — too much artificial bokeh can make your photo look digitally manipulated.
7. Fine-Tuning with Contrast and Tone Curves
Contrast is crucial for defining separation between sharp and blurred areas.
Here’s how to fine-tune it:
Steps:
- Slightly raise the black point to soften shadows.
- Create an S-curve for moderate contrast.
- Add a small lift in the midtones to keep the image bright.
Example Curve Adjustments:
| Area | Change | Effect |
| Shadows | Lifted slightly | Softens edges |
| Midtones | Slight bump | Adds dimension |
| Highlights | Boosted | Makes bokeh pop |
8. Use Noise Reduction Wisely
Since bokeh involves large smooth areas, visible noise can ruin the aesthetic.
Use noise reduction carefully:
- In Lightroom, set Luminance Noise Reduction around 15–25.
- Keep Detail slider around 40–50 to maintain sharpness.
- For night bokeh scenes, apply selective noise reduction only on blurred regions.
🧩 Pro Tip: A little noise can sometimes enhance realism — complete smoothness may make your bokeh look artificial.
9. Sharpen Only What Matters
A common mistake is global sharpening — which can destroy your creamy blur.
Instead:
- Use the Masking Slider in Lightroom’s Detail panel (hold Alt while dragging).
- Set Masking around 70–90 — this sharpens only the subject edges, not the background.
This ensures your focal point stands out crisply against the soft, blurred bokeh field.
10. Finishing Touches and Export Settings
Once your edits are done, finalize your photo for web or print.
Checklist:
- Check colors on different screens (especially brightness and warmth).
- Export at 300 DPI for print or 72 DPI for web.
- Keep JPEG quality above 80% to retain bokeh smoothness.
- Consider a gentle vignette or gradient overlay for framing.
Suggested Lightroom Export Settings for Bokeh Landscapes:
| Setting | Recommended Value |
| Format | JPEG |
| Quality | 85–100 |
| Resolution | 300 DPI (print), 72 DPI (web) |
| Color Space | sRGB |
| Sharpening | Standard for Screen |
| Noise Reduction | Applied selectively |
✅ Summary: The Art of Digital Bokeh Enhancement
| Step | Purpose | Tools |
| Clean Base Edit | Balance tone & exposure | Lightroom Basic Panel |
| Isolate Subject | Control depth & focus | Masks / Layers |
| Boost Highlights | Add luminous glow | Brush Tool |
| Color Grading | Define mood | HSL / Split Toning |
| Depth Control | Simulate natural blur | Gradient / Lens Blur |
| Final Touch | Enhance realism | Tone Curves / Vignette |
🖋️ Quote:
“Editing isn’t about changing reality — it’s about revealing its poetry. In bokeh landscapes, that poetry lives in the light between focus and blur.”
Common Mistakes and How to Avoid Them in Landscape Photography with Bokeh
Even experienced photographers can struggle with achieving natural, balanced bokeh in landscape photography.
While the dreamy blur of bokeh can transform a simple scene into something magical, it’s surprisingly easy to misuse or overdo it — leading to distracting or unnatural results.
Let’s explore the most common mistakes photographers make in landscape photography with bokeh, and how you can fix or avoid each one.
1. Overusing Wide Apertures
Many photographers assume that shooting at f/1.4 or f/1.8 automatically creates the best bokeh. But in landscape photography, too much blur can eliminate important details that define the environment.
Why It’s a Problem:
- The image loses depth context — everything except a tiny area is blurred.
- The photo may feel disconnected or “flat” instead of immersive.
- Foreground or background elements lose their storytelling value.
How to Fix It:
- Use moderately wide apertures like f/2.8 to f/4.
- Keep enough detail to show landscape features while maintaining soft blur.
- Remember: bokeh should support your subject, not dominate it.
💡 Pro Tip: Try focus bracketing — take several shots at different focus points and blend them to balance sharpness and blur.
2. Ignoring Foreground and Background Relationships
One of the biggest bokeh-related mistakes in landscapes is not paying attention to how foreground and background interact.
You might have a sharp subject, but if your background is messy or distracting, it ruins the effect.
Common Issues:
- Bright or cluttered backgrounds that pull attention away from your main subject.
- Unbalanced depth — subject and background appear merged.
- Misaligned layers causing visual confusion.
How to Avoid It:
- Choose a clean, non-distracting background (e.g., open field, sky, or distant hills).
- Physically move to reposition your subject against a smoother backdrop.
- Use longer focal lengths (85mm–200mm) to compress background elements and enhance blur.
Example:
Instead of shooting a flower against a busy forest, move slightly so the background becomes sky or distant trees. The bokeh becomes creamy and the subject stands out.
3. Focusing on the Wrong Subject
In bokeh-based landscapes, focus precision is everything.
Even a slight shift in focus can change where the blur falls — and ruin the entire composition.
Common Focus Errors:
- Focusing too far behind or in front of the main subject.
- Using autofocus in low-contrast scenes (the camera struggles).
- Relying on the wrong focus mode (e.g., continuous AF for still subjects).
How to Fix It:
- Switch to manual focus or single-point autofocus.
- Use live view or focus magnification to double-check sharpness.
- On mirrorless cameras, enable focus peaking for visual confirmation.
🔍 Pro Tip: Always review your image at 100% zoom before moving on — small focus errors often go unnoticed on-screen but are glaring in post.
4. Overprocessing or Artificial-Looking Edits
Heavy-handed post-processing is one of the fastest ways to destroy natural bokeh.
Excessive blurring, over-saturation, or artificial bokeh layers can make your photo look fake.
Signs of Overediting:
- Halos or glow around your subject edges.
- Uneven blur transitions.
- Oversaturated highlights or unrealistic light circles.
- Subject looks “cut out” from the background.
How to Fix It:
- Keep edits subtle and layered.
- Use Gaussian blur sparingly — less is more.
- Always zoom out and step back after editing; your eye can better spot unnatural effects when you take a break.
- Follow the 10-minute rule — if your photo still looks great after stepping away for 10 minutes, your edit is balanced.
5. Neglecting Lighting Conditions
Bokeh thrives on good light. Without the right lighting, your photo may lack the sparkle and glow that make bokeh stand out.
Common Lighting Mistakes:
- Shooting under harsh midday sun — creates flat light and hard shadows.
- Ignoring backlight or sidelight opportunities.
- Not considering how light hits reflective or translucent surfaces.
Fix It With:
- Golden Hour: Soft, warm light enhances bokeh glow and color separation.
- Backlighting: Perfect for producing circular light orbs and dreamy backgrounds.
- Diffused Overcast Light: Reduces harsh contrast, allowing for smooth, creamy blur.
- Artificial Light: For night landscapes, city lights can produce spectacular bokeh balls.
🌅 Pro Tip: Position yourself so the sun is behind or slightly to the side of your subject — it makes the highlights sparkle beautifully in your background.
6. Forgetting Composition Rules
Even with beautiful bokeh, poor composition weakens your photo’s impact.
Some photographers rely too heavily on blur and forget to compose intentionally.
Common Mistakes:
- Centering everything (makes the image static).
- No clear subject separation.
- Ignoring negative space.
- Lack of leading lines or depth structure.
Fix It:
- Follow the Rule of Thirds — place your subject off-center.
- Create depth layers (foreground, midground, background).
- Use leading lines to draw attention into the sharp area.
- Keep one-third of the frame blurred for balance.
Example:
In a mountain scene, use a sharp wildflower in the foreground, a mid-blurred tree line, and a soft glowing sky. Each layer contributes to a visually rich composition.
7. Not Accounting for Wind or Motion Blur
Outdoor landscapes often come with wind — and it can wreak havoc on your focus and sharpness.
Symptoms:
- Foreground flowers slightly moving during exposure.
- Long shutter speeds creating unwanted streaks.
- Misalignment in focus stacking due to motion.
Solutions:
- Increase shutter speed (1/250s or faster for moving elements).
- Use a tripod with remote shutter release to avoid camera shake.
- Shoot multiple frames and pick the sharpest one.
- Enable image stabilization (IS/VR) if available.
🌬️ Quick Fix: Use a small windbreak (your bag, jacket, or even your body) to shield delicate foreground elements when shooting close-up.
8. Poor Lens Choice or Dirty Optics
Your lens directly affects the quality of your bokeh.
Even small smudges or cheap optics can cause ugly, uneven blur patterns.
Common Issues:
- Scratches, fingerprints, or dust on the front element.
- Cheap kit lenses with distracting “onion-ring” or hexagonal bokeh.
- Overuse of filters (like UV filters) degrading clarity.
How to Fix It:
- Clean your lens regularly with a microfiber cloth and blower.
- Use prime lenses with wide maximum apertures (f/1.8, f/2.8).
- Avoid stacking unnecessary filters.
- If using filters, invest in high-quality multi-coated glass.
🧽 Pro Tip: Fingerprints scatter light — causing odd bokeh artifacts. Always clean your lens before golden hour shoots.
9. Ignoring the Storytelling Element
Beautiful blur alone doesn’t make a strong photo. The best bokeh landscapes tell a story — whether it’s peace, isolation, growth, or transition.
How to Improve Storytelling:
- Ask: What feeling am I trying to convey?
- Use light direction, color, and blur to support that emotion.
- Capture moments that imply action or passage — like wind, light, or mist.
- Pair your bokeh image with a caption or title to enhance emotional context.
✍️ Example:
A single sharp flower against a sea of golden blur can symbolize resilience — a story told through simplicity.
✅ Summary: Mistakes to Avoid in Landscape Photography with Bokeh
| Mistake | Effect | Solution |
| Overusing wide aperture | Unrealistic blur | Use f/2.8–f/4 |
| Messy background | Distracts viewer | Simplify composition |
| Wrong focus | Subject blur | Use manual focus / peaking |
| Overediting | Fake results | Keep blur natural |
| Harsh lighting | Harsh shadows | Shoot in golden hour |
| Poor composition | Weak storytelling | Apply rules of thirds & layering |
| Motion blur | Loss of sharpness | Increase shutter speed |
| Dirty lens | Distorted bokeh | Clean lens / use quality glass |
| No story | Emotionless photo | Focus on mood & meaning |
💬 Final Thought:
“Great bokeh isn’t just a blur — it’s balance. It’s knowing what to leave out so your story shines through.
Case Studies and Examples of Landscape Photography with Bokeh
One of the best ways to master landscape photography with bokeh is by studying real examples — analyzing what works, why it works, and how you can apply those lessons in your own photography.
Bokeh is not a “one-style-fits-all” effect. Depending on lighting, composition, subject, and gear, the same principle can create completely different emotional tones — from serene to dramatic, from nostalgic to cinematic.
Below, we’ll explore several case studies that showcase different approaches to bokeh in landscape photography.
🏞️ Case Study 1: Golden Hour Meadow — Dreamy Foreground Focus
Photographer: Elena V. / Nature Portraits Blog
Setup: Sony A7 III + 85mm f/1.8 | f/2.8 | ISO 100 | 1/320s
Scene:
Elena shot a wildflower field at sunset. She positioned herself low to the ground, focusing on a single buttercup surrounded by softly blurred golden flowers. The background was a warm orange sky filled with glowing bokeh circles from sunlit grass.
Why It Works:
- Foreground emphasis: The subject (flower) is sharp and isolated.
- Backlight + low angle: Created beautiful, natural bokeh spheres.
- Aperture control: f/2.8 gave shallow depth but still kept environmental context.
Key Lesson:
Combining backlighting with low-angle composition maximizes bokeh glow without losing the feel of the landscape.
💡 Takeaway: Use sunlight filtering through grass or leaves to generate natural, glowing bokeh spots during golden hour.
🌲 Case Study 2: Forest Pathway — Layered Depth and Mystery
Photographer: Daniel K. / Outdoor Visuals
Setup: Nikon Z6 + 50mm f/1.4 | f/2 | ISO 200 | 1/500s
Scene:
A narrow forest trail leads into the distance, framed by branches and leaves. Daniel focused on the bark texture of a tree in the midground, while the leaves in the foreground and distant path melted into creamy blur.
Why It Works:
- Layering: Clear depth structure — foreground (blurred), subject (sharp), background (bokeh).
- Natural vignetting: The soft blur draws the eye into the scene’s center.
- Mood: Cool color grading (greens and shadows) adds a calm, mysterious tone.
Key Lesson:
Bokeh doesn’t always have to be bright or warm — cool-toned bokeh can evoke mood, depth, and tranquility.
📸 Pro Tip: When shooting in forests, use spot metering to expose correctly for your subject, keeping the background naturally subdued.
🌅 Case Study 3: Mountain Silhouette with Soft Foreground Blur
Photographer: Lucas M. / Adventure Horizons
Setup: Canon EOS R5 + 70–200mm f/2.8 | f/3.2 | ISO 160 | 1/640s
Scene:
Lucas shot a mountain range at sunrise but used a nearby wildflower patch in the foreground, just inches from the lens. He focused on the mountain ridge, allowing the foreground blooms to blur into smooth bokeh at the bottom of the frame.
Why It Works:
- Telephoto compression: 200mm lens beautifully compressed the scene.
- Foreground blur: Added visual interest and depth.
- Color contrast: Warm foreground tones vs. cool blue mountains.
Key Lesson:
Even in grand landscapes, a touch of bokeh in the foreground can frame and lead the viewer’s eye naturally.
| Element | Effect |
| Long focal length | Smooth background compression |
| Wide aperture (f/3.2) | Controlled foreground blur |
| Color temperature contrast | Adds visual tension and beauty |
🏔️ Takeaway: In landscapes with distant subjects, use foreground bokeh to connect the viewer emotionally to the scene.
🌾 Case Study 4: Minimalist Bokeh — The Lone Tree
Photographer: Akira H. / Fine Art Landscapes
Setup: Fujifilm X-T5 + 56mm f/1.2 | f/1.4 | ISO 125 | 1/2000s
Scene:
A solitary tree stands on a hill under a soft pink sky. Akira shot with a wide aperture, allowing the grass and clouds to blur softly, while keeping the tree crisp and centered slightly off-rule-of-thirds.
Why It Works:
- Minimalist composition: Simplicity gives emotional weight.
- Soft pastel tones: Gentle bokeh enhances mood.
- Clean separation: Clear contrast between sharp subject and blurred surroundings.
Key Lesson:
Bokeh can emphasize solitude and calmness when paired with minimalist framing and soft colors.
✨ Pro Tip: In minimalist bokeh landscapes, negative space is your ally. Let the blur breathe — don’t clutter the frame.
🌆 Case Study 5: Urban Landscape with Night Bokeh
Photographer: Ravi D. / Cityscape Frames
Setup: Canon R6 + 135mm f/2 | f/2 | ISO 400 | 1/250s
Scene:
Ravi captured a skyline at night from across a river. Streetlights and bridge lamps transformed into golden bokeh circles, while the sharp reflection on the water anchored the composition.
Why It Works:
- Contrast: Sharp water reflection + blurred city lights = visual balance.
- Bokeh color variety: Warm yellows, reds, and whites create urban vibrancy.
- Aperture discipline: f/2 maintained detail in key highlights without overblowing light.
Key Lesson:
Bokeh isn’t just for nature — urban landscapes benefit from artificial light sources for stunning bokeh effects.
| Setting | Purpose |
| Wide aperture (f/2) | Enhances circular city-light bokeh |
| Tripod + low ISO | Maintains clarity |
| Manual focus | Prevents light bloom issues |
💡 Pro Tip: Cityscapes with bokeh look best during the blue hour — when the sky still holds a bit of light, balancing warm artificial tones.
🌧️ Case Study 6: Rain and Reflection Bokeh
Photographer: Lara G. / Visual Tranquility
Setup: Nikon D750 + 35mm f/1.8 | f/2.2 | ISO 320 | 1/200s
Scene:
After rainfall, Lara photographed puddles reflecting a line of street lamps. She focused on a pebble in the puddle foreground — the lamps behind turned into glowing orbs on the wet surface.
Why It Works:
- Reflected bokeh: Used the puddle as a reflective bokeh surface.
- Low perspective: Enhanced scale and depth.
- Soft light: Cloudy sky gave natural diffusion.
Key Lesson:
Look for water reflections or wet surfaces to create unique, layered bokeh compositions.
🌧️ Takeaway: Even ordinary conditions — rain, mist, puddles — can become creative gold for bokeh landscapes.
🧠 Comparative Summary: Lessons from the Case Studies
| Case Study | Environment | Technique Focus | Key Lesson |
| Golden Hour Meadow | Nature | Foreground focus | Use sunlight for glowing bokeh |
| Forest Pathway | Woodland | Depth layering | Cool tones can enhance calmness |
| Mountain Silhouette | Outdoor | Foreground blur | Use compression for depth |
| Lone Tree | Minimalist | Simplicity | Negative space enhances emotion |
| Urban Night Scene | Cityscape | Light control | Artificial lights = rich bokeh |
| Rain Reflections | Post-rain | Reflection use | Water surfaces amplify blur |
📸 Bonus Insight: What the Pros Say
“Bokeh is less about blur — it’s about attention. In a good landscape, you decide where the viewer’s heart should rest.”
— Max Rive, Landscape Photographer
“If your bokeh helps tell the story of light, then it’s serving your image. If it distracts, it’s just decoration.”
— Elia Locardi, Travel Photographer
✅ Key Takeaways from Case Studies
- Light direction defines bokeh quality — especially backlight and golden hour light.
- Composition layering creates natural depth and visual storytelling.
- Color grading controls emotional tone — warm for joy, cool for calm.
- Foreground bokeh adds intimacy; background bokeh adds dreaminess.
- Subtlety wins — restraint in both shooting and editing keeps the effect believable.
Tips for Practicing and Mastering Landscape Photography with Bokeh
Mastering landscape photography with bokeh is not just about learning camera settings — it’s about training your eye to see depth, light, and emotion differently.
Bokeh is both technical and artistic. The more intentionally you practice, the more natural and intuitive it becomes.
Below are field-tested tips, exercises, and pro habits that can accelerate your growth and help you capture consistently beautiful bokeh-filled landscapes.
🌅 1. Practice in Golden Hour Every Chance You Get
Golden hour — the time shortly after sunrise or before sunset — is a bokeh photographer’s dream.
The soft, directional light creates natural highlights that translate into glowing bokeh orbs.
Why It’s Perfect for Practice:
- Light is warm, diffused, and low in contrast.
- Backgrounds sparkle naturally when sunlight filters through trees or grass.
- You can experiment with silhouettes, backlighting, and soft color transitions.
Exercise:
- Go out during both morning and evening golden hours.
- Photograph the same subject (like a wildflower or tree) at various apertures (f/1.8, f/2.8, f/4).
- Compare results to learn how light direction and aperture shape your bokeh.
💡 Tip: Slightly underexpose your image during golden hour (+/- 0.3 EV) — it enhances bokeh contrast and color saturation.
📷 2. Train Your Eyes to See in Layers
Bokeh depends on spatial awareness — knowing where elements sit in your scene.
Developing this skill helps you compose depth-rich landscapes.
Practice Exercise:
- Before shooting, stand still and visually divide your scene into three parts:
- Foreground
- Midground
- Background
- Foreground
- Identify what you want sharp, and what can remain soft.
- Adjust your position and focal length to balance those layers.
Goal:
Train yourself to see depth before shooting. Once you can visualize blur areas mentally, your compositions will become more deliberate and artistic.
🔭 3. Experiment with Focal Lengths
Different lenses create different bokeh characteristics.
Wide lenses (24–35mm) provide subtle depth, while telephoto lenses (85mm–200mm) produce stronger background compression and smoother blur.
| Focal Length | Bokeh Style | Ideal Use |
| 24–35mm | Gentle, environmental | Wide landscapes with minimal blur |
| 50mm | Balanced depth | General-purpose landscape bokeh |
| 85mm | Strong subject separation | Portrait-style nature scenes |
| 135–200mm | Creamy compression | Distant mountains, flowers, trees |
Exercise:
- Use the same aperture (f/2.8) across 3 different focal lengths.
- Observe how bokeh softness changes with distance and perspective.
🎯 Pro Tip: The longer the focal length, the more compressed and painterly your background blur becomes.
🧍♂️ 4. Get Closer — Physically, Not Just Optically
Bokeh improves when distance between subject and background increases — but it also depends on how close you are to the subject.
Practical Rule of Thumb:
“Closer camera + farther background = stronger bokeh.”
Exercise:
- Choose a subject like a flower or rock.
- Move progressively closer (without changing aperture).
- Notice how background blur intensifies with proximity.
This helps you understand how physical distance influences depth perception more than aperture alone.
🪶 5. Learn to Balance Sharpness and Softness
The best bokeh landscapes are not about maximum blur — they’re about contrast between sharp and soft areas.
Balance is key.
Pro Techniques:
- Use focus stacking for hybrid depth (sharp subject, soft background).
- Keep small textures (like leaves or grass) slightly in focus for realism.
- Avoid extreme blur that removes visual context from the scene.
Practice Tip:
Take two versions of every shot — one with deep focus (f/8) and one with shallow focus (f/2.8). Compare and decide which best tells your story.
🪄 6. Master Manual Focus
Autofocus often struggles in low contrast or backlit bokeh situations.
Manual focus gives you pinpoint control over what’s sharp — essential in fine bokeh landscapes.
Exercise:
- Switch to manual focus mode.
- Use live view with 5x or 10x magnification to fine-tune focus.
- Adjust focus slowly until your subject edges shimmer (focus peaking).
🧠 Pro Tip: Always recheck focus after recomposing — depth of field can shift subtly even with minor framing changes.
🌸 7. Use Nature’s “Bokeh Builders”
Nature offers endless tools for creating organic bokeh — all you need is to recognize and use them.
Look for:
- Dew drops, rain, or snow (light refracting particles)
- Sunlight filtering through foliage
- Reflective surfaces like wet rocks or water
- Dust or pollen illuminated by light
- Backlit flowers or seeds
🌤️ Practice Idea:
After rain, go out during the first sunlight break. Photograph droplets on plants — they naturally produce dozens of mini bokeh circles.
🎨 8. Study Colors and Emotional Tones
Different color combinations dramatically influence how your bokeh feels.
Learning color psychology helps you compose more emotionally powerful images.
| Color Palette | Mood | Example Scene |
| Warm Golds & Reds | Comfort, vitality | Sunset meadows |
| Cool Blues & Greens | Calm, reflection | Forest streams |
| Muted Pastels | Serenity, dreaminess | Misty hills |
| Deep Contrast | Drama, power | Stormy skies, sunsets |
Exercise:
Shoot the same composition during morning, noon, and sunset — analyze how color and mood shift.
🎨 Tip: Edit with restraint — let natural color transitions and soft tones tell your story.
🏕️ 9. Shoot in Different Weather Conditions
Don’t limit your practice to clear, sunny days.
Fog, rain, and snow create ethereal, diffused bokeh that can’t be replicated artificially.
| Condition | Bokeh Quality | Recommended Settings |
| Fog | Soft, dreamy | f/2.8–f/4, underexpose -0.3 EV |
| Rain | Reflective, glowy | f/2, ISO 400, 1/250s |
| Snow | Bright, circular | f/1.8, ISO 200, 1/500s |
| Overcast | Gentle, even | f/3.5, +0.3 EV |
🌫️ Pro Tip: Misty mornings are perfect for bokeh — diffused light + soft contrast = magical results.
🧩 10. Analyze and Learn from Every Shoot
Every bokeh shot — good or bad — teaches something.
Develop the habit of self-analysis after each session.
Checklist for Review:
- Is the focus point exactly where I intended?
- Does the bokeh enhance the mood or distract from it?
- How does light direction influence the blur quality?
- What aperture/focal distance produced the most pleasing result?
Keep a simple bokeh journal with camera settings, lighting notes, and observations. Over time, you’ll build a personal “bokeh blueprint” for different landscapes.
📔 Pro Tip: Tag your successful images with keywords like “golden hour bokeh,” “backlit forest blur,” “rain reflections.” It helps you revisit techniques that worked best.
🎯 11. Embrace Patience and Experimentation
Bokeh is unpredictable. Sometimes, small shifts in light or focus can completely transform a photo.
Patience and playfulness are your best teachers.
Mindset Tips:
- Shoot a lot — quantity leads to refinement.
- Don’t chase perfection in every frame; chase emotion.
- Review your work critically, but with curiosity.
- Try unconventional ideas — even mistakes can lead to discovery.
💬 Quote:
“Photography is painting with light; bokeh is painting with feeling.”
— Unknown Landscape Artist
✅ Summary: Your Roadmap to Mastering Landscape Bokeh
| Skill | Focus Area | Daily Practice Tip |
| Light Control | Use golden hour | Practice daily sunsets |
| Depth Awareness | Foreground-midground-background | Visualize before shooting |
| Lens Handling | Focal length variation | Swap lenses per session |
| Manual Focus | Precision | Use magnified live view |
| Editing | Subtle enhancement | 10% adjustments only |
| Observation | Color + light study | Keep a field journal |
🌟 Final Takeaway
Mastering landscape photography with bokeh isn’t about chasing gear or settings — it’s about seeing differently.
It’s the art of understanding how light, distance, and emotion interact. With steady practice, your photos will start to feel less like images and more like visual poetry — where blur becomes beauty, and softness becomes strength.
✨ “A great landscape photo shows what you saw.
A great bokeh landscape shows what you felt.”
Perfect ✅ Here’s the Conclusion Section — along with an SEO-optimized meta description, key takeaways summary, and a strong closing call-to-action — all focused around your main keyword: landscape photography with bokeh and its variations.
The Art and Emotion of Landscape Photography with Bokeh
Landscape photography with bokeh is more than just a technique — it’s a creative language.
It blends the precision of optics with the softness of emotion, allowing you to express how a place feels, not just how it looks.
Throughout this guide, we’ve explored how to:
- Use wide apertures and focal lengths to create background separation.
- Apply composition rules like layering and leading lines to design depth.
- Choose lenses and settings tailored for dreamy bokeh effects.
- Harness light, weather, and distance to enhance atmosphere.
- Edit with intention — balancing sharpness and softness.
- And most importantly, practice patiently until bokeh becomes second nature.
“A photograph doesn’t just freeze a moment. It reveals how light whispers through space — and bokeh is that whisper’s echo.”
When done well, bokeh transforms landscapes into fine art.
A misty forest, a mountain bathed in sunset glow, or dew drops sparkling on morning grass — all become poetic expressions through the power of blur.
If you want to stand out as a photographer, mastering landscape photography with bokeh will help you create images that feel cinematic, emotional, and alive.
Key Takeaways at a Glance
| Concept | Quick Summary | Pro Tip |
| Bokeh Basics | Use wide apertures (f/1.4–f/2.8) for soft blur | Increase distance between subject & background |
| Composition | Layer foreground, midground, and background | Focus on depth, not just blur |
| Lighting | Shoot during golden hour for glowing bokeh orbs | Backlight enhances sparkle |
| Lenses | Prime lenses (35mm, 50mm, 85mm) are best for bokeh | Telephoto lenses compress and smooth backgrounds |
| Practice | Experiment in varied conditions | Keep a bokeh journal for learning |
💬 Final Words
Bokeh teaches you to slow down. To see how every leaf catches light, how every shimmer in the background can elevate your frame.
It’s where technical mastery meets emotional storytelling — the heart of all great photography.
So grab your camera, find the light, and let your next photo breathe with blur.
🌟 “In landscape photography with bokeh, perfection isn’t in focus — it’s in feeling.”
If you enjoyed this guide and want to level up your landscape skills:
- Explore our upcoming tutorials on bokeh composition and lens selection.
- Follow our blog for weekly photography tips and AI-assisted editing guides.
- Share your best bokeh landscapes with us — we might feature your work in our next article!
