
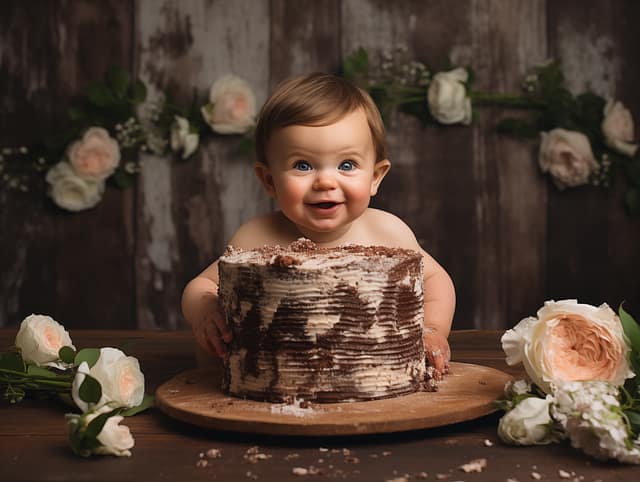
A baby’s first birthday is a moment filled with joy, laughter, and milestones worth celebrating. And what better way to capture that joy than with a photo smash the cake session — one of the most adorable photography trends that has taken over social media feeds and family photo albums alike?
In a photo smash the cake, your little one gets to explore, touch, and yes — smash — their very own birthday cake while a photographer captures every giggle, crumb, and frosting-covered expression. It’s messy, fun, and absolutely memorable.
But beyond the cuteness, a cake smash photoshoot is also a well-thought-out session involving planning, creativity, and timing. From selecting themes and outfits to setting up the perfect background, there’s an art behind those perfectly imperfect cake-covered smiles.
In this guide, we’ll dive deep into everything you need to know about planning, shooting, and enjoying your photo smash the cake session, including expert tips, popular ideas, and safety considerations — all designed to make your baby’s first birthday unforgettable.
🧁 What Is a Photo Smash the Cake Session?
A photo smash the cake session is a themed photography experience — typically done to celebrate a baby’s first birthday — where your baby gets their own small cake to play with, smash, and eat while the camera captures each spontaneous reaction.
What makes this trend so special is its blend of pure joy and candid photography. The idea is to let your baby’s natural curiosity and playfulness shine, resulting in images that are far more expressive and memorable than posed portraits.
A Brief History of Cake Smash Photography
The trend of cake smash photography first gained popularity in the United States around the early 2000s and has since become a global sensation. Initially, it began as a fun twist on traditional baby portraits, but it quickly evolved into a full-blown creative niche within the family photography industry.
Today, parents and photographers alike are embracing photo smash the cake sessions not just for their cuteness but for their symbolic value — marking the transition from babyhood to toddlerhood.
💬 “The best photos come when you let the baby be themselves — messy, curious, and free.”
— Lara Moore, Baby Portrait Photographer (2023)
Why a Cake Smash Is More Than Just Cute Photos
A smash cake photoshoot goes beyond aesthetics. It’s a celebration of growth, exploration, and personality. Every baby reacts differently — some dive face-first into the frosting, while others gently poke at the cake with fascination.
These little moments make for timeless memories, giving parents something tangible to look back on for years to come. Many families even include these photos in birthday slideshows, photo books, or framed prints at home.
Key Elements of a Photo Smash the Cake Session
| Element | Description | Why It Matters |
| Cake | A small, soft, baby-safe cake made for smashing | The star of the show — messy and fun |
| Theme | A chosen visual style (e.g., jungle, boho, princess) | Adds creativity and cohesion |
| Outfit | Cute yet comfortable clothing for baby | Enhances photos, keeps baby happy |
| Setup | Background, props, lighting | Creates the right visual atmosphere |
| Photographer | Professional or DIY shooter | Captures perfect moments effortlessly |
Each of these elements works together to create a visually stunning and emotionally meaningful experience.
Fun Fact
According to a 2024 photography trends report by BabyFrame Studio, 85% of first-time parents now choose to include a photo smash the cake session as part of their child’s first birthday celebration — making it one of the top three family photography experiences worldwide.
Key Takeaway
A photo smash the cake session is not just about cake or photography — it’s about celebrating your baby’s individuality, joy, and messy milestones in a way that’s creative, meaningful, and full of personality.
🎉 Why Choose a Smash the Cake Photoshoot for Your Baby’s First Birthday?
Celebrating a first birthday is more than just a milestone — it’s a reflection of twelve months filled with growth, sleepless nights, laughter, and love. A photo smash the cake session beautifully captures that journey in one joyful moment of messy fun.
Below, we’ll look at why parents across the world are choosing smash cake photography to mark this special occasion — and why it’s worth the frosting and cleanup.
🎈 1. It’s a Celebration of Growth and Personality
Your baby has changed more in the past year than they ever will again. From learning to sit up and crawl to discovering food, textures, and sounds — every milestone leads up to this first birthday moment.
A cake smash photoshoot allows your child’s unique personality to shine. Some babies approach the cake with curiosity, some with shyness, and others dive right in with laughter and delight. Every reaction becomes a snapshot of who they are at this beautiful stage of life.
💡 Tip: Encourage natural behavior. Don’t worry if your baby doesn’t “smash” the cake immediately — candid, real reactions make for the best memories.
📸 2. You Get Candid, Joyful Photos That Last a Lifetime
Unlike traditional posed baby portraits, photo smash the cake sessions focus on spontaneity. Every giggle, frosting-covered hand, and surprised face tells a story — one that feels authentic and full of life.
Professional photographers often use continuous shooting mode to capture dozens of frames per minute. This ensures no priceless expression is missed. These natural, emotional photos become treasured keepsakes that parents proudly frame or include in memory albums.
According to ShutterSync Studios (2023), cake smash photos are 65% more likely to be printed and displayed in family homes compared to standard portraits because of their emotional appeal and storytelling power.
🎀 3. A Perfect Way to Mark the First-Year Milestone
The first birthday is an emotional milestone for parents — it’s the end of the “baby year” and the beginning of toddlerhood. A photo smash the cake session celebrates this transition in a playful, symbolic way.
Smashing the cake represents freedom, exploration, and growth, allowing your baby to explore their senses and environment in a safe and joyful setup. It’s also a symbolic “smash” into the next stage of their life — filled with new adventures and discoveries.
💌 4. Perfect Content for Invitations, Décor & Social Media
A well-shot smash cake photoshoot can serve multiple purposes beyond the day itself.
- 🎂 Use photos for birthday invitations or thank-you cards.
- 📷 Display large prints at your baby’s birthday party.
- 💻 Share adorable highlights on social media with friends and family.
- 📔 Add the photos to a first-year memory book or milestone timeline.
Because the session is designed around your baby’s theme or personality, the images easily blend into any creative project related to your celebration.
🧡 5. It Strengthens Family Bonds
Many photographers include a few family portraits before or after the cake smash portion. This gives parents and siblings a chance to share in the joy and create beautiful candid moments together.
🗣️ “Parents often laugh more than the baby during a cake smash. It’s a release — a celebration of making it through year one.”
— Mila Jensen, Family Photographer, 2024
These moments often become cherished family photos, reminding everyone of the laughter and love that filled that special day.
📊 Quick Overview: Benefits of a Cake Smash Photoshoot
| Benefit | Description | Why It Matters |
| Emotionally Meaningful | Celebrates baby’s first year of growth | Creates lasting emotional memories |
| Visually Unique | Fun, messy, colorful photos | Stands out from traditional portraits |
| Multi-Purpose | Great for invites, albums, and décor | Versatile photo use |
| Engaging Experience | Interactive, sensory play | Keeps baby happy and expressive |
| Family Involvement | Parents can join in | Strengthens family connections |
🌟 Key Takeaway
Choosing a photo smash the cake photoshoot isn’t just about getting cute pictures — it’s about capturing your baby’s joy, curiosity, and spirit in a way that no posed photo ever could. It’s a playful celebration that symbolizes growth, family love, and the start of many more happy milestones ahead.
🕒 When Is the Best Time to Do a Photo Smash the Cake Session?
Timing plays a crucial role in getting those perfect, joy-filled shots during your photo smash the cake session. Babies are unpredictable — their mood, energy, and curiosity vary throughout the day — so choosing the right moment ensures both comfort and cooperation.
Whether you’re planning a professional cake smash photoshoot or setting up a DIY session at home, the right timing can make the difference between happy giggles and frustrated tears.
🎂 1. The Ideal Age: 10 to 12 Months
Most professional photographers recommend scheduling your photo smash the cake session when your baby is between 10 and 12 months old.
Here’s why this window is perfect:
- 👶 Better motor skills: Around this age, babies can sit up confidently and use their hands to explore, making it easier for them to interact with the cake.
- 📷 Natural expressions: Babies are curious and expressive but not yet camera-shy.
- 🧁 Pre-birthday photos: Scheduling the session a few weeks before the actual birthday gives you time to edit and print the photos for invitations or décor.
💬 “Babies under 9 months often lose interest quickly, while over 13 months they may get too mobile — so 11 months is the sweet spot.”
— Harper Lee, Child Portrait Expert (2024)
☀️ 2. Time of Day: When Baby Is Happiest
Every baby has their “golden hour” — a time of day when they’re happiest, alert, and full of energy. Usually, this is after a nap and meal, often in the morning between 9 AM and 11 AM.
Avoid scheduling the session close to nap or feeding times. A tired or hungry baby is less likely to smile or engage with the cake.
| Time | Ideal For | Notes |
| Morning (9–11 AM) | Best light, fresh mood | Perfect for natural daylight and happy energy |
| Midday (12–2 PM) | Possible short sessions | Baby may get tired quickly |
| Evening (4–6 PM) | Soft light for outdoor shoots | Works if baby naps well in the afternoon |
📸 Pro Tip: Natural light from a large window or an outdoor setting during the morning provides soft, flattering illumination — perfect for capturing glowing skin tones and true colors.
📅 3. Book Early for Professional Cake Smash Photography
If you plan to hire a professional photographer, it’s wise to book at least 4–6 weeks in advance, especially during peak birthday months (April–August).
Booking early gives you enough time to:
- Discuss themes and color palettes
- Order a custom cake
- Select props and backdrops
- Coordinate outfits and accessories
Most photographers also offer packages that include pre-smash portraits, smash session, and sometimes post-smash bath photos (adorable cleanup shots in a mini tub).
💡 Tip: Ask your photographer if they provide the cake — some studios include it, while others recommend bringing your own for safety and allergy considerations.
📸 4. Indoor vs. Outdoor Timing Considerations
- Indoor Smash Sessions: Perfect for controlled lighting and mess-free management. You can schedule these anytime, but morning hours still work best for baby mood.
- Outdoor Cake Smash Photos: Best done during “golden hour” (one hour after sunrise or before sunset). The soft, golden sunlight adds warmth and magic to your photos.
| Setup Type | Best Time | Lighting | Tips |
| Indoor | Morning | Diffused natural light | Use neutral backgrounds for timeless photos |
| Outdoor | Early morning or late afternoon | Golden, soft light | Avoid midday glare and heat |
🗓️ 5. Timing Around the Birthday Party
If you’re planning to use your photo smash the cake pictures for birthday invitations, aim to schedule the shoot 3–4 weeks before the birthday.
If the photos are only for memory-keeping or social sharing, scheduling it 1 week before or even on the birthday works fine. Some parents even make the cake smash part of the party itself — though that can be trickier with distractions and guests.
🌟 Key Takeaway
The best time for your photo smash the cake session depends on your baby’s personality and your purpose for the photos. Aim for the 10–12 month window, schedule during your baby’s happiest hours, and book your photographer early to get the date and setup you want.
Remember: a well-timed session equals a happy baby, effortless smiles, and perfectly messy memories.
🪄 How to Prepare for a Cake Smash Photoshoot
Preparing for a photo smash the cake session takes more than just a cake and a camera. The best results come from thoughtful planning — selecting a cohesive theme, comfortable outfit, and baby-safe cake, along with a clean, visually pleasing background.
This section will help you plan step-by-step so that your cake smash photoshoot runs smoothly and stress-free.
🎨 1. Choosing the Right Theme and Color Palette
A creative theme sets the tone for the entire smash cake photography session. It’s what ties together the props, cake, and outfit into one cohesive look.
Here are some popular cake smash themes parents love:
| Theme | Description | Color Ideas |
| Classic Birthday | Simple balloons, pastel bunting, and a baby-sized cake | Blue, pink, white, gold |
| Boho Chic | Natural fabrics, rattan props, pampas grass | Beige, cream, sage, peach |
| Fairy Tale Princess/Prince | Tiara, castle props, delicate textures | Lilac, silver, blush |
| Jungle Adventure | Animal plushies, green leaves, wooden props | Green, brown, yellow |
| Rainbow Fun | Bright balloons and colorful frosting | Multi-color palette |
| Seasonal Themes | Christmas, spring, or fall-inspired setups | Match to time of year |
💡 Tip: Stick to 2–3 complementary colors to keep your photos balanced. Overly busy backdrops or too many colors can distract from your baby’s adorable expressions.
👕 2. Selecting the Perfect Outfit for Your Baby
When it comes to cake smash outfits, comfort beats everything. Babies move, crawl, and play — restrictive clothing can ruin the fun and the photos.
For Boys:
- Suspenders and shorts sets
- Little bow ties or plain white onesies
- Denim overalls for rustic themes
For Girls:
- Tulle skirts or bloomers with headbands
- Floral rompers or lace tops
- Simple bodysuits for minimal looks
Neutral options:
- Linen rompers or simple cotton sets work for any theme.
🧁 Pro Tip: Always keep a backup outfit for post-smash portraits or the ride home. Most babies get completely covered in frosting!
🍰 3. Choosing the Cake for the Smash Session
The cake is the centerpiece of your photo smash the cake session. It should be safe, soft, and visually appealing — but not overly sweet or complex.
Ideal Cake Smash Cake Features:
- Soft texture: Easily smashed by small hands
- Simple frosting: Whipped cream or buttercream (avoid fondant)
- Baby-safe ingredients: No nuts, honey, or artificial coloring
- Size: 5–6 inches is perfect for a baby-sized cake
- Decoration: Add baby’s name or number “1” for a personal touch
| Cake Type | Pros | Considerations |
| Buttercream cake | Easy to smash and photogenic | May melt under hot lights |
| Naked cake | Elegant and minimal | Less messy (good for indoor shoots) |
| Whipped cream cake | Light and baby-friendly | Can collapse quickly |
| Fruit-topped cake | Healthier, colorful | Some babies dislike fruit textures |
📸 Pro Tip: Avoid chocolate frosting — it can look messy or muddy in photos. Go for pastel shades like mint, peach, or baby blue for a clean, bright aesthetic.
🏡 4. Setting Up the Perfect Cake Smash Background
The backdrop is what makes your smash cake photoshoot come alive. It frames your baby and cake beautifully while keeping attention on their expressions.
Key Setup Essentials:
- Backdrop: Use neutral or themed colors; paper rolls, curtains, or fabric work great.
- Flooring: Vinyl mats or washable blankets protect your floor and make cleanup easier.
- Props: Add balloons, banners, cake stands, and small toys — but avoid clutter.
- Lighting: Natural window light or softbox lighting ensures flattering tones.
- Camera setup: Use a tripod for stability and set your focus at the cake’s level.
| Setup Element | Purpose | Tip |
| Backdrop | Adds depth and theme | Keep it uncluttered |
| Props | Complements the theme | Use minimal, soft-colored props |
| Lighting | Enhances photo clarity | Avoid harsh overhead light |
| Flooring | Easy cleanup | Use washable vinyl or cloth |
🎥 Photographer’s Insight: “The best photos happen when the setup looks effortless. Less is more — focus on expressions, not decorations.” — Nina Torres, Newborn & Baby Photographer, 2024
🧴 5. Plan for Cleanup and Comfort
Smash sessions can get very messy — frosting on the baby, floor, and sometimes even parents! Be prepared so the cleanup doesn’t stress you out.
Quick Cleanup Checklist:
- Baby wipes or damp washcloths
- Extra towels and a small wash basin
- Spare clothes for baby (and maybe parents!)
- Trash bag for leftover cake
- Wet/dry vacuum or floor mat
💬 Tip: Some studios offer a post-smash bubble bath session — it’s not only adorable but also doubles as cleanup time while capturing more cute photos.
🧁 Preparation Summary Table
| Step | Focus Area | What to Do |
| 1 | Theme | Pick 1–2 colors and a simple concept |
| 2 | Outfit | Choose comfortable, easy-to-wash clothes |
| 3 | Cake | Order baby-safe, soft, 5–6 inch cake |
| 4 | Setup | Use bright light and minimal props |
| 5 | Cleanup | Have wipes, towels, and spare outfits ready |
🌟 Key Takeaway
Preparation is the backbone of a perfect photo smash the cake experience. The more thoughtfully you plan — from theme to cleanup — the smoother and more enjoyable the session becomes. Keep things simple, safe, and baby-focused, and you’ll end up with joyful photos full of personality and laughter.
📸 How to Take the Perfect Photo Smash the Cake Pictures
A photo smash the cake session is as much about timing and technique as it is about joy and laughter. Capturing a baby’s spontaneous reaction requires patience, preparation, and an eye for storytelling.
Whether you’re working with a professional photographer or planning a DIY cake smash setup at home, these strategies will help you create stunning, high-quality images that highlight the baby’s natural expressions and personality.
🎥 1. Professional vs. DIY Cake Smash Photography
Hiring a Professional Photographer
Professional baby photographers are experts in lighting, angles, and timing. They know exactly how to capture a baby’s unpredictable movements and expressions — often before parents even notice them happening.
Pros of Hiring a Pro:
- Access to professional lighting and camera gear
- Experience working with babies and creating comfort
- Creative set designs and props
- Editing and retouching included
Cons:
- Higher cost (average price ranges from $200–$600)
- Limited session time (30–60 minutes)
- Must book weeks in advance
💡 Pro Tip: Ask your photographer if they include “before and after” portraits — many offer adorable pre-smash photos followed by post-smash cleanup shots.
Doing It Yourself (DIY Cake Smash Photoshoot)
If you’re handy with a camera, you can absolutely create a DIY photo smash the cake setup at home.
Here’s what you’ll need:
- A DSLR or mirrorless camera (or a new smartphone with portrait mode)
- Natural window light or a softbox lighting kit
- Neutral backdrop (a plain wall, curtain, or photography paper)
- Tripod for stability
- A playful, relaxed environment for the baby
DIY Shooting Tips:
- Get down to the baby’s eye level — this makes photos more intimate.
- Use burst mode to capture every micro-expression.
- Keep your shutter speed high (1/250s or faster) to freeze movement.
- Avoid using harsh flash — it can startle babies.
| DIY Setup Component | Recommendation | Why It Helps |
| Camera | DSLR / smartphone with portrait mode | Better depth of field |
| Lighting | Natural window light | Soft and flattering on skin |
| Backdrop | Neutral colors | Keeps focus on baby and cake |
| Angles | Eye-level or slightly lower | More engaging photos |
😀 2. Posing and Capturing Baby’s Reactions
The beauty of smash cake photography lies in capturing real reactions, not staged ones. Babies are naturally curious, so your role is to let them explore freely while you document every giggle and crumb.
Tips to Capture Genuine Expressions:
- Let your baby touch the cake first before encouraging them to smash.
- Make funny faces, sing, or clap to keep their attention.
- Capture close-ups of tiny hands, feet, frosting-covered cheeks, and eye contact moments.
- Encourage siblings or parents to join in for a few candid frames.
🗣️ “A baby’s curiosity is the real director of a cake smash shoot. Follow their lead, not your shot list.”
— Evelyn Carter, Lifestyle Baby Photographer (2024)
| Shot Type | Description | Example |
| Wide shot | Full scene showing theme setup | Baby + cake + props |
| Mid shot | Baby interacting with cake | Hand in frosting |
| Close-up | Expressions and details | Frosting on face, toes |
| Candid moment | Unposed reaction | Laughing, crawling, or clapping |
🧠 3. Camera Settings for Perfect Cake Smash Photos
If you’re shooting manually, use these recommended settings for clarity and emotion:
| Setting | Recommended Value | Why It Works |
| Aperture | f/2.8 – f/4 | Soft background blur, keeps baby sharp |
| Shutter Speed | 1/250s or faster | Freezes motion and frosting splashes |
| ISO | 200–400 (indoor) / 100 (outdoor) | Clean, bright photos |
| White Balance | Daylight or Auto | Natural skin tones |
| Mode | Continuous / Burst | Captures reactions in real-time |
💬 Tip: Always check focus on the baby’s eyes — they should be sharp and clear, even when there’s frosting chaos all around!
🖼️ 4. Tips for Editing Cake Smash Photos
Once the session is complete, post-processing can take your photo smash the cake pictures from cute to captivating.
Editing Tools:
- Adobe Lightroom – For color correction and brightness
- Photoshop – For removing distractions or background cleanup
- Canva / Snapseed – For quick mobile edits
Editing Guidelines:
- Keep colors natural — avoid over-saturation
- Brighten shadows to highlight baby’s face
- Use a warm tone for cozy, joyful mood
- Crop distractions but maintain storytelling
| Edit Type | Goal | Recommended Adjustment |
| Brightness | Highlight expressions | +10 to +20 |
| Contrast | Add depth | +10 |
| Temperature | Warm skin tones | +100–200 K |
| Sharpening | Define details | +20 |
📸 Pro Tip: Always save an original copy of the photo. Edit in layers or non-destructive modes to keep flexibility.
🧁 5. Capture the Story, Not Just the Moment
Remember, a photo smash the cake session is not just about one perfect photo — it’s about storytelling. Include the pre-smash curiosity, the first frosting touch, the laughter, the mess, and even the post-smash cleanup. These sequences create a visual narrative that becomes priceless over time.
✨ “Perfection in cake smash photography isn’t about clean shots — it’s about capturing the perfectly imperfect.”
🌟 Key Takeaway
To take the perfect photo smash the cake pictures, focus on natural light, candid moments, and storytelling. Whether you hire a professional or go DIY, let your baby’s curiosity lead the session. With the right camera settings, creativity, and patience, you’ll capture images that radiate love, laughter, and life.
🎨 Creative Cake Smash Photo Ideas and Themes
One of the most exciting parts of planning a photo smash the cake session is choosing a unique theme. The theme sets the tone for everything — from the backdrop and cake design to the outfit and props. Whether you’re celebrating a first birthday, milestone, or just want fun photos, a thoughtful theme transforms an ordinary photo session into a memorable story.
Below are some popular, trending, and creative ideas for smash cake photography themes that parents and photographers love — along with practical tips on how to make them stand out.
🎂 1. Classic and Timeless Themes
Sometimes, simple is stunning. Classic setups never go out of style and highlight the baby more than the decorations.
Popular Timeless Themes:
- White & Gold Minimalist – Clean backdrop, golden “One” sign, simple cake.
- Floral Garden – Light pink, lavender, and cream tones with real flowers.
- Balloon Wonderland – Soft pastel balloons filling the background.
- Neutral Boho Vibe – Beige tones, rattan props, pampas grass, linen textures.
🌿 Pro Tip: Classic setups age beautifully — they look elegant years later in photo albums.
| Theme | Ideal for | Props to Include |
| White & Gold | Formal 1st birthday | Gold crown, white balloons |
| Floral Garden | Baby girls | Real petals, pastel flowers |
| Boho | Neutral aesthetic | Macramé, wood crates |
| Balloon Bash | Gender-neutral fun | Helium balloons, confetti |
🚀 2. Fun and Whimsical Themes
Bring your baby’s personality to life with fun, imaginative setups that capture joy and playfulness.
Creative Ideas:
- Under the Sea – Blue tones, seashell props, mermaid or sailor outfit.
- Woodland Adventure – Forest backdrop, toy animals, earthy colors.
- Dino World – Mini dinosaurs, green foliage, chocolate “mud” cake.
- Space Explorer – Silver stars, moon props, and astronaut onesie.
- Farmyard Fun – Straw, toy animals, barn backdrop, and cowboy hat.
| Theme | Color Palette | Highlight Prop |
| Under the Sea | Teal, aqua, coral | Seashells, bubbles |
| Woodland | Green, brown, beige | Mini trees, fox plush |
| Dino World | Green, orange, brown | Plastic dinosaurs |
| Space | Silver, navy, black | Star garlands, rocket |
| Farmyard | Red, yellow, green | Wooden crates, toy animals |
🦕 Expert Tip: Keep props baby-safe — avoid small, breakable pieces that could pose a choking hazard.
🌈 3. Seasonal Cake Smash Ideas
Aligning your photo smash the cake theme with the season makes for beautiful, cohesive photos.
Seasonal Inspirations:
| Season | Theme Ideas | Color Palette | Cake Style |
| Spring | Bunny garden, rainbow bloom | Pastel pink, mint, white | Floral buttercream |
| Summer | Lemon sunshine, beach day | Yellow, blue, coral | Bright frosting, fruit accents |
| Fall | Pumpkin patch, autumn harvest | Orange, brown, gold | Pumpkin spice or caramel |
| Winter | Snow wonderland, cozy cabin | Silver, blue, white | Whipped cream texture cake |
❄️ Fun Idea: For winter, use faux snow, fairy lights, and a soft blanket backdrop to create a cozy feel.
🧁 4. Character and Pop Culture Themes
If your baby has a favorite character or toy, why not turn it into the highlight of their smash cake photoshoot?
Top Character-Based Ideas:
- Mickey or Minnie Mouse – Red, yellow, black theme
- Winnie the Pooh – Rustic forest, honey jar props
- Superhero Smash – Baby dressed as Superman, Batman, or Wonder Woman
- Disney Princess – Castle backdrop, tiara, pink cake
- Toy Story – Woody hat, cow print backdrop, blue sky balloons
📷 Note: Avoid trademarked logos in commercial photos, but inspiration-based setups are perfectly fine for personal use.
🌸 5. Themed Outfit and Cake Coordination
To make your photos look cohesive, always coordinate the baby’s outfit, cake design, and backdrop.
Here’s a simple coordination chart:
| Theme | Outfit Idea | Cake Design |
| Boho Neutral | Linen romper | Naked cake with dried florals |
| Space Explorer | Silver onesie | Dark blue frosting with stars |
| Dino World | Green romper | Chocolate “mud” with toy dinos |
| Floral Garden | Lace dress | Pink rose buttercream |
| Farmyard Fun | Denim overalls | Red barn cake |
🧠 Tip: Avoid overly busy patterns on outfits — solid colors let the baby’s expression shine.
📸 6. Props That Elevate Your Photo Smash the Cake Setup
Props bring storytelling to life. Use a few thematically relevant items to enhance your photos — but don’t overcrowd the frame.
Essential Prop List:
- Wooden “ONE” sign or banner
- Baby chair or small crate
- Cake stand or low platform
- Confetti or balloon garland
- Themed plush toys
- Fresh flowers or greenery
🌟 Less is more! Two or three key props create focus — clutter distracts from the main subject.
✨ 7. Creative Add-ons: Milk Baths & After-Smash Shots
Want to make your photo smash the cake gallery truly unforgettable? Add a mini after-smash milk bath session — it’s a trending favorite among photographers.
Why Add a Milk Bath Session?
- Cleans baby after the messy smash
- Adds another cute, soothing photo set
- Perfect for flower or fruit themes
- Creates calm, serene closing shots
💬 “Babies love water, and milk bath photos add a sweet, clean ending to a smash story.”
— Sophia Grey, Family Photographer (2026)
🌟 Key Takeaway
A creative theme makes your photo smash the cake session unforgettable. Choose colors, props, and backdrops that reflect your baby’s personality and season. Whether you go minimal, whimsical, or pop-culture inspired, keep the focus on fun, safety, and storytelling. The right theme turns simple photos into a timeless memory.
👗 What to Wear for a Photo Smash the Cake Photoshoot (Baby & Parents)
Choosing the right outfit for a photo smash the cake session is about finding the balance between comfort, style, and theme. Your baby will be crawling, smashing, laughing, and covered in frosting — so the outfit should allow for freedom of movement while still looking great on camera.
This section will guide you through outfit ideas for both baby and parents, color coordination, and pro styling tips that make your cake smash photos pop without overwhelming the scene.
👶 1. What Should the Baby Wear?
The baby is the star, so their outfit should reflect the theme while staying practical. Avoid anything stiff or layered — comfort comes first.
Best Outfit Types for Cake Smash Sessions
- Romper or Bodysuit: Keeps the baby free to move while staying picture-perfect.
- Tulle Skirt or Bloomers (for girls): Adds a soft, dreamy look.
- Suspenders or Shorts (for boys): Cute, simple, and classic.
- Diaper Cover Only: Works great for minimalistic or natural setups.
- Theme Costume: Perfect for character or seasonal shoots.
| Outfit Type | Ideal For | Tip |
| Romper | Neutral or boho themes | Choose cotton or linen fabric |
| Bloomers + Headband | Floral / princess themes | Add soft pastel tones |
| Suspenders + Shorts | Classic / rustic themes | Neutral or vintage colors |
| Barefoot Look | All themes | Baby stays relaxed and natural |
💡 Pro Tip: Always have a backup outfit. Babies can get messy quickly, and a second look helps capture fresh post-smash photos.
🎨 2. Color Coordination and Outfits that Photograph Well
Color is crucial in photo smash the cake photography. You want your baby’s outfit to complement the cake and backdrop, not blend into it.
Color Harmony Tips:
- Use 2–3 main colors that match your theme (avoid too many shades).
- Choose soft, muted tones like beige, pastel pink, sky blue, or sage green.
- Avoid bright neon colors — they reflect on skin and can look harsh in photos.
- Keep patterns minimal — solid colors photograph better.
- If your cake is colorful, choose neutral clothing to balance the frame.
| Theme | Recommended Colors | Avoid |
| Boho Neutral | Beige, ivory, dusty rose | Bright reds |
| Under the Sea | Aqua, teal, white | Neon blue |
| Dino World | Olive green, tan, brown | Dark black |
| Princess Theme | Light pink, cream, gold | Hot pink |
| Woodland | Brown, forest green, cream | Bright yellow |
📷 Expert Tip: Test the outfit under similar lighting before the shoot. Some colors can look different under artificial light.
👨👩👧 3. Coordinating Outfits for Parents (and Siblings)
Parents often join the final few shots — or appear in candid frames helping the baby. Coordinating outfits ensures your photo smash the cake gallery looks unified and aesthetic.
Style Tips for Parents:
- Stick to neutral or pastel colors (white, beige, light gray, blush).
- Avoid bold prints or logos — they distract from the baby.
- Wear comfortable clothing since you may need to sit or kneel.
- Coordinate, don’t match — complement your baby’s outfit with soft tones.
| Family Member | Outfit Suggestion | Why It Works |
| Mom | Simple dress or blouse in neutral tone | Soft, timeless look |
| Dad | Solid shirt with chinos | Balanced, clean contrast |
| Siblings | Coordinating pastels | Adds cohesion to group shots |
💬 Quote:
“Parents are part of the story. Their subtle presence in cake smash photos creates emotional depth and a timeless family bond.”
— Elena Miles, Lifestyle Photographer
🧁 4. Accessorizing Smartly (Less Is More)
Accessories can elevate a photo or overpower it — the key is moderation. The goal is to highlight the baby’s personality and expressions.
Smart Accessory Ideas:
- Headbands or Flower Crowns (soft and baby-safe)
- Tiny Hats or Crowns for birthday vibes
- Wooden Name Signs or “ONE” banners
- Barefoot or simple socks for natural posing
Avoid:
- Hard metal jewelry
- Large, shiny props near the baby’s face
- Overly bulky hats that cover expressions
🌟 Safety Tip: Always check for loose beads or strings that babies could pull off or chew.
🧼 5. Post-Smash Outfit: The Cleanup Look
After the frosting fun, it’s time for the “cleanup” photos — a chance to capture the sweet, calm aftermath of the chaos.
Ideas for Cleanup Look:
- Milk Bath Outfit: Soft diaper cover or none at all
- Simple White Onesie: Clean, minimalist contrast to the colorful smash
- Towel Wrap: Cozy and adorable ending shot
🛁 Tip: If doing a milk bath session, use lukewarm water and add a few petals, slices of fruit, or small toys for extra charm.
🌟 Key Takeaway
When dressing for a photo smash the cake shoot, comfort, coordination, and simplicity are key. Soft fabrics, neutral tones, and minimal accessories keep focus on your baby’s expressions and joy. Plan one look for the smash and one for the cleanup to tell a full story — from anticipation to celebration.
💡 Cake Smash Photography Setup and Lighting Tips
The secret behind every breathtaking photo smash the cake session isn’t just the adorable baby or the cute cake — it’s the setup and lighting. A well-designed scene with balanced light turns ordinary photos into magical keepsakes.
In this section, we’ll break down how to build a professional-looking cake smash setup, optimize lighting, and avoid the most common mistakes photographers and parents make.
🏠 1. Choosing the Right Location
The location sets the stage for your cake smash photography session. You don’t need a fancy studio — a small, well-lit space can work wonders if arranged properly.
Ideal Location Options:
- Home Studio Setup: Use a large window with natural light.
- Professional Studio: Great for themed backdrops and controlled lighting.
- Outdoor Session: Perfect for natural aesthetics and seasonal themes.
| Location Type | Pros | Cons |
| Home | Convenient, comfortable for baby | Limited lighting options |
| Studio | Professional equipment, clean background | Can feel unfamiliar for baby |
| Outdoor | Natural light, beautiful colors | Weather-dependent, bugs |
🌤️ Tip: If shooting outdoors, plan early morning or late afternoon (“golden hour”) for the best light and cooler temperatures.
🎨 2. Choosing and Setting Up the Backdrop
Your backdrop sets the tone and theme for the entire photo smash the cake shoot. It should be simple enough not to overpower the baby or cake, yet detailed enough to add personality.
Backdrop Ideas:
- Solid-Colored Paper Rolls – Clean, timeless look (white, beige, pastel tones).
- Fabric Backdrops – Soft and versatile; avoid shiny materials.
- DIY Wall Décor – Garlands, balloons, streamers, or flowers.
- Wood or Rattan Texture – Great for rustic or boho vibes.
| Theme | Ideal Backdrop | Accent Decor |
| Boho Neutral | Beige wall + wooden crates | Dried flowers, macramé |
| Floral Garden | Pastel fabric | Fresh petals |
| Space Adventure | Dark navy background | Stars, moon cutouts |
| Farmyard Fun | Wood texture | Straw, toy animals |
🧠 Pro Tip: Always keep 2–3 feet between the baby and backdrop for better depth of field and easier lighting control.
💡 3. Mastering Lighting for Cake Smash Photos
Lighting is what transforms your photos from average to professional. In photo smash the cake photography, soft, diffused light is the key — it flatters the baby’s skin and minimizes harsh shadows.
Natural Light Setup
- Position the baby near a large north- or east-facing window.
- Use sheer white curtains to diffuse the light.
- Reflect light back onto the baby using a white foam board or reflector.
Artificial Light Setup
If you’re shooting indoors without enough daylight:
- Use one large softbox angled at 45° to the baby.
- Add a fill light or reflector on the opposite side to reduce shadows.
- Avoid direct flash — it can create glare and make the baby uncomfortable.
| Lighting Type | Ideal For | Setup |
| Natural Light | Soft, airy themes | Near window + reflector |
| Softbox Light | Indoor studio | 45° angle to subject |
| Ring Light | Small spaces | Fill light for eyes |
| Golden Hour (outdoor) | Warm, dreamy look | Sunset or sunrise timing |
📸 Expert Insight:
“In baby photography, light should feel like a hug — gentle, soft, and natural. If it’s harsh, you lose the innocence of the moment.”
— Hannah Wells, Baby Portrait Photographer (2024)
🪑 4. Setting Up the Scene: Props and Layout
Every element in the frame contributes to the story. Keep your layout balanced and clutter-free, ensuring the baby and cake are always the focal points.
How to Arrange the Scene:
- Place the backdrop at least 2–3 feet behind the baby.
- Position the cake slightly off-center (rule of thirds).
- Use props to frame the scene, not dominate it.
- Add balloons or garlands in the background for depth.
- Keep wet wipes, towels, and backup outfits nearby for quick cleanups.
| Element | Placement Tip | Purpose |
| Cake | Slightly in front of baby | Central focus |
| Props | Around edges | Adds texture |
| Lighting | 45° to the side | Creates soft shadows |
| Backdrop | 3 ft behind baby | Adds depth, reduces shadow |
🎂 Bonus Tip: Keep the cake stable on a stand or small wooden platform to prevent toppling during the smash!
🎥 5. Camera Positioning and Framing Techniques
Even with perfect lighting, poor composition can ruin the shot. The right angles help capture all the action — the curiosity, the giggles, the frosting chaos.
Best Angles for Cake Smash Photos:
- Eye-Level: Most intimate and engaging perspective.
- Overhead: Great for showcasing the mess and layout.
- Close-Up: Focus on details like tiny hands, toes, or frosting smears.
- Wide Shot: Captures the entire theme and setup.
🧁 Pro Tip: Use the rule of thirds — place the baby slightly off-center to create a balanced and professional composition.
⚙️ 6. Equipment Checklist for a Smooth Session
Here’s a quick setup checklist for your photo smash the cake photoshoot:
| Category | Essentials |
| Camera Gear | DSLR / mirrorless camera, 35mm or 50mm lens, tripod |
| Lighting | Softbox or natural window light, reflector |
| Backdrop Setup | Stand, fabric/paper roll, tape or clips |
| Props | Balloons, banners, crates, toys |
| Baby Comfort Items | Towels, wipes, snacks, water |
| Post-Smash Items | Backup outfit, small tub for cleanup |
💬 Always do a test shot before bringing the baby in — adjust lighting, check exposure, and ensure safety.
🌟 Key Takeaway
A flawless photo smash the cake setup is a mix of thoughtful lighting, simple backdrops, and intentional layout. Use soft light, space your scene well, and frame creatively. The baby’s expressions and joy will shine brightest when your environment quietly complements the chaos.
🎂 How to Choose or Make the Perfect Smash Cake
The cake is the centerpiece of every photo smash the cake session — both the star prop and the source of all the laughter, frosting, and fun. But not every cake works well for smashing or photographing.
The perfect smash cake is soft, colorful, baby-safe, and designed to look amazing even when messy. Whether you plan to bake it yourself or order it professionally, a bit of planning ensures your cake not only looks gorgeous but also complements your theme and setup perfectly.
🍰 1. What Is a Smash Cake?
A smash cake is a small, single-layer cake made specifically for a baby to smash, squish, and enjoy — usually for their first birthday photoshoot.
Unlike regular cakes, smash cakes are made to be:
- Soft and easy to break apart
- Low in sugar
- Baby-safe (no harmful ingredients)
- Visually colorful and themed
🎉 Fun Fact: The “cake smash” trend began in the early 2000s and quickly became a must-have milestone photo for 1-year-olds — symbolizing freedom, joy, and a baby’s first taste of celebration.
🧁 2. Smash Cake Size, Shape & Texture
The cake’s design impacts both how it photographs and how easily your baby can interact with it.
| Cake Element | Recommended Option | Why It Works |
| Size | 4–6 inches round | Small enough for baby, large enough for photos |
| Layers | 1–2 layers max | Easy to smash without collapsing |
| Texture | Soft sponge or chiffon | Crumbles easily for messy fun |
| Frosting | Whipped cream or buttercream | Smooth, baby-safe texture |
| Base | Sturdy cake board | Keeps cake stable during smashing |
💡 Pro Tip: Avoid fondant — it’s too tough for babies to break and can create choking hazards.
🧈 3. Baby-Safe Ingredients for Smash Cakes
A baby’s digestive system is still developing at one year old, so ingredients should be gentle, allergen-conscious, and free from harmful additives.
Recommended Ingredients:
- Whole wheat or oat flour
- Mashed banana or applesauce (as sweetener)
- Greek yogurt or natural cream cheese for frosting
- Natural coloring (like beet juice or blueberry puree)
Avoid These Ingredients:
- Artificial food coloring
- Excess sugar or salt
- Honey (unsafe for babies under 1 year old)
- Nuts or nut butter (common allergen)
- Hard toppings like sprinkles or candies
| Ingredient Type | Safe Options | Avoid |
| Flour | Oat / whole wheat | White refined |
| Sweetener | Banana, applesauce | Sugar, honey |
| Frosting Base | Yogurt, cream cheese | Butter-heavy frosting |
| Colors | Pure fruit/veggie juice | Artificial dye |
👩🍳 DIY Hack: For pink frosting, use strawberry puree. For blue, use blueberry powder. These create natural hues that photograph beautifully.
🎨 4. Matching the Cake with the Theme
Your photo smash the cake should visually tie into your overall setup. Choose colors and decorations that enhance the background and baby’s outfit.
Theme-Based Cake Design Ideas:
| Theme | Cake Design | Decoration Tip |
| Floral Garden | Soft pink frosting with edible flowers | Add petals on the base |
| Under the Sea | Blue ombre buttercream | Seashell fondant toppers |
| Woodland Adventure | Brown “tree stump” cake | Toy fox or bear topper |
| Space Explorer | Black fondant with white dots | Edible stars |
| Boho Neutral | Naked cake with dried florals | Beige, white tones |
| Farmyard Fun | White frosting with red accents | Mini barn topper |
📷 Visual Balance Tip: The cake should complement — not overpower — the setup. Use 2–3 accent colors that repeat across props, backdrop, and outfit.
🍓 5. DIY Smash Cake Recipe (Simple & Baby-Safe)
If you prefer homemade, here’s a simple recipe that’s safe, easy, and photo-ready.
Ingredients:
- 1 cup oat flour
- 1 ripe banana (mashed)
- 1 egg
- ¼ cup unsweetened applesauce
- ½ tsp baking powder
- ¼ cup plain Greek yogurt (for frosting)
- 1 tsp beet juice (for natural pink color)
Instructions:
- Preheat oven to 350°F (175°C).
- Mix dry ingredients first, then add wet ingredients.
- Pour batter into two small 4-inch pans.
- Bake for 15–20 minutes or until soft.
- Let cool completely.
- Frost with yogurt or cream cheese.
- Decorate with fruit slices or flower petals.
🍌 Optional Variation: Add mashed blueberries for natural color specks that look adorable in photos.
🎥 6. Cake Presentation and Placement Tips
Presentation is everything — you want the cake to look irresistible before the chaos begins.
Pro Setup Tips:
- Place the cake on a low platform or rustic stand.
- Position it slightly off-center for balanced framing.
- Add a matching mat or fabric base under the cake for texture.
- Keep backup decorations handy — frosting may slide off during setup.
- Chill the cake briefly before the session so it’s firm but still soft inside.
| Aspect | Why It Matters | Recommendation |
| Height | Baby should reach easily | Cake 4–6 inches tall |
| Texture | Encourages messy play | Soft sponge, creamy frosting |
| Color | Adds visual pop | Matches outfit/theme |
| Temperature | Prevents melting | Slightly chilled |
📸 Photographer Tip: Take a few close-up shots of the untouched cake before the session starts — it’s a beautiful “before” contrast to the messy aftermath!
🌟 7. Cake Safety and Allergy Check
Before the shoot, always confirm that the cake ingredients are allergy-safe for your baby.
Checklist Before Cake Time:
- ✅ No eggs, nuts, or honey if your baby is allergic.
- ✅ Avoid artificial dyes or toppings.
- ✅ Bring a water bottle and wipes for cleanup.
- ✅ Keep the cake at room temperature for 20–30 minutes before shooting.
⚠️ Safety Reminder: Never leave the baby unattended with the cake, especially if using props, toppers, or decorations.
🌈 Key Takeaway
The perfect photo smash the cake cake is more than decoration — it’s a combination of safety, softness, and stunning design. Choose natural ingredients, match your theme colors, and focus on presentation. Whether homemade or bakery-made, a baby-safe, beautifully styled cake ensures your photos are as joyful as the celebration itself.
🖼️ Editing and Enhancing Smash Cake Photos Like a Pro
The magic of a photo smash the cake session doesn’t end when the frosting settles — it truly comes alive during editing. The right edits can transform good photos into magazine-worthy memories, highlighting your baby’s joy, colors, and tiny details in the cake chaos.
Even simple, beginner-friendly tools can help you produce professional-quality results that pop with warmth and clarity.
💻 1. Why Editing Matters in Smash Cake Photography
Editing helps refine and elevate your photos while maintaining a natural, emotional feel.
| Benefit | What It Does | Result |
| Brightening | Corrects lighting issues | Makes photos soft and airy |
| Color correction | Fixes dull or uneven tones | Brings out vibrant frosting and baby’s skin tone |
| Cropping | Focuses on baby or key moments | Removes distractions |
| Sharpening | Enhances cake texture and details | Adds crispness and focus |
| Skin smoothing | Gently retouches minor blemishes | Keeps baby looking natural |
✨ Editing Rule: The goal isn’t to change reality — it’s to enhance it. Preserve the warmth, the mess, and the joy.
🎨 2. Basic Photo Edits for Beginners
If you’re not a professional photographer, start with these fundamental adjustments.
Essential Edits:
- Exposure: Adjust to make the photo bright but not washed out.
- Contrast: Increases visual depth; avoid overdoing it.
- Highlights/Shadows: Bring down highlights to recover white frosting details; lift shadows for more depth.
- White Balance: Keep skin tones natural; avoid overly warm or cool filters.
- Sharpness: Focus slightly on the cake and baby’s face.
- Crop/Rotate: Center your subject or use the rule of thirds for balance.
| Edit | Ideal Range | Why It Works |
| Exposure | +0.2 to +0.5 | Adds brightness |
| Contrast | +10 to +20 | Defines features |
| Highlights | -20 to -40 | Preserves details |
| Shadows | +20 to +40 | Softens harsh light |
| Temperature | Slightly warm | Adds cozy tone |
🧁 Pro Tip: Smash cake photos look best with soft, pastel color tones — avoid filters that oversaturate.
📱 3. Recommended Editing Tools and Apps
You don’t need expensive software — several mobile and desktop tools can create professional-quality results.
| Tool | Platform | Best For | Skill Level |
| Lightroom Mobile | iOS, Android | Fine-tuning colors and exposure | Beginner–Pro |
| Canva | Web, App | Adding text or layouts | Beginner |
| Snapseed | Mobile | Quick edits and filters | Beginner |
| Photoshop | Desktop | Detailed retouching | Advanced |
| VSCO | Mobile | Gentle filters and tones | Beginner |
| Pixlr | Web | Simple color correction | Beginner |
💡 Quick Workflow: Import → Adjust lighting → Fix white balance → Crop → Apply soft preset → Save for web.
🧠 4. Editing Styles That Work for Smash Cake Photos
Different editing aesthetics evoke different emotions. Choose one that fits your theme or brand.
| Style | Look & Feel | Perfect For |
| Bright & Airy | Light whites, soft pastels | Baby girl themes, floral sets |
| Warm & Cozy | Golden tones, deep contrast | Rustic or boho setups |
| Vibrant & Colorful | Pop of colors | Birthday or carnival themes |
| Minimal & Neutral | Muted beige tones | Studio or modern shoots |
| Moody & Artistic | Rich shadows | Dramatic, storytelling setups |
📷 Pro Insight: Most parents and photographers prefer bright and airy editing for photo smash the cake sessions — it emphasizes joy, innocence, and clean tones.
🎯 5. Highlighting Key Moments During Editing
A photo smash the cake shoot is full of priceless micro-moments. Editing helps emphasize them visually.
Moments to Highlight:
- First Touch: When baby first pokes the cake.
- Expression Explosion: That big giggle or frosting-covered smile.
- Mess Moment: Frosting all over hands and cheeks.
- Family Interaction: Parents laughing in the background.
- Before & After Shots: Clean baby vs. messy baby comparison.
🖌️ Editing Tip: Use vignette or light focus tools to subtly draw the eye to your baby’s face.
🧾 6. File Format and Export Settings
When saving your edited photos, ensure you keep them sharp and web-optimized.
| Purpose | Format | Resolution | Recommended |
| Printing | TIFF / PNG | 300 DPI | For albums and frames |
| Web Upload | JPEG | 72 DPI | For sharing online |
| Social Media | JPEG / PNG | 1080–2048 px wide | Balanced size and quality |
| Backup | RAW | Full resolution | Always keep originals |
💾 Pro Tip: Save multiple versions — an original, an edited master, and a resized copy for social sharing.
🌟 7. Before-and-After Editing Example
| Step | Description | Visual Impact |
| Before Editing | Slightly dark, dull frosting colors, background clutter | Flat, lacks focus |
| After Editing | Brightened tones, color-corrected frosting, soft blur on edges | Cheerful and professional look |
🖼️ Quote from a Pro Photographer:
“A great cake smash photo isn’t made in the camera — it’s revealed in the edit.”
✨ Key Takeaway
Editing is the finishing touch that makes your photo smash the cake session shine. With the right balance of light, color, and emotion, you can transform a frosting-filled mess into a timeless memory. Whether you use Lightroom, Snapseed, or Canva, focus on enhancing natural tones and keeping your baby the hero of every frame.
🌈 Creative Photo Smash the Cake Themes and Inspiration
A photo smash the cake session is more than just a messy birthday shoot — it’s your baby’s first big story. Every theme tells a little something about their personality: adventurous, sweet, playful, or curious.
Whether you’re planning a DIY cake smash setup at home or a full-blown studio session, choosing the right theme sets the mood, guides the decor, and even influences the cake design and outfit.
🧸 1. Classic and Timeless Cake Smash Themes
Some ideas never go out of style — they’re clean, charming, and elegant. These themes focus on simplicity, color harmony, and timeless backdrops that will still look beautiful years from now.
| Theme | Description | Best Color Palette | Ideal Props |
| Pastel Dreams | Soft pinks, blues, and yellows for an angelic vibe | Pastel pink, mint, ivory | Balloons, clouds, wooden crates |
| Minimal White Studio | Crisp, pure background that makes baby and cake pop | White, beige | Wooden floor, neutral cake |
| Classic Birthday Party | Streamers, confetti, and balloons everywhere | Primary colors | Banners, candles, hats |
| Fairy Garden | Whimsical forest look with soft greenery | Sage green, cream | Flowers, butterflies |
| Baby Blue Bliss / Pink Perfection | Gender-themed soft hues | Blue or pink pastels | Paper fans, bunting flags |
🧁 Pro Tip: Classic setups photograph beautifully in natural light and are ideal for framed prints or album covers.
🚀 2. Trendy and Thematic Smash Cake Ideas
If you love modern aesthetics and social media-worthy setups, these trendy photo smash the cake themes are perfect for 2026 and beyond.
| Theme | Description | Cake Idea |
| Boho Bliss | Earthy tones, dried florals, macramé | Naked cake with white icing |
| Wild One (Safari) | Jungle or zoo theme for adventurous babies | Animal topper cake |
| Space Explorer | Celestial magic with moons and stars | Galaxy swirl cake |
| Little Farmer | Barnyard fun with hay and wooden crates | Cow print or barn cake |
| Under the Sea | Ocean blues, mermaid vibes | Sea shells and wave frosting |
| Dino Smash | Tiny dinosaurs and greenery | Green and brown “mud” cake |
| Bee-Day Party | “Sweet as can bee” yellow and black theme | Honeycomb cake |
| Rustic Woodland | Logs, ferns, and soft greens | Semi-naked cake with berries |
📸 Trend Insight: According to Pinterest’s 2024 baby photography trends, boho neutrals and safari setups remain the top cake smash choices for parents worldwide.
🎀 3. Gender-Neutral Cake Smash Theme Ideas
Modern parents are loving gender-neutral color palettes — soft, earthy, or muted tones that feel sophisticated and work for any baby.
| Theme | Mood | Palette |
| Sunshine Smile | Warm, happy, cozy | Yellow, cream, soft brown |
| Rainbow Minimalist | Simple but cheerful | Muted rainbow tones |
| Teddy Bear Picnic | Nostalgic and cozy | Beige, brown, caramel |
| Nature’s Baby | Outdoorsy vibe | Sage green, sand, white |
| Neutral Boho | Minimal and modern | Ivory, taupe, gold |
🌿 Pro Tip: Gender-neutral themes are ideal for families planning matching sibling or family photos during the same session.
🎉 4. Seasonal and Holiday Cake Smash Themes
Aligning your photo smash the cake shoot with the time of year adds a festive, personalized twist.
| Season / Occasion | Theme Idea | Decor Suggestions |
| Spring | Blooming Baby | Flowers, butterflies, bright cake |
| Summer | Lemonade Stand | Fresh fruit props, yellow accents |
| Autumn | Pumpkin Smash | Orange tones, hay bales, pumpkins |
| Winter | Snowflake Baby | White and silver tones, faux snow |
| Christmas | Santa’s Helper | Red-green palette, ornaments |
| Halloween | Little Pumpkin | Subtle spooky props |
| New Year’s | Sparkle Baby | Gold balloons, glitter backdrop |
🎂 Case Example: One photographer gained 30% more social shares by timing her “Pumpkin Smash” sessions during fall family photo season.
📷 5. Creative DIY Theme Ideas for Home Shoots
You don’t need a professional studio to create magic. Here are budget-friendly, DIY-friendly ideas using items you likely already have.
| DIY Theme | Easy Props | Cake Inspiration |
| Laundry Day Fun | Hanging baby clothes | Simple buttercream cake |
| Bubble Bath Smash | Mini tub + bubbles | White frosted cake |
| Storybook Baby | Favorite book pages as backdrop | Open-book cake |
| Kitchen Chaos | Pots, whisks, cupcake liners | Sprinkle overload cake |
| Tiny Artist | Paint smudges (edible!) | Palette-style cake |
🧠 DIY Tip: Keep it simple — babies get overwhelmed easily. The more room they have to move, the happier your shots will look.
🌟 6. Matching Cake, Outfit, and Props
For cohesive and visually stunning photo smash the cake pictures, match your cake, outfit, and props around a single theme or color tone.
| Element | Example (Boho Theme) | Example (Space Theme) |
| Cake | Semi-naked with white frosting | Galaxy blue frosting |
| Outfit | Linen romper, neutral headband | Metallic silver romper |
| Props | Woven baskets, greenery | Star garland, black balloons |
💬 Pro Photographer Insight:
“Your props should whisper your theme, not scream it. The baby and the cake are always the stars of the show.”
— Ella Martinez, Cake Smash Specialist
🎨 7. Bonus: Unique Theme Combinations
If you want to stand out, try merging two complementary ideas:
- Boho Safari: Neutrals + jungle leaves.
- Space Princess: Galaxy setup with pastel tones.
- Farmer’s Market: Rustic baskets with fruit decor.
- Dreamy Clouds: White backdrop with cotton “clouds” and soft lighting.
✨ Key Takeaway
Your photo smash the cake theme should tell a story — whether it’s dreamy, rustic, playful, or elegant. Choose colors that complement your baby’s personality, keep the setup cohesive, and remember: simplicity often photographs better than extravagance. With the right creative touch, every theme can become a timeless treasure.
🛡️ Safety and Hygiene Tips During Smash Cake Sessions
While photo smash the cake sessions are all about laughter, frosting, and fun, they also involve potential risks — from allergies and choking hazards to slipping on frosting or reacting to decorations.
Ensuring a safe, hygienic, and baby-friendly environment means everyone can enjoy the moment stress-free.
👶 1. Choose a Baby-Safe Cake
The cake is the centerpiece, but not all cakes are baby-safe. Many store-bought cakes contain artificial coloring, hard decorations, or sugar-heavy frosting that can irritate your baby’s stomach or skin.
✅ Checklist for a Safe Smash Cake:
- Avoid nuts, honey (for babies under 1 year), or raw eggs.
- Use natural colors like beet juice (pink), spinach (green), or turmeric (yellow).
- Keep frosting light — whipped cream or cream cheese works best.
- Skip fondant and hard candy decorations.
- Do a taste test before the session to check for allergies.
| Ingredient | Safe Option | Avoid |
| Flour | Whole wheat / oat flour | Bleached white flour |
| Sweetener | Banana, applesauce | Refined sugar |
| Color | Natural fruit purees | Artificial dyes |
| Topping | Whipped cream | Fondant or gum paste |
🧁 Tip: Ask your pediatrician if you’re unsure about introducing new ingredients before the photoshoot.
🧴 2. Maintain a Clean Shooting Space
Frosting, crumbs, and props can quickly turn your space into chaos. Cleanliness ensures better hygiene and smoother workflow during your photo smash the cake session.
🧹 Before the Shoot:
- Sanitize the floor or backdrop area.
- Use a washable mat or plastic sheet under the setup.
- Keep disinfectant wipes nearby.
- Wash all props, toys, and utensils.
🪣 After the Shoot:
- Have a cleanup zone ready — a warm towel, wipes, and baby wash.
- Dispose of leftover cake safely (don’t feed to pets — sugar and dairy can harm them).
- Wipe down all surfaces before the next session.
🧼 Pro Tip: A mini bath setup at the end can double as a cleanup and an adorable “post-smash” photo opportunity!
👗 3. Outfit Safety and Comfort
Babies love movement. Their outfits should look cute without restricting mobility or causing irritation.
👕 Safe Outfit Guidelines:
- Choose soft, breathable fabrics like cotton or linen.
- Avoid buttons, sequins, or small detachable pieces.
- Keep accessories (like crowns or ties) loose and short.
- Always have one backup outfit in case of frosting overload.
| Outfit Type | Ideal Material | Avoid |
| Rompers | Cotton / muslin | Synthetic fabrics |
| Tutus | Soft tulle | Stiff or glittery tulle |
| Shorts | Stretchable jersey | Tight elastic bands |
💡 Tip: Barefoot looks adorable and safer — socks can become slippery on icing!
⚡ 4. Ensure Cake Smash Set Safety
A visually appealing photo smash the cake setup can still be unsafe if not checked carefully.
🚫 Watch Out For:
- Loose balloons (choking risk).
- Sharp props (wood splinters, metal edges).
- Electrical cords from lighting equipment.
- Unstable cake stands that can topple easily.
✅ Safety Must-Haves:
- Non-slip floor mats.
- Soft edges on all decor.
- Sturdy cake base or tray.
- Baby placed at least 2–3 feet away from lighting stands or cords.
⚠️ Rule of Thumb: If it’s small enough to fit through a toilet paper roll, it’s small enough to be a choking hazard.
🧠 5. Manage Allergies and Skin Sensitivities
Many babies experience mild reactions to frosting or certain ingredients. Always plan ahead to prevent skin irritation or allergies.
How to Prevent Reactions:
- Test a small amount of frosting on baby’s arm 24 hours before.
- Avoid scented or colored lotions before the shoot.
- Keep a clean towel and hypoallergenic wipes on standby.
- If redness appears, pause the session immediately.
| Issue | Common Cause | Quick Fix |
| Redness on cheeks | Frosting irritation | Wipe gently, apply baby lotion |
| Runny eyes/nose | Food allergy | Stop and rinse with warm water |
| Dry patches | Cold or air-conditioning | Moisturize before session |
💬 Expert Note:
“Always treat baby’s comfort as your top priority. The best photos come when they feel safe and happy.”
— Sophie Lane, Pediatric Photographer
📸 6. Keep the Session Short and Stress-Free
Babies have limited attention spans — typically 20–30 minutes before they lose interest or get tired.
Tips for a Smooth Session:
- Schedule during baby’s happy hours (after nap and snack).
- Keep the set simple to minimize distractions.
- Play gentle background music or white noise.
- Take quick breaks if baby seems overwhelmed.
- Have a helper (parent or assistant) within arm’s reach.
🕰️ Pro Tip: The best moments usually happen in the first 10 minutes — when the baby’s curiosity peaks.
🧽 7. Hygiene During Group or Studio Sessions
If you’re a professional photographer handling multiple sessions:
- Wash hands before and after handling each baby.
- Clean props between clients.
- Use disposable frosting cakes when possible.
- Provide hand sanitizer for parents.
- Disinfect toys and high-touch areas regularly.
📷 Bonus: Mention your hygiene practices in your service description — parents love knowing you prioritize safety!
🌟 Key Takeaway
Safety and hygiene form the foundation of every successful photo smash the cake session. From baby-safe ingredients to sanitized props and a calm environment, every small precaution ensures a joyful, stress-free experience. Remember: happy babies make the best photos — and safe ones make memories you can cherish with confidence.
🧺 Post-Smash Cleanup and Preserving Memories
The “smash” part of a photo smash the cake session is fun and chaotic, but the aftermath can be frosting everywhere — on the floor, props, clothes, and even hair!
A smooth cleanup routine keeps your baby comfortable and helps you protect your precious photos, props, and gear for future sessions.
🫧 1. Quick Baby Cleanup Tips
Once the session is over, your baby will likely look like a mini cake monster — and that’s part of the fun! But to avoid sticky discomfort or rashes, quick and gentle cleanup is essential.
✅ Baby Cleanup Routine:
- Warm Wipe Down: Use soft, fragrance-free baby wipes or a warm damp cloth.
- Mini Bath: If at home or studio, prepare a small tub with lukewarm water and mild baby soap.
- Soft Towel Dry: Pat, don’t rub — frosting can irritate skin if scrubbed.
- Apply Lotion: Use hypoallergenic baby lotion to soothe skin.
- Change Outfit: Dress baby in clean, comfortable clothes.
🛁 Bonus Tip: Many photographers capture a few “bath splash” shots right after cleanup — it’s a natural, adorable extension of the cake smash story.
🧹 2. Cleaning the Set and Props
Whether you’re a parent doing a DIY shoot or a professional photographer, post-session cleanup ensures your equipment stays in good shape and the environment remains hygienic for future use.
🧺 Step-by-Step Cleanup:
- Remove leftover cake pieces and frosting immediately (hardened sugar is difficult to clean later).
- Wipe surfaces with mild disinfectant or vinegar solution.
- Wash reusable props like trays, blankets, and toys with baby-safe detergent.
- Air-dry backdrops and mats completely before storage.
- Vacuum or mop the area to remove crumbs and residue.
| Item | Cleaning Method | Notes |
| Fabric Backdrops | Machine wash gentle cycle | Air dry only |
| Plastic Mats | Wipe with disinfectant | Avoid strong chemicals |
| Props (wood/metal) | Wipe with damp cloth | Dry immediately |
| Balloons | Discard safely | Keep out of reach of children |
🧽 Pro Tip: If using studio backdrops, keep a dedicated washable mat under the cake area — it’ll save you hours of scrubbing.
💾 3. Storing and Organizing Photos
Once your photo smash the cake images are captured and edited, proper storage ensures they’ll stay safe and accessible for years.
🗂️ Digital Storage Tips:
- Save a RAW copy (original unedited file).
- Export edited versions in JPEG or PNG format for easy sharing.
- Use cloud storage (Google Drive, Dropbox, iCloud) for backup.
- Store an extra copy on an external hard drive or USB.
| File Type | Use | Recommended Storage |
| RAW | Editing and archival | External hard drive |
| JPEG | Social media, sharing | Cloud or phone |
| PNG | Prints and websites | Cloud backup |
💾 Pro Tip: Rename files by date and theme — e.g., “CakeSmash_Ali_Birthday2026.jpg” — for easy retrieval.
📚 4. Creating Keepsakes and Photo Albums
Your baby’s first birthday photos deserve more than just a place in your phone gallery. Turning them into custom keepsakes helps preserve the joy for decades.
Creative Memory Ideas:
- 📘 Printed Photo Book: Combine cake smash, family, and pre-cake shots.
- 🖼️ Framed Collages: Feature “before, during, and after” shots.
- 🧁 Custom Calendar: Use a favorite photo for each month.
- 💌 Thank-You Cards: Send printed cake smash photos to family.
- 🎬 Slideshow Video: Add music and transitions for a cinematic memory.
| Keepsake Type | Ideal Use | Where to Order |
| Photo Album | Family coffee table | Shutterfly, Mixbook |
| Canvas Print | Wall decor | Canva, Printique |
| Digital Slideshow | Sharing online | Canva, Animoto |
💬 Parent Tip: Choose a few standout photos and print them — physical albums create emotional connections digital ones can’t match.
🧠 5. Archiving for Professionals
If you’re a photographer offering photo smash the cake services:
- Keep backups of client galleries for at least 6–12 months.
- Use software like Pixieset or SmugMug for professional delivery.
- Offer a “memory package” (prints + digital album) to enhance client value.
- Include a consent form if you plan to use photos for portfolio or marketing.
📸 Pro Insight:
“Clients love it when you turn memories into products — albums and keepsakes create emotional value that digital files alone can’t.”
— Mark Rivera, Baby Photographer, 2026
🪶 6. Sustainable Cleanup and Storage
Eco-conscious parents and photographers can make cleanup more sustainable:
- Use biodegradable wipes and compostable plates.
- Choose cloth backdrops over disposable plastic ones.
- Reuse props for future sessions.
- Print albums using recycled paper options.
| Action | Eco-Friendly Alternative |
| Paper Towels | Reusable cloth wipes |
| Plastic Balloons | Paper garlands or felt bunting |
| Plastic Cake Stand | Wooden or bamboo base |
🌎 Sustainability Note: The best memories don’t just capture joy — they respect the world your child will grow up in.
✨ Key Takeaway
A photo smash the cake session doesn’t end when the camera stops clicking — it continues with careful cleanup and creative preservation. Keep your baby comfortable, clean your setup responsibly, and store your images safely.
Every frosting smear tells a story, and preserving it well means you’ll be able to relive those giggles and messy smiles for years to come.
Final Thoughts and FAQs About Photo Smash the Cake Sessions
The photo smash the cake experience is one of the most joyful ways to celebrate your baby’s first big milestone — their first birthday! It’s more than a photo shoot; it’s a sensory playdate, a family bonding moment, and a memory frozen in frosting.
To wrap up our comprehensive guide, let’s go through some final insights and frequently asked questions (FAQs) to help you plan your session with confidence and creativity.
💭 Final Thoughts: Why “Photo Smash the Cake” Matters
A photo smash the cake session is not just about cute pictures — it’s a celebration of growth, emotion, and discovery.
From their first touch of icing to the proud giggles after a messy bite, every moment reveals your baby’s personality.
Here’s why this tradition has become a global favorite:
| Reason | What It Means |
| 🎂 Milestone Marker | Symbolizes your baby’s first big year and all their little “firsts.” |
| 📸 Memory Capsule | A creative way to capture innocence and pure joy. |
| 👨👩👧 Family Bonding | Siblings and parents join in for priceless laughter. |
| 🌈 Creative Expression | Lets parents and photographers design unique, themed setups. |
“Every crumb and giggle tells a story — the story of your baby growing up.”
— Sarah Louise, Family Photographer
A well-planned photo smash the cake shoot combines creativity, comfort, and connection. Whether DIY or professional, it’s a celebration that brings out genuine smiles — and sticky hands!
❓ Frequently Asked Questions About Photo Smash the Cake Sessions
Here are some of the most common questions parents ask before booking or setting up their own cake smash photo shoot:
🕓 1. When should I schedule a photo smash the cake session?
Ideally, plan the session 2–4 weeks before your baby’s first birthday.
This timing gives you enough room to edit and print photos before the birthday party.
📅 Tip: Babies are happiest mid-morning after a nap and meal — schedule your shoot then!
📷 2. How long does a cake smash session last?
Most sessions last 30–60 minutes, including setup, warm-up shots, and cleanup.
Babies have short attention spans — so shorter, fun bursts work best!
🧁 3. What kind of cake is best for a smash session?
Choose a soft, light-colored cake with minimal sugar and no fondant.
Avoid chocolate frosting (can look messy) or red dye (can stain skin and props).
| Cake Type | Texture | Baby-Safe? | Notes |
| Vanilla Sponge | Soft | ✅ | Easy to smash and gentle on tummy |
| Butter Cake | Medium | ✅ | Slightly denser but holds up well |
| Chocolate | Messy | ⚠️ | Fun but can look muddy in photos |
| Fondant Cake | Hard | ❌ | Difficult for baby to break |
👶 4. What should my baby wear for a photo smash the cake?
- Go for light, comfortable fabrics that allow movement.
- Popular choices: tutus, suspenders, rompers, or diaper covers.
- Avoid heavy clothes or tight elastic bands.
💡 Tip: Have a backup outfit — frosting accidents are part of the fun!
🧺 5. How do I clean up after the session?
Bring:
- Baby wipes and towels
- A change of clothes
- A small tub or basin for a quick rinse
- Trash bags for cake debris
You can even make cleanup part of the shoot — bubble bath photos are a trending bonus!
📦 6. What should I bring to the studio or setup?
Here’s a quick checklist:
| Item | Purpose |
| Cake | The main star of the show |
| Outfit | Cute + comfortable for baby |
| Props | Balloons, banners, toys |
| Wipes/Towels | Post-cake cleanup |
| Camera/Tripod | Capture every giggle |
| Backup Memory Card | Never risk losing shots |
🧁 7. Can I do a DIY photo smash the cake at home?
Absolutely!
DIY shoots are cost-effective and personal. Just ensure:
- Good natural lighting (near a window).
- Neutral backdrop (white or pastel works best).
- Simple props that don’t distract from the baby.
- Safety first — never leave baby unattended with cake or decorations.
🎥 Tip: Many parents set up their DIY sessions using their smartphone camera and tripod — modern phones capture stunning, high-resolution images.
📸 8. What should I ask a professional photographer before booking?
Ask:
- Do you specialize in baby or cake smash sessions?
- What’s included in your package (cake, outfits, prints)?
- How long is delivery for edited photos?
- Can we include family shots or a theme?
- Do you provide props or should we bring our own?
Pro Insight: The right photographer will focus on both safety and emotional storytelling — not just pretty pictures.
🌿 9. Are there eco-friendly options for cake smash sessions?
Yes — try:
- Reusable props like cloth banners or wooden stands.
- Plant-based frosting or natural dyes (beet, turmeric, spinach).
- Cloth wipes instead of paper towels.
- Recycled paper prints for albums.
It’s a small but meaningful way to celebrate responsibly.
🎉 Final Takeaway: Celebrate the Mess, Cherish the Memory
At the heart of every photo smash the cake session is pure joy — a messy, colorful, unfiltered moment that captures your baby’s true spirit.
So whether you’re planning a themed studio shoot or a cozy home DIY session:
- Keep your baby’s comfort first.
- Let them lead the fun.
- Capture every giggle, every splash, every crumb.
Because one day, these frosting-covered photos will be more than just images — they’ll be memories of love, laughter, and life’s sweetest firsts.
“You can’t freeze time, but you can freeze the frosting.” 💕

