
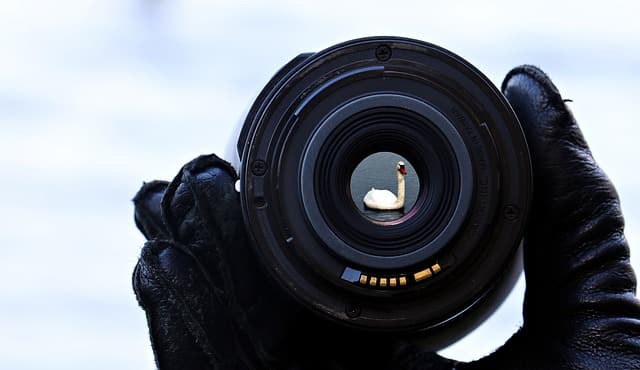
Have you ever looked at a dewdrop on a leaf and wondered how photographers capture that level of detail? That’s the magic of micro lens photography — the art of revealing intricate textures, patterns, and details invisible to the naked eye. With the right lens, technique, and a bit of patience, you can transform tiny subjects into extraordinary works of art.
Micro lens photography has become increasingly popular among photographers who want to explore the world on a miniature scale — from the fine hairs of an insect’s leg to the crystalline edges of a snowflake. Whether you’re a beginner using a smartphone lens attachment or a professional using a high-end DSLR with a dedicated micro lens, understanding the principles behind this genre will dramatically improve your results.
This guide covers everything you need to know about micro lens photography — what it is, how it works, what gear you need, and the techniques that turn small subjects into big visual stories.
What Is Micro Lens Photography?
Micro lens photography refers to capturing subjects at an extremely close range using a micro lens — a lens designed to reproduce life-size (1:1) or larger magnification on the camera’s sensor. This allows you to capture the tiniest details, such as the texture of fabric, the wings of a butterfly, or the delicate patterns on a coin.
In everyday terms, it’s the science of magnifying the miniature. While macro and micro photography are often used interchangeably, there is a subtle distinction:
| Term | Meaning | Common Use |
| Macro Photography | General close-up photography with magnification up to 1:1 | Canon & general photography |
| Micro Lens Photography | Nikon’s terminology for true macro lenses capable of 1:1 or greater | Nikon systems |
| Close-Up Photography | Shooting small subjects without achieving true macro scale | Smartphones, compact cameras |
Fun Fact:
Nikon uses the term “Micro-NIKKOR” for its macro lenses. So, “micro photography” isn’t about microscopes — it’s about magnifying reality to life-size or beyond.
Micro lens photography is perfect for capturing:
- Nature subjects like insects, flowers, and plants
- Textures and patterns (wood grain, paper fibers, skin)
- Jewelry and product details for commercial shoots
- Scientific and educational images (minerals, specimens, materials)
At its core, this style of photography trains your eye to see beauty in the details — a drop of water, a dust particle, a thread — all become captivating subjects when viewed through a micro lens.
How Does a Micro Lens Work?
A micro lens is engineered to focus extremely close to a subject while maintaining excellent sharpness and minimal distortion. The hallmark of a true micro lens is its 1:1 magnification ratio, meaning the subject appears at actual size on the camera sensor. For example, if you photograph a 10mm object, it will occupy 10mm on your camera’s sensor.
Here’s a breakdown of what makes these lenses unique:
| Feature | Description |
| Magnification Ratio | Defines how large the subject appears on the sensor (1:1 is life-size). |
| Minimum Focusing Distance | The shortest distance from your lens to the subject where it can still focus. |
| Flat Field Design | Ensures the entire subject plane is in sharp focus, not just the center. |
| Apochromatic Elements | Reduce chromatic aberration (color fringing around edges). |
Focal Length and Its Impact
Micro lenses come in various focal lengths, typically between 50mm and 200mm:
- 50–60mm: Great for small objects and studio use. Requires you to be close to the subject.
- 90–105mm: The most versatile range — perfect for insects and flowers.
- 150–200mm: Longer working distance, ideal for shy or moving subjects (like butterflies).
The longer the focal length, the more space you can keep between the camera and your subject — useful when shooting skittish wildlife.
Depth of Field Challenges
At extreme close-up distances, depth of field (DOF) becomes razor-thin — sometimes only a few millimeters. This means:
- Even a slight camera movement can shift focus entirely.
- You often need smaller apertures (like f/8–f/16) to keep your subject sharp.
- Focus stacking (which we’ll discuss later) is commonly used to increase DOF.
Quote from Nikon’s Optical Design Team:
“Micro lenses are not just about magnification. They are about precision — maintaining flatness, color accuracy, and edge-to-edge sharpness even at the closest focusing distances.”
In short, a micro lens doesn’t just zoom in — it reveals an entirely new world. By mastering how it works, you gain control over one of the most detail-oriented forms of photography available.
Why Try Micro Lens Photography?
The appeal of micro lens photography goes far beyond technical fascination. It’s a creative and meditative practice that challenges photographers to see the world differently — to uncover beauty in the smallest, most overlooked places. Whether you’re an artist, a hobbyist, or a professional, shooting with a micro lens helps you refine your technical precision, composition, and appreciation for detail.
Let’s explore the reasons why this genre has captured the hearts of so many photographers around the world.
1. Discover a Hidden World of Details
Micro lens photography unveils details invisible to the naked eye — the delicate veins of a leaf, the shimmering scales of a butterfly, or the crystalline sparkle of sand grains. These subjects, though tiny, become grand landscapes of texture and light under a micro lens.
Consider this comparison:
| Subject | Normal View | Micro Lens View |
| Flower Petal | A smooth color surface | A detailed landscape of ridges and pollen grains |
| Human Hair | Thin strand | Cylindrical structure with surface texture |
| Printed Paper | Flat page | Network of fiber patterns and ink dots |
By exploring micro photography, you train your eye to see complexity and art in simplicity — turning ordinary subjects into extraordinary compositions.
2. Strengthen Your Technical Photography Skills
Shooting close-up subjects with a micro lens demands control, patience, and precision. You’ll learn to master key fundamentals that apply to all photography styles:
- Manual Focus Mastery: Autofocus struggles at extreme magnifications, so micro work teaches fine manual adjustments.
- Depth of Field Awareness: A millimeter of difference can shift what’s in focus.
- Lighting Control: You learn to manipulate natural or artificial light to enhance detail and reduce reflections.
- Stability & Sharpness: Small vibrations can ruin a shot, so you become skilled at stabilizing your camera and timing your shutter.
Many professional photographers credit micro lens photography as the training ground that improved their overall photography — from portraits to landscapes.
“Once you learn to control light and focus at 1:1 magnification, every other type of photography feels easier.”
— Alex Noriega, Fine Art Photographer
3. Creative Expression and Storytelling
Micro lens photography invites you to create new worlds. A drop of water becomes a universe. The eye of a spider becomes a portrait. Each frame can tell a story that most people never notice in daily life.
Here are a few creative directions micro photographers explore:
- Abstract Art: Focusing on color, texture, and form rather than the subject itself.
- Nature Storytelling: Documenting ecosystems on a micro scale — pollination, decay, metamorphosis.
- Scientific Exploration: Using photography as a tool to document and study biology, minerals, and materials.
- Product and Commercial Photography: Capturing texture, precision, and detail in jewelry, food, and watches.
With a micro lens, creativity has no limits — only smaller scales.
4. Accessibility and Affordability
Contrary to what many believe, you don’t need an expensive setup to begin. There are affordable ways to experiment with micro lens photography:
- Use clip-on macro lenses for smartphones (some cost under $30).
- Try extension tubes or reversing rings with your existing DSLR lens.
- Use free focus stacking software for post-processing sharpness.
You can start simple and scale up as your skills grow. Even basic gear can produce professional-grade results with practice and good lighting.
5. Therapeutic and Mindful Benefits
Beyond the artistic and technical side, micro lens photography is known to be a deeply mindful activity. It forces you to slow down, observe, and appreciate small wonders that usually go unnoticed.
Many photographers describe it as a form of visual meditation — requiring calmness, patience, and focus. In fact, a 2022 survey by Photographic Mindfulness Journal found that 78% of macro photographers reported feeling more relaxed and present after photo sessions.
By engaging deeply with your subject — a flower, an insect, or a water droplet — you disconnect from distractions and connect to your environment on a deeper level.
6. Building a Unique Portfolio
In a digital world saturated with wide landscapes and portraits, micro lens photography offers something rare — a fresh visual perspective.
A strong portfolio of close-up images can make your work stand out to:
- Art directors looking for texture and detail shots
- Scientific publishers needing micro-documentation
- Stock photo platforms that reward unique, niche imagery
- Social media audiences captivated by intricate detail
With proper tagging (keywords like macro, micro, close-up, texture), your images can attract more views and engagement.
Key Takeaway
Micro lens photography is more than just a technique — it’s a new way of seeing. It blends art, science, and mindfulness into one discipline that trains your eye to notice what others overlook. Whether for creativity, relaxation, or professional work, micro photography offers endless opportunities to explore and grow.
Essential Equipment for Micro Lens Photography
When it comes to micro lens photography, the right gear makes all the difference between a good shot and a breathtaking one. Because you’re working at extremely close distances, your equipment must handle fine details, precise focus, and stable shooting conditions.
The good news? You don’t need to start with expensive professional gear. Whether you’re shooting with a DSLR, mirrorless, or smartphone, there’s a setup for every budget and skill level.
Let’s explore the essential tools that will help you capture sharp, detailed, and visually stunning close-up images.
Choosing the Right Micro Lens
The lens is the heart of micro lens photography. A micro lens (also called a macro lens in many systems) allows you to focus much closer than a standard lens and achieve 1:1 magnification — meaning your subject appears life-size on the camera’s sensor.
Here’s what to look for when selecting one:
| Specification | What It Means | Why It Matters |
| Magnification Ratio | The size of the subject on the sensor compared to real life (1:1 = life-size) | Determines how close and detailed your images can be |
| Focal Length | The lens’s zoom power (typically 50mm–200mm for micro lenses) | Affects working distance and perspective |
| Minimum Focusing Distance | How close you can get while staying in focus | Crucial for tiny subjects |
| Aperture Range | The range of f-stops available | Controls light and depth of field |
| Image Stabilization (VR/IS/OSS) | Reduces blur from small hand movements | Extremely helpful in handheld shots |
Recommended Micro Lenses by Brand
Here are some of the most popular and trusted micro lenses across camera systems:
| Camera Brand | Lens Model | Key Features | Approx. Price (USD) |
| Nikon | AF-S Micro-NIKKOR 105mm f/2.8G IF-ED VR | 1:1 magnification, vibration reduction, great sharpness | $750 |
| Canon | EF 100mm f/2.8L Macro IS USM | Hybrid IS, weather-sealed, excellent color rendition | $1,000 |
| Sony | FE 90mm f/2.8 Macro G OSS | Optical SteadyShot, razor-sharp optics | $1,100 |
| Fujifilm | XF 80mm f/2.8 R LM OIS WR Macro | 1:1 magnification, stabilized, weather-sealed | $1,200 |
| Sigma / Third-Party | 105mm f/2.8 DG DN Macro Art | Affordable, sharp, and available for multiple mounts | $700 |
Pro Tip:
If you’re photographing insects or easily disturbed subjects, choose a longer focal length (90mm–200mm). It allows you to keep distance while still capturing life-size magnification.
Budget-Friendly Alternatives for Beginners
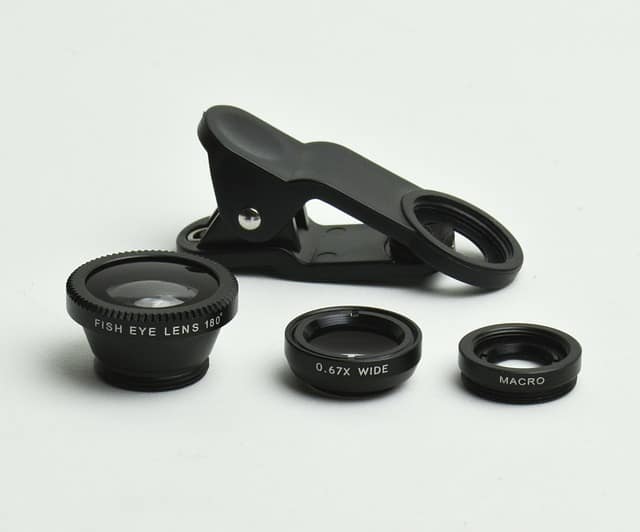
You don’t need to buy a dedicated micro lens right away. There are several affordable tools that can give you macro-level magnification using the gear you already own.
1. Extension Tubes
- Hollow tubes that fit between your camera and lens to reduce focusing distance.
- Cheap (usually $30–$100) and maintain image quality.
- Best used with prime lenses for maximum sharpness.
2. Close-Up Filters
- Screw onto the front of your lens like a UV filter.
- Provide instant magnification, though with some optical softness.
- Ideal for beginners experimenting with micro photography on a budget.
3. Reversing Rings
- Allow you to mount your lens backward, turning it into a high-magnification macro lens.
- Cost under $20, but you lose electronic lens controls (like autofocus and aperture adjustment).
4. Smartphone Macro Lenses
Modern smartphones can produce excellent micro images using clip-on lenses. Popular options include:
- Moment Macro 10x Lens
- Apexel 5-in-1 Macro Kit
- Xenvo Pro Lens Kit
Many mobile photographers create stunning micro photography portfolios using these attachments and good lighting.
Supporting Equipment for Better Stability and Lighting
Capturing razor-sharp details in micro lens photography isn’t just about the lens. Stability and lighting play crucial roles.
Tripods
A sturdy tripod eliminates the smallest shakes that can ruin a close-up shot.
- Look for tripods with flexible legs or adjustable heads for precise positioning.
- Recommended models: Manfrotto Befree Advanced, Joby GorillaPod, Benro Slim Travel Tripod.
Focusing Rails
Micro focusing rails let you move your camera forward or backward in millimeter increments, ensuring perfect focus for small subjects — especially useful for focus stacking.
Remote Shutter Release
Even pressing your shutter button can create micro vibrations. Use:
- A wired remote or
- A wireless trigger
to eliminate movement and improve sharpness.
Lighting Tools
Lighting is everything in micro lens photography. Because you’re so close to the subject, even small shadows or highlights can dominate your frame.
| Lighting Tool | Use Case | Benefit |
| Ring Light | Even illumination for small objects | Reduces harsh shadows |
| LED Panel | Adjustable light source | Portable and easy to position |
| Flash Diffuser | Softens direct flash | Prevents overexposed highlights |
| Reflector Card | Bounces light into dark areas | Adds dimension and texture |
Lighting Tip:
Use diffused natural light from a window whenever possible. It provides soft, balanced illumination ideal for delicate subjects like petals or insects.
Optional but Useful Accessories
Here are a few accessories that can significantly improve your workflow:
- Macro Rails: For stacking focus layers precisely.
- Portable Light Tents: For product or jewelry photography.
- Lens Hoods: Reduce glare from side lighting.
- Mini Tripods or Table Clamps: Great for indoor setups.
- Cleaning Kit: Dust particles show up clearly in micro photography — keep your lens spotless!
Example Gear Setup (Beginner to Pro)
| Level | Recommended Setup | Estimated Cost |
| Beginner | Smartphone + clip-on macro lens + small ring light | $50–$150 |
| Intermediate | DSLR/Mirrorless + 90mm micro lens + tripod + LED panel | $800–$1,500 |
| Professional | Full-frame camera + 105mm pro lens + focusing rail + macro flash kit | $2,500+ |
Case Study: Budget vs. Pro Setup Comparison
| Criteria | Budget Setup (Smartphone + Lens Kit) | Professional Setup (DSLR + 105mm Micro) |
| Detail Sharpness | Good for web use | Excellent for prints and commercial work |
| Depth of Field Control | Limited | Full manual control |
| Lighting Options | Natural or small LED | Full lighting kits and modifiers |
| Ease of Use | Very portable | Requires more setup and experience |
| Cost | Under $150 | $2,000+ |
Conclusion:
Even with minimal gear, you can achieve beautiful close-up results — what matters most is your understanding of light, focus, and patience. As your passion grows, investing in dedicated micro lenses and accessories will elevate your results exponentially.
Camera Settings for Sharp Micro Lens Photography
One of the biggest challenges in micro lens photography is getting tack-sharp, well-exposed images. When you shoot close-up subjects, even the slightest movement, wrong aperture, or poor lighting can ruin an otherwise perfect shot. Unlike regular photography, micro photography requires precise control over every camera setting — aperture, shutter speed, ISO, and focus — to capture the subject in stunning detail.
In this section, we’ll break down the optimal camera settings for shooting micro subjects, plus professional tips for balancing light, sharpness, and depth of field.
Aperture and Depth of Field
The aperture (f-stop value) controls how much light enters your lens and how much of your image is in focus. In micro lens photography, this setting is critical because depth of field (DOF) becomes extremely shallow when shooting close-up — sometimes just a few millimeters thick.
Here’s a quick reference for how aperture affects depth of field and sharpness:
| Aperture (f-stop) | Depth of Field | Recommended Use |
| f/2.8 – f/4 | Very shallow | Artistic shots, blurred backgrounds |
| f/5.6 – f/8 | Balanced sharpness and blur | Ideal for most micro photography |
| f/11 – f/16 | Deeper DOF, less light | Great for detailed subjects and focus stacking |
| f/18+ | Too narrow, possible diffraction | Avoid unless necessary |
Pro Tip:
Start at f/8 — it’s the sweet spot for most micro lenses, balancing sharpness and depth of field without diffraction.
Understanding Diffraction
When you use a very small aperture (like f/22), light bends slightly as it passes through the tiny opening, reducing image sharpness. This effect is called diffraction, and it’s especially noticeable in micro photography, where precision detail is key.
So, instead of closing down too much, aim for a mid-range aperture (f/8–f/11) and use focus stacking (combining multiple images with different focus points) to achieve greater overall sharpness.
Shutter Speed and Stability
Because micro lens photography magnifies even the smallest movements, camera shake is your biggest enemy. A minor vibration that’s invisible in portrait photography can blur your entire micro shot.
Shutter Speed Guidelines
| Scenario | Recommended Shutter Speed | Notes |
| Handheld shots | 1/200 sec or faster | Helps counteract hand movement |
| Tripod with still subject | 1/60 – 1/125 sec | Stable base allows slower speeds |
| Moving insects or plants in wind | 1/250 – 1/500 sec | Freezes motion effectively |
Expert Advice:
Always turn on your camera’s mirror lock-up or electronic front curtain shutter if available — it minimizes internal vibration during the shot.
How to Prevent Shake
- Use a tripod or focusing rail for static subjects.
- Trigger the shutter with a remote release or camera app.
- Enable image stabilization (VR/IS/OSS) if your lens supports it.
- When shooting handheld, tuck your elbows and control your breathing before pressing the shutter.
A good rule of thumb for handheld shooting is:
Shutter Speed = 1 / (Focal Length × Crop Factor)
So if you’re using a 100mm lens on an APS-C camera (crop factor 1.5), try shooting at 1/160 sec or faster.
ISO and Lighting Considerations
The ISO controls your camera’s sensitivity to light. In micro lens photography, lighting can be tricky since you’re often blocking natural light by being so close to your subject. Raising ISO helps brighten the image — but it can also introduce digital noise that reduces clarity.
| ISO Range | Result | Use When |
| ISO 100–400 | Clean, low noise | Bright daylight or controlled lighting |
| ISO 800–1600 | Moderate noise, still usable | Low light with handheld shooting |
| ISO 3200+ | High noise, loss of detail | Only if absolutely necessary |
Lighting Tip:
Always prioritize adding more light (with an LED panel, ring light, or flash) over increasing ISO. Proper lighting keeps ISO low and detail crisp.
Using Natural vs. Artificial Light
- Natural Light: Soft and diffused light from a window or overcast sky is ideal for delicate subjects like flowers or fabrics.
- Artificial Light: Use adjustable LED panels or ring flashes to control direction and intensity, especially for indoor or product photography.
- Diffusers: Always soften harsh light sources — harsh reflections can destroy detail at close range.
“In macro and micro photography, light is your paintbrush — it defines every tiny ridge and curve. Control it, and you control the story.”
— Elena Krawczuk, Nature Macro Photographer
White Balance and Color Accuracy
At close distances, even slight color shifts can affect the realism of your photo. For instance, indoor lighting may produce a warm orange cast, while LED lights can make colors look cool and sterile.
Best Practices for Accurate Color
- Set white balance manually or use a gray card for reference.
- If shooting RAW, adjust white balance later in post-processing.
- Match the color temperature of all light sources (don’t mix daylight with tungsten bulbs).
| Light Type | Approx. Temperature (Kelvin) | WB Preset |
| Daylight | 5200–5600K | Daylight |
| Shade | 6000–6500K | Cloudy |
| Tungsten Bulb | 2800–3200K | Incandescent |
| LED Panel | 4000–5600K | Custom / Auto |
Recommended Settings for Common Micro Photography Scenarios
| Subject Type | Aperture | Shutter Speed | ISO | Lighting Tip |
| Still Object (Jewelry, Coins) | f/8 | 1/125 sec | ISO 100 | LED ring light or softbox |
| Flowers (Outdoors) | f/11 | 1/250 sec | ISO 200 | Diffused daylight |
| Insects (Handheld) | f/8 | 1/400 sec | ISO 400–800 | Flash with diffuser |
| Textures / Fabrics | f/5.6 | 1/160 sec | ISO 100 | Natural window light |
| Water Droplets / Abstracts | f/16 | 1/200 sec | ISO 200 | Use off-camera flash for highlights |
Bonus: Histogram and Exposure Check
When shooting micro lens photos, it’s easy to overexpose highlights or underexpose shadows — especially when dealing with shiny or reflective surfaces.
Always check your histogram (the graph on your camera display) after each shot.
Quick Histogram Guide:
- A balanced curve (peaks in the middle) = correct exposure
- A spike on the left = underexposed (too dark)
- A spike on the right = overexposed (too bright)
This quick check ensures you capture every delicate tone and texture — without losing information in blown-out whites or crushed blacks.
Key Takeaway
For the sharpest micro lens photography, aim to:
- Use f/8–f/11 for optimal depth of field.
- Keep shutter speed fast enough to avoid shake.
- Maintain low ISO (100–400) for clean detail.
- Control lighting carefully — never rely on ISO to brighten the image.
With the right settings, even the smallest subjects will shine in razor-sharp clarity and balanced light.
Focusing Techniques in Micro Lens Photography
In micro lens photography, achieving precise focus is often the hardest part. When you’re magnifying subjects at a 1:1 ratio, the depth of field (DOF) becomes incredibly shallow — sometimes less than a millimeter. Even a tiny movement or breath can shift the focus completely off the subject.
That’s why understanding and mastering focus is one of the most essential skills for any micro photographer. The sharper your focus, the more breathtaking and lifelike your close-up images will appear.
Manual vs. Autofocus — Which Is Better for Micro Lens Photography?
When shooting normal subjects, autofocus is fast, convenient, and reliable. But in micro lens photography, autofocus often struggles to find the correct focal plane — especially when you’re only a few centimeters away from your subject.
Manual Focus Advantages
Manual focusing gives you full control over what part of the image appears sharp, allowing you to fine-tune focus precisely on the area you want.
Benefits:
- Perfect accuracy on tiny focal points (like an insect’s eye or a droplet edge).
- No “hunting” issues that occur with autofocus in low light or low contrast.
- Easier to use with a tripod or focusing rail setup.
Manual Focus Tips:
- Use Live View mode and zoom in digitally (5x or 10x) to see fine details.
- Turn off autofocus assist lights, which can confuse the system at close range.
- Slightly rock the camera back and forth to nail focus on extremely shallow DOFs.
- Focus on the most important feature of your subject — e.g., eyes for insects, center of a flower, texture pattern, etc.
When to Use Autofocus
Autofocus can still be useful when:
- Shooting moving subjects (e.g., flying insects or wind-blown plants).
- Using modern cameras with hybrid AF systems that detect contrast and phase simultaneously.
- Leveraging focus tracking modes on high-end mirrorless cameras (like Sony’s Real-Time Tracking or Canon’s Dual Pixel AF).
Pro Tip:
For handheld macro shots, use Continuous AF (AF-C) with focus limiter turned on. This reduces hunting and keeps the lens focused within a short range.
Using Focus Peaking (For Mirrorless Cameras)
Many mirrorless cameras feature focus peaking, which highlights in-focus edges in a bright color (red, yellow, or white). This is a game-changer for micro photography, as it visually confirms which part of the subject is in sharp focus.
How to Use Focus Peaking Effectively:
- Enable focus peaking in your camera menu.
- Choose a medium sensitivity level — too high may highlight too much.
- Select a peaking color that contrasts with your subject (e.g., red for green plants).
- Zoom in using your LCD to double-check critical focus before capturing.
Focus Stacking — The Secret to Perfect Sharpness
Even at f/16, the depth of field in micro lens photography can be too thin to capture your entire subject in focus. That’s where focus stacking comes in.
Focus stacking involves taking multiple shots at slightly different focus points, then merging them into one image where everything is sharp from front to back.
How to Do Focus Stacking Step-by-Step
1. Set Up Your Camera:
- Mount your camera on a tripod or macro rail for stability.
- Use manual focus and turn off image stabilization.
- Set your aperture to f/8–f/11 for the best optical sharpness.
2. Capture a Series of Shots:
- Start focusing on the nearest point of your subject.
- Gradually shift focus slightly deeper into the scene after each shot.
- Take 10–50 images depending on subject depth.
3. Merge the Images:
Use stacking software such as:
- Adobe Photoshop → Auto-Blend Layers > Stack Images
- Helicon Focus (popular for professional stacking)
- Zerene Stacker (excellent for complex organic textures)
Example: Focus Stacking in Practice
A photographer captures a ladybug on a leaf:
- 20 images taken, each with 0.3mm focus shift.
- Software merges them into one final photo.
- Result: Entire ladybug, leaf, and droplets are tack-sharp — with beautiful bokeh in the background.
| Step | Image Count | Focus Plane | Final Result |
| Before stacking | 1 | Limited (only eyes in focus) | Shallow DOF |
| After stacking | 20 | Front to back | Crisp details throughout |
Using Focusing Rails for Precision
A focusing rail is a must-have accessory for serious micro photographers. It allows micro-adjustments by sliding your camera forward or backward by fractions of a millimeter — without changing your composition.
Benefits of Using a Focusing Rail:
- Precise focus adjustment for stacking.
- Avoids touching the lens, reducing camera shake.
- Maintains consistent framing.
- Enables repeatable focus shifts for scientific or commercial work.
Recommended Models:
- Neewer 4-Way Macro Focusing Rail
- Manfrotto 454 Micro Positioning Plate
- Novoflex Castel-Q
Pro Insight:
For stacking 20+ shots, use a motorized focusing rail. Brands like StackShot automate micro adjustments, saving hours of manual refocusing.
Dealing with Movement in Micro Photography
Even the smallest breeze or vibration can throw your subject out of focus. To overcome this:
- Block wind with a diffuser or clear plastic shield when shooting outdoors.
- Use clamps or holders to stabilize flowers or branches.
- For living subjects (like insects), shoot early in the morning when they are less active.
- Increase shutter speed or use flash to freeze motion.
Pro Hack for Moving Subjects
Use burst mode with continuous shooting — take a short burst of 5–10 frames while slowly shifting focus. Later, you can pick the sharpest frame or stack them selectively.
Common Focusing Mistakes to Avoid
| Mistake | Why It Happens | Fix |
| Focusing on the wrong plane | Shallow DOF makes autofocus miss | Switch to manual focus |
| Camera shake | Touching camera or unstable tripod | Use remote shutter or delay timer |
| Inconsistent stacking steps | Uneven focus shift between shots | Use focusing rail or software with automatic increments |
| Over-reliance on autofocus | AF can’t lock on fine details | Use Live View and manual zoom focusing |
Case Study: How Manual Focus Improved Results
A jewelry photographer, Eliza Tran, struggled with blurry gemstone edges when using autofocus. After switching to manual focus with focus peaking and a focusing rail, she achieved 30% sharper images and reduced editing time by half.
“The difference was night and day. Once I started focusing manually, every sparkle and facet came alive.”
— Eliza Tran, Product Photographer
Key Takeaway
In micro lens photography, focus is everything. Even the best lens and lighting can’t save a photo that’s slightly off-focus.
Mastering manual focus, understanding depth of field, and learning focus stacking will transform your close-ups from average to extraordinary.
Remember:
Precision beats speed. Slow down, adjust carefully, and your subject will reward you with stunning micro detail.
Composition Tips for Micro Lens Photography
In micro lens photography, technical mastery is only half the story — composition is what transforms a technically correct image into an emotionally engaging photograph.
Because the frame is often filled with small subjects or textures, composition plays a critical role in leading the viewer’s eye, evoking mood, and creating balance.
Even a tiny shift in angle or framing can change your photo from flat to fascinating. Let’s dive into composition techniques that will help your micro photos stand out.
1. Apply the Rule of Thirds — Even in Tiny Frames
The Rule of Thirds is one of the simplest and most effective compositional tools in micro lens photography.
It divides your frame into a 3×3 grid and suggests placing your subject along the lines or at the intersections — not directly in the center.
Why it works:
Our eyes naturally gravitate toward these intersecting points, creating dynamic balance and tension that makes the image more engaging.
How to apply it in Micro Photography:
- Position an insect’s eye, a flower’s center, or a water droplet along a third-line intersection.
- Leave negative space on one side to give the subject “breathing room.”
- Enable the grid lines on your camera display to help visualize this rule.
Example:
In a macro shot of a butterfly, placing its head on the upper-left intersection draws attention while still revealing the wing patterns — making the image feel alive and natural.
2. Use Leading Lines and Curves
Leading lines are visual pathways that guide the viewer’s eyes through your photo.
In micro lens photography, these can be natural features like the curve of a leaf, the veins of a petal, or the spiral of a shell.
Pro Tips:
- Look for patterns, curves, or lines that lead toward your subject.
- Use shallow depth of field to fade the background and strengthen the subject’s prominence.
- Experiment with diagonal compositions, which often appear more dynamic than horizontal or vertical lines.
| Composition Type | Visual Impact | Best Used For |
| Diagonal Lines | Adds energy and movement | Abstract textures, insects in motion |
| Curved Lines | Feels natural, calming | Petals, shells, water droplets |
| Radial Lines | Draws attention to the center | Flowers, eyes, jewelry |
3. Control the Background
When shooting close-up, backgrounds can quickly become cluttered or distracting — even a single bright spot can ruin the harmony of your image.
The goal in micro lens photography is to make the subject pop while keeping the background soft and complementary.
Background Control Techniques:
- Use a wide aperture (f/2.8–f/5.6) to blur the background.
- Increase distance between subject and background for more separation.
- Place a plain background behind your subject (colored paper, fabric, or even your hand).
- Avoid bright or reflective surfaces that compete for attention.
Quick Hack:
Carry small colored cards (neutral gray, black, pastel) to use as portable backgrounds. They can dramatically change the mood of your photo.
Color Harmony
Choose background colors that contrast or complement your subject:
- Contrast colors (e.g., blue vs. yellow) add energy.
- Complementary colors (e.g., green on green) feel calm and natural.
| Subject Color | Good Background Choices |
| Red | Dark green, gray, or black |
| Yellow | Blue or deep purple |
| Blue | Beige or warm brown |
| White | Black or soft pastels |
4. Experiment with Angles and Perspectives
Most beginners shoot micro subjects from above — but the most striking images come from unusual perspectives.
Try These Angles:
- Eye-Level Angle: For insects, match their eye height. It feels intimate and engaging.
- Low Angle (Looking Up): Makes small subjects appear monumental.
- Side Angle: Enhances shape and texture — great for flowers or textures.
- Top-Down: Ideal for flat objects like coins, fabrics, or patterns.
Pro Insight:
“The best micro photographs are often just a few degrees away from average.” — David Hall, Nature Macro Specialist
Changing your perspective also alters how light interacts with textures — revealing new dimensions and details.
5. Include Context and Scale
Micro lens photography often isolates subjects so much that viewers can’t grasp their size.
Adding a hint of scale or context can help tell a stronger story.
Creative Ways to Add Scale:
- Include part of a recognizable object (like a leaf edge or pencil tip).
- Place the subject next to another smaller or larger element for comparison.
- Use water droplets or reflections to add interest and dimensionality.
Example:
A tiny ant photographed next to a human fingerprint instantly gives scale — and makes the image more relatable.
6. Simplify and Eliminate Distractions
Less is often more in micro photography.
Because your subject already fills most of the frame, extra details can feel chaotic or confusing.
Simplify Your Composition By:
- Using a plain background or soft blur (bokeh).
- Cropping tightly to focus on one interesting feature.
- Removing unnecessary elements before shooting (dust, dirt, stray petals).
- Using spot lighting to highlight only key areas.
Quick Tip:
Use a small brush or air blower to clean your subject — especially for product or jewelry micro photography.
7. Play with Negative Space
Negative space — the empty area around your subject — creates breathing room and balance.
In micro lens photography, this can be used to isolate tiny subjects or emphasize their fragility.
How to Use It:
- Compose your subject in one-third of the frame, leaving the rest softly blurred.
- Use minimal backgrounds (like gradients or soft bokeh).
- Experiment with asymmetry — the imbalance can feel more artistic and intentional.
Example:
A single dew drop suspended on a blade of grass, surrounded by soft green blur, can evoke calmness and simplicity.
8. Highlight Texture and Patterns
One of the most rewarding aspects of micro lens photography is the ability to capture textures invisible to the naked eye — like the ridges of a butterfly’s wing or the surface of a leaf.
Tips to Enhance Texture:
- Use side lighting to emphasize ridges and shadows.
- Increase contrast slightly in post-processing to make patterns pop.
- Combine textures and patterns for abstract or artistic results.
| Lighting Direction | Effect on Texture |
| Front Light | Flat, even exposure |
| Side Light | Strong shadows, high texture |
| Back Light | Silhouette or glowing edges |
“In micro photography, light defines texture — without good light, even the most fascinating subjects fall flat.”
— Lena Yoshida, Scientific Photographer
9. Creative Composition Techniques
Once you master the basics, experiment with creative composition strategies that add visual interest and storytelling elements.
Try These Ideas:
- Reflection Photography: Capture mirrored images in water droplets.
- Symmetry: Frame perfectly balanced subjects like snowflakes or petals.
- Framing: Use surrounding elements (like leaves or stems) to naturally frame your subject.
- Repetition: Capture repeating patterns — especially in abstract textures or fabrics.
10. Analyze and Learn from Your Shots
After each session, review your photos critically:
- Which angles and compositions worked best?
- Did your background distract or enhance the subject?
- Was the focus point effective for drawing attention?
Compare your images with top-ranking micro photography examples on platforms like 500px, Flickr, and Instagram.
Study their compositions — not to copy, but to understand how framing, lighting, and perspective work together.
Key Takeaway
In micro lens photography, great composition isn’t just about arranging elements — it’s about telling a story in miniature.
By mastering rules like the Rule of Thirds, controlling backgrounds, and experimenting with angles, you can create powerful, visually striking images that resonate with viewers.
Remember:
The best composition makes viewers forget they’re looking at something small — and instead, feel like they’re stepping into another world.
Lighting Techniques for Micro Lens Photography
In micro lens photography, light is everything. It defines form, texture, and depth. It separates your subject from the background and transforms simple details into works of art.
Unlike standard photography, lighting in micro lens photography must be carefully controlled, diffused, and directed — because at such small scales, even a tiny shadow or glare can overwhelm your subject.
This section breaks down the best lighting techniques, tools, and strategies for mastering micro photography lighting — whether you shoot indoors, outdoors, or in a studio.
1. Understanding the Importance of Light in Micro Photography
Every photograph begins with light — but in micro photography, the challenge is getting enough of it.
When your lens is close to the subject, less ambient light reaches the sensor. The result? Underexposed or noisy images if lighting isn’t managed well.
Why Lighting Is Harder in Micro Photography
- The working distance (space between lens and subject) is small, often blocking natural light.
- Apertures are smaller (f/8–f/16) for greater depth of field, which reduces brightness.
- Movement and reflections become more noticeable.
That’s why dedicated lighting tools — like LED panels, ring lights, and diffusers — are essential for creating soft, even illumination.
Pro Quote:
“Light is the brush that paints your micro world. Without it, you’re just guessing at the beauty hiding in the shadows.”
— Elena Brooks, Nature Micro Photographer
2. Natural Light vs. Artificial Light
Both natural and artificial light can work beautifully in micro lens photography — the choice depends on your subject, location, and creative intent.
Natural Light
Soft, diffused sunlight is ideal for delicate subjects like flowers, plants, and insects.
Advantages:
- Natural color rendering.
- Free and widely available.
- Gentle contrast that flatters organic textures.
Best Practices:
- Shoot during golden hours (early morning or late afternoon) for warm tones.
- Use overcast skies as a natural diffuser.
- If sunlight is too harsh, use a thin white cloth or translucent diffuser to soften it.
Artificial Light
Artificial lighting gives you control and consistency — great for indoor or product-based micro photography.
Common Tools:
- LED Panels: Adjustable brightness and color temperature.
- Ring Lights: Even, shadow-free lighting around the lens.
- Macro Flashes: Directional control with diffusers for highlights and shadows.
| Light Source | Pros | Cons |
| Natural Light | Soft and flattering, realistic tones | Limited control, changes quickly |
| LED Panels | Adjustable and portable | May cause specular reflections |
| Ring Lights | Uniform illumination, compact | Can create flat, shadowless images |
| Flash (Speedlight/Macro Flash) | Powerful, freezes motion | Can produce harsh light if not diffused |
Tip:
For beginners, a combination of LED panels + diffusers gives flexible control and natural results.
3. Using Diffusers to Soften Light
In micro lens photography, harsh lighting creates overexposed highlights and unnatural reflections. A diffuser spreads light evenly, reducing contrast and preserving delicate detail.
Types of Diffusers You Can Use:
- Softboxes — Great for larger light sources or product photography.
- DIY Diffusers — Use parchment paper, white cloth, or translucent plastic.
- Clip-on Lens Diffusers — Designed specifically for ring flashes or macro flashes.
DIY Tip:
Cut a small square from a milk jug — it makes an excellent, portable diffuser for close-up subjects!
Why Diffused Light Works
- Eliminates harsh shadows.
- Maintains surface texture without glare.
- Enhances depth and natural tone.
| Lighting Type | Texture Quality | Shadow Character | Use Case |
| Direct Light | Harsh, reflective | Sharp shadows | High-contrast artistic effects |
| Diffused Light | Soft, smooth | Gentle shadows | Natural, realistic details |
4. Controlling Light Direction
The direction of light changes the entire mood and appearance of a micro photograph.
Even a slight shift can emphasize different features — like edges, shapes, or surface patterns.
Lighting Directions in Micro Photography:
- Front Lighting: Illuminates evenly, good for documentation or technical shots.
- Side Lighting: Enhances texture and dimension by creating shadows.
- Back Lighting: Highlights translucency (great for petals or leaves).
- Top Lighting: Adds a dramatic, spotlight effect.
| Direction | Visual Effect | Best For |
| Front | Flat, detailed | Coins, jewelry, textures |
| Side | Depth, texture | Leaves, insects, fabrics |
| Back | Glow, translucence | Petals, glass, water |
| Top | Emphasis and contrast | Product highlights |
Pro Insight:
“Side lighting reveals the microscopic mountains and valleys that make texture come alive.” — Mark Devereaux, Product Photographer
5. Using Reflectors for Fill Light
Reflectors help bounce light back onto the subject, brightening shadows without adding another light source.
They are perfect for controlling contrast and maintaining a natural look.
Common Reflector Colors and Their Effects:
| Reflector Type | Effect on Image | Best For |
| White | Neutral, soft fill | Natural color correction |
| Silver | Bright, cool-toned reflection | Enhances detail, adds contrast |
| Gold | Warm, sunny tone | Skin tones, warm objects |
| Black | Reduces reflection | Adds drama and depth |
You can even make your own reflector using aluminum foil, white card, or gold wrapping paper.
Experiment with angles — moving the reflector even an inch can dramatically change the lighting balance.
6. Using Ring Lights and Macro Flashes
Ring Lights
Ring lights are circular lights that attach around your lens, providing even, shadowless illumination. They’re perfect for beginners or small stationary subjects like jewelry and flowers.
Benefits:
- Uniform light with minimal shadows.
- Easy to use and attach.
- Works well for handheld shooting.
Drawbacks:
- Can make lighting too flat for subjects needing texture emphasis.
Macro Flashes
Dedicated macro flashes (like the Canon MR-14EX or Nikon R1C1) offer directional control, letting you light one side more strongly than the other for depth.
Advantages:
- Freeze motion of fast-moving subjects.
- Adjustable power and angle for creative lighting.
- Compatible with most micro lenses.
Pro Setup Suggestion:
Use a macro twin flash with diffusers on each head at 45° angles — this setup provides both texture and realism.
7. Creative Lighting Techniques
Once you master the basics, experiment with creative lighting setups to add drama, storytelling, and emotion to your images.
Ideas to Try:
- Colored Gels: Add mood by placing colored film over your light source.
- Backlit Droplets: Illuminate water droplets from behind for glowing reflections.
- Low-Key Lighting: Use a single light source and dark background for mystery.
- High-Key Lighting: Bright, minimal shadows for clean and airy compositions.
- Cross Lighting: Two lights from opposite sides to reveal 3D texture.
“Play with shadows as much as light — the balance between them defines artistry in micro photography.”
— Nadia Moore, Studio Photographer
8. Lighting Setup Examples
| Setup Type | Equipment Used | Description | Result |
| Soft Diffused | LED panel + diffuser | Light angled 45° from side | Natural texture and color |
| Ring Light | LED ring around lens | Direct frontal light | Even illumination, no shadows |
| Twin Flash | Dual flashes + diffusers | Light from both sides | Enhanced depth and crisp detail |
| Backlight | LED behind subject | Illuminates edges and translucence | Ethereal glow |
| Reflector Fill | LED + white reflector | Bounces light into shadows | Balanced contrast |
9. Managing Reflections and Glare
Reflective surfaces — like metal, glass, or water — can easily blow out highlights in micro lens photography.
To control glare:
- Use cross-polarization (polarizing filter on both light and lens).
- Adjust your light angle — move slightly until glare disappears.
- Apply diffusion for softer reflection.
- Avoid placing lights directly in front of shiny subjects.
10. Light and Color Temperature
Color temperature affects how your micro photos feel emotionally.
Measured in Kelvin (K), it determines whether the image appears warm or cool.
| Light Source | Color Temp (K) | Visual Effect |
| Candlelight | 1800–2500K | Very warm, orange tones |
| Tungsten Bulb | 2800–3200K | Warm white |
| Daylight | 5000–5500K | Neutral white |
| Cloudy Sky | 6000–6500K | Slightly cool |
| LED Panel (adjustable) | 3200–5600K | Custom control |
Tip: Always set your white balance manually or shoot RAW for precise color correction in post.
Key Takeaway
In micro lens photography, light defines the story. Whether you’re working with natural sunlight, LED panels, or specialized flashes, controlling intensity, direction, and softness separates professional results from amateur attempts.
To recap:
- Use diffused light for soft, natural details.
- Experiment with angles to reveal texture.
- Balance your light using reflectors and macro flashes.
- Master both technical control and creative expression — because every subject, no matter how small, deserves to be seen in its best light.
Equipment and Accessories for Micro Lens Photography
In micro lens photography, your creativity depends not only on skill and technique — but also on the right equipment. Because you’re working at extremely close distances, even the slightest vibration, misfocus, or lighting issue can ruin a shot.
The right tools make it easier to control stability, focus accuracy, lighting, and composition — and they open up new creative possibilities.
Below is a complete guide to the essential and optional gear for capturing professional-quality micro images.
1. Micro Lenses — The Heart of Micro Photography
The most important piece of gear is, of course, the micro lens (sometimes referred to as a macro lens). These lenses allow you to reproduce subjects at life-size (1:1 magnification) or greater, revealing fine details invisible to the naked eye.
Recommended Focal Lengths
| Focal Length | Working Distance | Best For |
| 35mm–60mm | Short | Stationary subjects, product photography |
| 90mm–105mm | Medium | Flowers, insects, versatile all-around choice |
| 150mm–200mm | Long | Skittish insects, outdoor nature photography |
Pro Tip:
A longer focal length (like 150mm) gives more working distance — keeping you farther from subjects like insects while maintaining full magnification.
Top Micro Lenses by Brand
| Camera Brand | Recommended Lens | Key Feature |
| Canon | EF 100mm f/2.8L IS USM Macro | Hybrid IS, sharp optics |
| Nikon | AF-S 105mm f/2.8G VR | Vibration reduction |
| Sony | FE 90mm f/2.8 G OSS Macro | Optical stabilization |
| Fujifilm | XF 80mm f/2.8 R LM OIS WR Macro | Weather-sealed |
| Sigma / Tamron | 105mm f/2.8 Macro | Budget-friendly, professional quality |
Note: “Micro” and “Macro” are often used interchangeably. Nikon calls its macro lenses “Micro-NIKKOR,” but the principle is the same.
2. Camera Bodies for Micro Lens Photography
You can create incredible micro shots with nearly any modern camera, but certain features make the process much easier.
Ideal Camera Features:
- High resolution sensor (24MP+) — captures more detail for cropping.
- Live View with focus peaking — critical for precise manual focusing.
- Low noise at high ISO — helpful in low light.
- Tilting LCD screen — makes shooting at awkward angles more comfortable.
- Electronic shutter — eliminates vibration caused by mechanical shutter movement.
Recommended Cameras:
| Level | Camera Model | Notes |
| Beginner | Canon EOS R50 / Nikon Z50 | Compact, affordable mirrorless options |
| Intermediate | Sony A6700 / Fujifilm X-T5 | Excellent image quality and focus aids |
| Professional | Canon R5 / Nikon Z8 / Sony A7R V | High resolution and stabilization |
Expert Insight:
Mirrorless cameras are now preferred for micro photography because of focus peaking and silent shooting, making it easier to capture fine details without vibration.
3. Tripods — Stability Is Everything
At high magnification, even the tiniest camera shake looks like an earthquake. A stable tripod is your best friend in micro photography.
What to Look For:
- Adjustable height and angles — for low-level shots.
- Ball head or geared head — for fine-tuned positioning.
- Light but sturdy material — carbon fiber is ideal.
| Type | Pros | Ideal For |
| Standard Tripod | Great stability | Studio, controlled environments |
| Mini Tripod | Portable, compact | Outdoor, ground-level shots |
| Flexible Tripod (e.g., GorillaPod) | Attaches to surfaces | Creative angles, field work |
Pro Tip:
Hang a weight or camera bag from the tripod center hook for extra stability in windy conditions.
4. Focusing Rails — Precision Control for Sharp Focus
When you’re focusing at microscopic levels, even turning the focus ring can cause the subject to shift out of frame.
A focusing rail allows you to move the camera forward and backward with micrometer precision — essential for focus stacking.
Best Features to Look For:
- Smooth, fine adjustment knobs.
- Sturdy construction (metal, not plastic).
- Compatibility with your tripod and quick-release plates.
Top Recommended Focusing Rails:
| Model | Feature | Price Range |
| Neewer 4-Way Macro Rail | Affordable, dual-axis | $50–$80 |
| Manfrotto 454 | High precision, durable | $150–$200 |
| Novoflex Castel-Q | Professional-grade accuracy | $400+ |
| StackShot Automated Rail | Motorized focus stacking | $800+ |
Bonus:
For scientific or product photography, a motorized focusing rail automates stacking with millimeter-perfect focus steps.
5. Lighting Gear — Illuminate Every Detail
Lighting can make or break a micro shot. We covered lighting techniques earlier, but here’s the gear that helps you execute them effectively.
Must-Have Lighting Tools:
- LED Ring Lights – Soft, even light ideal for stationary subjects.
- Twin Macro Flash Kits – Powerful and adjustable for natural shadows.
- Diffusers and Reflectors – Soften harsh light and reduce glare.
- Mini LED Panels – Flexible and portable for field work.
| Tool | Best For | Example |
| Ring Light | Jewelry, products | Neewer 48 LED Ring Light |
| Twin Flash | Insects, flowers | Godox MF12 or Nikon R1C1 |
| Softbox Diffuser | Studio setups | SmallRig RC60 Diffuser |
| Reflector Kit | Balancing light | 5-in-1 Portable Reflector |
Lighting Tip:
Pair your lights with color temperature control (around 5500K daylight balance) for accurate colors.
6. Remote Shutters and Timers
Pressing the shutter button can introduce vibration that blurs your photo — even on a tripod.
That’s why remote shutters or self-timers are essential tools for micro lens photography.
Options:
- Wired Remote — Direct control, no delay.
- Wireless Remote — Perfect for long exposures.
- Smartphone App — Many modern cameras support remote capture through Wi-Fi.
Alternative:
Use your camera’s 2-second delay timer — simple, effective, and free.
7. Additional Helpful Accessories
A few more tools can significantly improve both your results and your workflow.
| Accessory | Purpose | Recommendation |
| Plamp (Plant Clamp) | Holds flowers steady outdoors | Wimberley Plamp II |
| Lens Hood | Prevents glare and protects front element | Brand-specific |
| Extension Tubes | Increase magnification without buying a new lens | Kenko Auto Extension Tube Set |
| Portable Reflector | Adds fill light outdoors | 12-inch collapsible model |
| Air Blower / Cleaning Kit | Removes dust from subjects | Giottos Rocket Blower |
| Portable Backgrounds | Simplifies backdrop control | Foldable color cards |
Pro Workflow Tip:
Keep a micro photography toolkit bag ready — including diffusers, cleaning cloths, batteries, and memory cards. It saves setup time during outdoor sessions.
8. Equipment Setup Example
Here’s a sample professional micro photography setup:
| Component | Model | Purpose |
| Camera | Sony A7R V | High-resolution sensor |
| Lens | Sony FE 90mm f/2.8 Macro | Versatile working distance |
| Tripod | Manfrotto BeFree Carbon | Stability |
| Focusing Rail | Novoflex Castel-Q | Micro precision focus |
| Lighting | Godox MF12 Twin Flash + Diffuser | Controlled illumination |
| Remote Trigger | Sony Bluetooth Remote | Vibration-free shutter |
Result: Razor-sharp details, natural lighting, and repeatable precision — perfect for professional work or fine art projects.
9. Budget vs. Professional Micro Photography Kits
You don’t need to spend thousands to start. Here’s how to build your setup based on budget level.
| Category | Essential Gear | Est. Cost |
| Beginner ($300–$600) | Entry-level DSLR or mirrorless + extension tubes + mini tripod | Affordable start |
| Intermediate ($800–$1500) | Dedicated micro lens + LED light kit + sturdy tripod | Balanced performance |
| Professional ($2000+) | High-res mirrorless camera + twin flash + focusing rail | Maximum precision |
Tip for Beginners:
Start simple. Even with a kit lens and extension tubes, you can create incredible micro photos. Upgrade only when you hit technical limits.
Key Takeaway
In micro lens photography, equipment is not about luxury — it’s about precision and control.
The right gear helps you stabilize, focus, and light your subject with scientific accuracy and artistic freedom.
To recap:
- Start with a dedicated micro lens and sturdy tripod.
- Add lighting tools and focusing rails as you progress.
- Invest in accessories that reduce vibration and improve workflow.
“Your gear doesn’t take the photo — but the right gear helps you take the photo you imagine.”
— Rafael Kimura, Micro Lens Expert
Post-Processing Tips for Micro Lens Photography
Even the most perfectly shot micro lens photograph can benefit from a bit of digital polishing. Because micro photography captures extreme detail, post-processing plays a vital role in refining clarity, depth, and color — while keeping the image true to life.
Whether you’re shooting insects, jewelry, or abstract textures, post-processing helps transform your raw captures into professional-quality art.
Let’s explore the essential steps and tools for editing micro images like a pro.
1. The Importance of Post-Processing in Micro Lens Photography
Micro photography reveals textures, colors, and details invisible to the naked eye — but the camera sensor doesn’t always reproduce them accurately.
Common raw image issues include:
- Uneven lighting or shadows.
- Dust spots or sensor blemishes.
- Limited depth of field causing soft focus areas.
- Color shifts from artificial lighting.
Post-processing corrects these issues while emphasizing your image’s subject. Think of it as fine-tuning — not over-editing.
Golden Rule:
Great editing enhances what’s already there — it doesn’t “fix” a poor photo.
2. Recommended Software for Micro Photography Editing
There are several professional tools ideal for editing micro images. Some specialize in focus stacking, while others handle color grading and sharpening.
| Software | Key Features | Best For |
| Adobe Lightroom Classic | Color correction, noise reduction, exposure control | General editing workflow |
| Adobe Photoshop | Advanced retouching, layering, focus stacking | Detailed enhancement |
| Helicon Focus | Dedicated focus stacking tool | Macro and micro image focus blending |
| Zerene Stacker | Professional focus stacking and fine detail rendering | Scientific and product photography |
| Affinity Photo | Affordable Photoshop alternative | Budget-friendly, powerful editing |
| Capture One Pro | Precise color control | Product and commercial photographers |
Pro Tip:
Use Lightroom for global adjustments, then export to Photoshop or Helicon Focus for detailed edits and stacking.
3. Workflow Overview: From RAW to Final Image
Here’s a simple yet effective editing workflow for micro lens photography:
Step 1: Import and Organize
- Import your RAW files into Lightroom or Capture One.
- Rename and categorize shots based on subject or lighting setup.
- Apply camera calibration profiles for accurate color.
Step 2: Crop and Straighten
- Crop to enhance composition or eliminate distractions.
- Use the rule of thirds or symmetry depending on your subject.
Step 3: Adjust Exposure and White Balance
- Fine-tune exposure to maintain natural brightness.
- Correct white balance to match daylight or artificial light.
- Avoid overexposing highlights — micro details can easily be lost.
Step 4: Enhance Texture and Clarity
Micro photography benefits from subtle contrast boosts:
- Use Texture and Clarity sliders in moderation (+10 to +20).
- Avoid excessive sharpening early in the workflow — it amplifies noise.
Step 5: Correct Colors and Vibrance
- Adjust HSL sliders (Hue, Saturation, Luminance) for precise control.
- Use Vibrance instead of Saturation to preserve natural tones.
- Keep background colors muted to emphasize the main subject.
Step 6: Remove Imperfections
- Zoom in to 100% and use the Healing or Clone tool for dust, scratches, or sensor spots.
- Be careful not to over-retouch textures like insect wings or flower petals — detail is part of the charm.
Step 7: Sharpen and Reduce Noise
At high magnifications, even the best cameras produce noise.
- Apply Detail Sharpening in Lightroom (~Amount 60–80).
- Mask sharpening to affect only subject edges (hold Alt while dragging Masking slider).
- Apply Luminance Noise Reduction (10–30) for smoother backgrounds.
4. Focus Stacking for Extended Depth of Field
Depth of field in micro lens photography is razor-thin — sometimes less than a millimeter. To keep your entire subject sharp, you can use a technique called focus stacking.
How Focus Stacking Works
- Take multiple photos of the same subject, each focused at slightly different distances.
- Combine (stack) these images using software to merge the sharpest areas from each shot.
- The result: one fully in-focus image from front to back.
Recommended Stacking Software:
| Software | Features | Ease of Use |
| Helicon Focus | Fast, automatic alignment | ★★★★★ |
| Zerene Stacker | Precise control for professionals | ★★★★☆ |
| Photoshop | Built-in stacking function | ★★★☆☆ |
Focus Stacking Steps (Photoshop Example):
- Import all focused images as layers.
- Select all layers → Edit > Auto-Align Layers.
- Then choose Edit > Auto-Blend Layers > Stack Images.
- Flatten the result and fine-tune using masks or cloning.
Pro Tip:
Use a focusing rail when capturing stack sequences. It helps maintain framing consistency between shots.
5. Enhancing Detail and Depth
Once your stacked image is ready, you can emphasize micro textures for a 3D effect:
- Add micro-contrast using “Dehaze” or “Clarity.”
- Use Dodge & Burn tools to highlight and shadow selectively.
- Apply High-Pass Sharpening (radius 1–2px) on a duplicate layer for fine details.
Tip: Always zoom in to 100% or more while editing micro shots — what looks good at fit-to-screen may appear over-processed up close.
6. Color Grading and Artistic Style
Post-processing isn’t just technical — it’s also creative.
Once your image is corrected, experiment with color tones and moods that enhance the story.
Color Grading Ideas:
- Cool tones (blue/green): Calm, scientific, or minimalistic feel.
- Warm tones (yellow/red): Natural, organic, or emotional style.
- Monochrome (black & white): Highlights structure and texture.
You can use Lightroom’s Color Grading panel or Photoshop’s Gradient Maps to apply subtle tints.
7. Final Touches and Export Settings
Before publishing or printing your image:
Checklist:
- ✅ Verify sharpness at 100%.
- ✅ Inspect for dust spots.
- ✅ Confirm color balance under different screens.
- ✅ Add watermark or signature if desired.
Export Settings for Web:
| Setting | Recommended Value |
| Format | JPEG, sRGB |
| Quality | 80–90% |
| Resolution | 2048px longest side |
| Sharpening | Standard for Screen |
| Metadata | Include copyright only |
Export Settings for Print:
| Setting | Recommended Value |
| Format | TIFF |
| Color Profile | Adobe RGB or ProPhoto RGB |
| Resolution | 300 DPI |
| Sharpening | Standard for Print |
Quick Tip:
Always keep your original RAW and stacked files backed up — micro photography edits are complex and often need revisiting.
8. Before and After Example
| Stage | Description | Example Result |
| Original Image | Flat lighting, limited focus | Soft and slightly dull |
| Post-Processed Image | Balanced light, sharp detail, natural colors | Lifelike, high-impact result |
Quote:
“Post-processing is where your vision meets your capture — where you reveal the story your lens began.”
— Ava Duran, Fine Art Micro Photographer
Key Takeaway
Post-processing in micro lens photography is about balance.
You’re not trying to transform your image — you’re enhancing what your lens already revealed.
By combining focus stacking, color correction, and precise sharpening, you can create photos that look crisp, vivid, and deeply immersive — without losing realism.
Remember:
Micro lens photography shows the unseen. Post-processing helps the world see it clearly.
Common Mistakes in Micro Lens Photography (and How to Avoid Them)
Even seasoned photographers struggle when they first dive into micro lens photography. The ultra-close focus, shallow depth of field, and sensitivity to movement make this genre both fascinating and technically challenging.
Let’s explore the most common mistakes beginners make — and how you can avoid them to consistently capture crisp, detailed, and professional-looking images.
1. Mistake: Shooting Handheld Without Enough Stability
The Problem:
At high magnifications, even the tiniest hand movement looks like an earthquake. A small tremor or breeze can make your photo blurry beyond repair.
The Fix:
- Use a tripod for maximum stability.
- Add a remote shutter release or use a 2-second timer to eliminate button press shake.
- If you must shoot handheld, increase your shutter speed (1/250 or faster) and enable image stabilization (IS/VR) if available.
Pro Tip:
Anchor your elbows against your body or a stable surface for extra support in handheld shots.
2. Mistake: Getting Too Close to the Subject
The Problem:
In micro photography, moving just a few millimeters can throw off your focus or cast unwanted shadows. Getting too close can also block your light source.
The Fix:
- Use a longer focal length micro lens (e.g., 90mm–200mm) for better working distance.
- Add diffused side lighting instead of front lighting to avoid shadowing your subject.
- Use a focusing rail for micro adjustments rather than physically moving your camera.
3. Mistake: Poor Lighting or Harsh Shadows
The Problem:
Direct light creates harsh shadows, overexposed highlights, and reflections — especially in reflective subjects like insects, glass, or jewelry.
The Fix:
- Use soft, diffused light from a ring light, light tent, or white diffuser.
- For natural light, shoot on cloudy days or near a window with a sheer curtain.
- Position reflectors strategically to bounce light into dark areas.
| Lighting Solution | Ideal For | Example Tool |
| Ring Light | Even, shadowless illumination | Neewer 48 LED Ring Light |
| Mini Softbox | Indoor macro setups | SmallRig RC60 |
| Diffuser Sheet | Outdoor shoots | Foldable translucent diffuser |
Lighting Rule:
In micro lens photography, softer is almost always better.
4. Mistake: Over-Relying on Autofocus
The Problem:
At micro distances, autofocus systems often hunt back and forth — or focus on the wrong part of your subject (like a petal edge instead of an insect’s eye).
The Fix:
- Switch to manual focus for better control.
- Use Live View or Focus Peaking to confirm sharpness.
- Combine manual focusing with a focusing rail for fine-tuned precision.
Pro Tip:
Move your camera slightly forward and backward instead of adjusting the focus ring constantly — it’s more accurate at extreme magnifications.
5. Mistake: Ignoring Depth of Field
The Problem:
In micro photography, depth of field (DOF) can be less than 1mm — meaning only a tiny portion of your subject is sharp while the rest is blurred.
The Fix:
- Use a smaller aperture (f/8 to f/16) to increase DOF.
- Try focus stacking for full-subject sharpness.
- Position your camera parallel to the subject to maximize the in-focus area.
| Aperture | Depth of Field | Recommended Use |
| f/2.8–f/4 | Very shallow | Artistic, soft backgrounds |
| f/8–f/11 | Balanced sharpness | Most micro photography |
| f/16–f/22 | Deep DOF (risk of diffraction) | Focus stacking setups |
Expert Insight:
Avoid going beyond f/16 unless stacking — diffraction can reduce sharpness even though depth increases.
6. Mistake: Underestimating Subject Movement
The Problem:
Even a gentle breeze can ruin a micro shot of flowers or insects. At 1:1 magnification, the smallest motion looks dramatic.
The Fix:
- Photograph early in the morning or late evening when wind is calmer.
- Use a Plamp (plant clamp) or mini stand to hold subjects steady.
- If movement persists, raise ISO slightly and use a faster shutter speed.
Pro Tip:
Insects are often more still during cooler hours — ideal for close-ups.
7. Mistake: Over-Editing or Oversharpening
The Problem:
It’s tempting to push clarity and saturation too far when editing micro photos, resulting in unnatural colors and noisy textures.
The Fix:
- Apply sharpening selectively (mask edges, not backgrounds).
- Keep clarity and dehaze adjustments under +25.
- Compare edits side-by-side with your original to maintain realism.
- Always zoom in to 100% or 200% while retouching.
Editing Rule:
Subtlety wins — you want your viewer to notice the subject, not the editing.
8. Mistake: Forgetting Background Composition
The Problem:
Many photographers focus only on the subject and ignore distracting backgrounds — like messy leaves, harsh highlights, or clutter.
The Fix:
- Simplify your background using shallow depth of field or colored paper/card stock.
- Use distance — move your subject farther from the background to blur it naturally.
- When possible, adjust your shooting angle to replace clutter with clean tones.
| Background Type | Effect | Best Use |
| Neutral (Gray/White) | Clean, minimal | Product and studio shots |
| Natural (Bokeh, Green) | Organic and soft | Outdoor and floral photography |
| Black Background | High contrast | Artistic close-ups or metallic subjects |
Quick Hack:
A simple sheet of colored paper behind your subject can instantly make your image look professional.
9. Mistake: Not Cleaning the Subject or Lens
The Problem:
Dust, pollen, or fingerprints are magnified dramatically in micro shots — often unnoticed until editing.
The Fix:
- Clean your lens and sensor regularly with a microfiber cloth and blower.
- Gently clean subjects (flowers, objects) before shooting.
- Keep a small brush or air blower in your field kit.
10. Mistake: Lack of Patience
The Problem:
Micro lens photography requires precision and timing. Rushing the process leads to missed focus, uneven lighting, and frustration.
The Fix:
- Slow down — micro photography is about observation as much as technique.
- Take multiple shots at varying focus points and lighting angles.
- Revisit the same subject under different light — natural changes can create stunning results.
Quote:
“Macro and micro photography teach patience — because every millimeter is a new world.”
— Lena Moritz, Nature Photographer
Key Takeaway
Avoiding these mistakes isn’t just about better photos — it’s about developing your eye for precision, light, and focus.
By mastering stability, controlling lighting, and practicing patience, you’ll turn frustration into fascination.
Remember:
In micro lens photography, small changes make the biggest difference.
Every adjustment — from focus to lighting — brings you closer to capturing the invisible world beautifully.
Advanced Tips and Creative Techniques for Micro Lens Photography
Once you’ve mastered the basics of focus, lighting, and stability, micro lens photography opens up a world of creativity. Beyond capturing detail, you can explore new perspectives, lighting styles, and compositional techniques that transform tiny subjects into breathtaking works of art.
This is where science meets imagination — where you stop just seeing the micro world, and start interpreting it.
1. Experiment with Depth and Focus Stacking Artistry
Focus stacking isn’t only a technical fix for shallow depth of field — it can be a creative storytelling tool.
Technique:
- Combine multiple images at different focus points to create hyper-real depth.
- Use the stacking process to guide the viewer’s eye — keep the main subject fully sharp while letting background layers fade gradually.
Creative Ideas:
- Stack only partial areas for selective sharpness (like a flower center or insect eyes).
- Create a “tilt-shift” illusion by blending focus areas selectively.
- Experiment with focus blending in Photoshop using layer masks.
Pro Insight:
Focus stacking can mimic how the human eye explores detail — sharp where attention rests, soft where it wanders.
2. Master Creative Lighting Effects
Light defines shape and texture — and in micro photography, light direction and quality become artistic tools.
Lighting Styles to Try:
| Technique | Description | Visual Result |
| Backlighting | Light from behind the subject | Glowing edges, translucency (great for leaves, wings) |
| Side Lighting | Light from one direction | Strong texture and depth |
| Low-Angle Light | Grazes the surface | Reveals patterns and contours |
| Colored Gels | Filters for creative effects | Adds mood and atmosphere |
Pro Lighting Setups:
- Use two LED panels at 45° angles for dimensional lighting.
- Add a small reflector card to fill deep shadows.
- For artistic shots, use RGB LED lights to introduce color contrast (e.g., blue vs. orange tones).
Creative Tip:
Try placing translucent objects like flower petals or feathers over a lightbox — it creates luminous, dreamlike results.
3. Play with Unconventional Perspectives
The most captivating micro lens photographs often come from unique viewpoints.
Try These:
- Low-Angle Macro: Shoot from below or through transparent subjects for dramatic compositions.
- Top-Down Symmetry: Ideal for structured objects (coins, watches, flowers).
- Through-the-Lens Effects: Shoot through droplets, crystals, or textured glass to create abstract distortion.
Pro Tip:
Keep a small mirror or glass plate in your kit — you can use it to create reflections, symmetry, or floating illusions.
4. Use Backgrounds Intentionally
Backgrounds are just as important as the subject in micro photography. A well-chosen background can set the emotional tone and visual harmony of your image.
Creative Background Ideas:
- Bokeh Backdrops: Use a distant light source or fairy lights to create soft, glowing circles.
- Gradient Paper: Blend two colors for subtle tone transitions.
- Natural Textures: Wood, moss, or stones can complement organic subjects.
- Abstract Color Cards: Bright, single-color cards add contrast and mood.
Color Psychology in Micro Photography:
- Blue = Calm, scientific precision.
- Green = Natural, organic growth.
- Red = Passion, energy, or intensity.
- Black = Drama and focus on subject detail.
5. Incorporate Water and Reflections
Water can completely transform the mood and detail of a micro shot.
Ideas:
- Use water droplets on leaves or glass to magnify underlying patterns.
- Create reflections by placing your subject near a puddle, mirror, or smartphone screen.
- Capture droplet refractions — where you focus on an image seen through a droplet instead of the droplet itself.
| Water Technique | Setup | Result |
| Dew Simulation | Spray fine mist on petals | Natural morning effect |
| Reflection Macro | Subject on reflective surface | Artistic depth |
| Refraction Macro | Focus through droplet lens | Inverted, miniature image inside droplet |
Fun Fact:
A single water droplet can act as a micro lens itself, bending light and magnifying subjects underneath.
6. Try Abstract and Minimalist Micro Photography
Micro photography doesn’t have to show recognizable objects — abstract close-ups can reveal mesmerizing colors, shapes, and patterns.
Creative Approaches:
- Focus on texture only (e.g., butterfly wings, sand, or fabric).
- Use shallow depth of field intentionally for soft, painterly effects.
- Combine motion blur with static detail for surreal contrasts.
- Convert to black and white to emphasize structure over color.
Pro Insight:
Abstract micro shots often perform well in fine art galleries — they invite curiosity and emotional interpretation.
7. Use Motion and Time in Creative Ways
Most micro photographers freeze moments, but adding motion introduces emotion and energy.
Techniques to Try:
- Slow Shutter Macro: Use a longer exposure (1/10–1 sec) with intentional motion for a dreamy feel.
- Macro Time-Lapse: Capture slow changes — like blooming, evaporation, or crystal formation.
- Focus Pull Series: Record a short video with focus shifting through different layers.
Pro Tip:
Combine slow motion with diffused lighting — it turns even a simple insect movement into cinematic poetry.
8. Explore Micro Compositing
Advanced editors sometimes merge multiple micro shots to create imaginative compositions — blending realism with artistry.
Ideas:
- Combine different micro textures into one frame (e.g., fabric + metal + plant).
- Overlay transparent elements using Photoshop blending modes.
- Add miniature-scale subjects into surreal environments (like a drop of water containing a landscape).
Creative Reminder:
Always maintain realism in perspective and lighting — even imaginative composites look best when light directions match naturally.
9. Embrace the Power of Storytelling
Even a tiny subject can tell a powerful story. What makes a micro photo memorable isn’t always its detail — it’s the emotion and context behind it.
Ask Yourself:
- What does this image make me feel?
- Is there a pattern, contrast, or behavior worth highlighting?
- How can I frame the subject to reveal something unexpected?
Examples:
- A bee on a fading petal can symbolize life cycles.
- A broken crystal or dewdrop might evoke fragility.
- A color gradient can reflect emotion or seasonality.
Quote:
“The closer you look, the more stories the world reveals.”
— Daniel Kline, Micro Visual Artist
10. Mix Techniques for Unique Styles
Advanced micro photographers often blend multiple approaches:
- Combine backlighting + water refraction for glowing textures.
- Mix focus stacking + colored gels for surreal detail and tone.
- Try black backgrounds + side lighting for dramatic, museum-style contrast.
- Use partial focus stacking for dreamlike realism — sharp eyes, soft surroundings.
The best images often come from intentional experimentation.
Key Takeaway
Mastering micro lens photography is about patience, precision, and play.
At this stage, your goal isn’t just technical perfection — it’s expression.
By experimenting with light, depth, and composition, you can turn micro details into artistic masterpieces.
Final Thought:
“Micro photography is not just about seeing small things — it’s about seeing differently.”
Inspiring Micro Lens Photography Ideas and Projects
Once you understand the technical and creative sides of micro lens photography, the best way to grow is by experimenting. Practice turns theory into instinct — and the more you shoot, the more your eye for texture, light, and story will sharpen.
Whether you’re shooting in your backyard, kitchen, or studio, the micro world offers endless subjects to explore. Let’s look at some inspiring micro photography projects to spark your creativity and help you build a diverse, visually stunning portfolio.
1. Nature’s Miniature Worlds
Nature provides a treasure trove of micro subjects. Every leaf, petal, and insect hides incredible detail when seen up close.
Ideas to Try:
- Dew Drops on Spiderwebs: Capture early morning light refracting through droplets.
- Flower Anatomy: Focus on pollen, petal textures, or stamen structures.
- Insect Portraits: Ants, bees, butterflies — their symmetry and patterns are mesmerizing.
- Moss Forests: Use a low angle to make moss look like miniature landscapes.
Pro Tip:
Early morning is perfect for nature micro photography — the light is soft, insects move slowly, and dew adds natural highlights.
2. Everyday Object Transformations
Micro lens photography reveals the unseen beauty of ordinary objects. It challenges you to see magic in the mundane.
Objects to Explore:
- Water bubbles, soap film, or condensation on glass.
- Fabrics and threads — silk, denim, wool, or lace patterns.
- Kitchen items: sugar crystals, salt grains, spices, or coffee beans.
- Technology close-ups: circuit boards, watch gears, or pen tips.
Creative Challenge:
Choose one everyday item (like a spoon or a leaf) and shoot it from 10 different perspectives. You’ll be amazed at how different it can appear.
3. Food Micro Photography
Food is full of texture, color, and geometry — perfect for micro lens exploration.
Ideas:
- The bubbles in a freshly poured soda.
- The crystalline texture of sugar or salt.
- The fibers of a fruit peel (like orange or kiwi).
- Melting chocolate, dripping honey, or cracked bread crusts.
Use side lighting or backlighting to bring out the food’s texture. A macro diffuser helps soften reflections on glossy surfaces.
| Food Type | Lighting Suggestion | Ideal Lens Setup |
| Fruits / Vegetables | Soft daylight | 60–100mm lens |
| Liquids (drinks, honey, oils) | Backlight | 90mm macro + tripod |
| Baked Goods / Desserts | Side light | 70–105mm lens |
4. Refraction and Reflection Projects
Micro lens photography excels at capturing optical illusions using water droplets, glass, or reflective surfaces.
Try These:
- Refraction Drops: Place water droplets on glass with an image underneath — focus on the image inside the drop.
- Mirror Reflections: Capture symmetry and depth using mirrors or phone screens.
- Crystal Macro: Photograph light refracted through prisms or gems for colorful bursts.
Pro Insight:
A droplet refracts light like a mini lens — by adjusting distance and background, you can create tiny “worlds” within each drop.
5. Texture and Pattern Exploration
Texture-based micro photography highlights surface details that are often invisible to the naked eye.
Subjects to Shoot:
- Tree bark, rust, cracked paint, or stone surfaces.
- Feathers, fur, or fabric weaves.
- Printed text, coins, or fingerprints.
Pro Tip:
Use side lighting at a low angle — it enhances shadows and emphasizes surface texture dramatically.
6. Abstract Micro Art Projects
Turn the micro world into abstract visual art by focusing on color, light, and form over recognizable subjects.
Ideas:
- Capture oil and water mixtures for psychedelic color effects.
- Shoot bokeh reflections off metallic or wet surfaces.
- Photograph broken glass or crystals for sharp geometric patterns.
- Create motion blur abstracts by slightly moving the subject or camera.
Creative Exercise:
Use colored gels or LEDs to introduce mood and emotion. Combine colors (like blue + red) for contrast and visual energy.
7. Seasonal Micro Photography Projects
Each season offers unique textures, colors, and moods for your micro lens.
| Season | Micro Subject Ideas | Lighting Tips |
| Spring | Flower petals, pollen, raindrops, insects | Soft daylight, diffused sunlight |
| Summer | Water, sand, plants, butterfly wings | Bright sunlight or reflective bounce light |
| Autumn | Fallen leaves, seed pods, dried plants | Warm golden-hour lighting |
| Winter | Frost crystals, ice textures, snowflakes | Use flash or LED to highlight reflections |
Pro Tip:
Snowflakes require special technique — use a dark cloth background, and photograph immediately before melting. A 1:1 lens and cold environment work best.
8. Thematic Micro Photography Projects
Give structure to your creative process by setting weekly or monthly themes. This helps you build consistency and a cohesive body of work.
Theme Ideas:
- “Water Week” – focus on droplets, reflections, and refractions.
- “Texture Tuesday” – one texture each week.
- “Tiny Portraits” – insects or miniature figurines.
- “Hidden Patterns” – everyday symmetry and geometry.
Challenge Idea:
Commit to a 30-day Micro Challenge — shoot one unique close-up every day. It boosts creativity and hones technique fast.
9. Micro Storytelling Projects
Move beyond single images — use a series of micro photos to tell a story.
Example Projects:
- The life cycle of a plant (seed to bloom).
- The decay of an object (e.g., rusting metal, drying leaf).
- “A Day in the Life of a Drop” — tracking a single water droplet through evaporation.
- Transformation projects — e.g., freezing and melting of ice, breaking of chocolate, unfolding petals.
Pro Insight:
Narrative series work well for exhibitions, blogs, and social media. They invite viewers into your micro world, frame by frame.
10. Human and Product Micro Projects
Use micro photography for creative portrait and product work.
Ideas:
- Micro Portrait Details: Eyes, lips, hands, or hair textures.
- Jewelry & Watches: Capture craftsmanship with precision.
- Cosmetics or Skincare: Focus on product texture, packaging, or shimmer effects.
| Category | Creative Angle | Key Setup |
| Jewelry | Use reflection and sparkle | Tripod + ring light |
| Cosmetics | Texture focus (lipstick, powder) | Side light + diffuser |
| Human Skin | Artistic detail | Softbox + low ISO |
Pro Tip:
For human skin or product textures, use soft diffused light to avoid harsh shadows and reflections.
11. Science and Education Micro Projects
Micro photography is not only art — it’s a powerful educational tool.
Projects:
- Photograph plant cells through transparent surfaces.
- Capture mineral structures or crystalline growth.
- Document insects or fungi for field guides or research projects.
- Combine images with labels to create educational charts.
Example:
A biology student used micro lens photography to document the germination of seeds — creating a visual timeline from day 1 to day 10. The project earned recognition in a local science fair for innovation.
12. Combining Micro Photography with Other Art Forms
Push creative boundaries by blending micro lens photography with other disciplines.
Ideas:
- Micro + Watercolor: Print your micro shots and enhance them with paint.
- Micro + Digital Collage: Mix textures from multiple images.
- Micro + Poetry: Pair abstract micro images with short verses or haikus.
- Micro + Stop Motion: Create animated sequences of growth or transformation.
Creative Thought:
The closer you look, the more artistic opportunities you find. Micro photography bridges the line between science and art — it trains your eye to find beauty in the invisible.
Key Takeaway
Inspiration is everywhere — sometimes it’s sitting unnoticed on your desk or blooming quietly in your backyard.
The essence of micro lens photography is curiosity: the desire to look closer, explore deeper, and reveal hidden worlds.
Quote to Remember:
“The real voyage of discovery consists not in seeking new landscapes, but in having new eyes.” — Marcel Proust
Editing and Post-Processing Techniques for Micro Lens Photography
Even the most perfectly captured micro lens photograph can be elevated through careful editing. Post-processing allows you to refine colors, enhance textures, and highlight the intricate details that make micro photography so mesmerizing.
Think of editing as the second half of the creative process — it transforms a technically good photo into a visually stunning masterpiece.
1. Why Editing Matters in Micro Lens Photography
Micro photography pushes your equipment to its limits. When you’re working at such close distances, minor issues like dust, chromatic aberration, or shallow depth of field become highly noticeable.
Proper editing helps you:
- Reveal hidden textures and fine details.
- Correct color shifts caused by artificial or mixed lighting.
- Eliminate distractions like dust or sensor spots.
- Merge multiple focus layers into one sharp image.
- Create a polished, professional look that stands out online and in print.
Pro Tip:
Always shoot in RAW format — it preserves maximum detail and dynamic range, giving you greater control during editing.
2. Recommended Software for Micro Lens Photography Editing
There’s no one-size-fits-all editing program. The choice depends on your workflow, budget, and technical needs.
| Software | Best For | Key Features | Price |
| Adobe Lightroom Classic | General editing & organization | Global adjustments, presets, batch editing | Subscription |
| Adobe Photoshop | Advanced retouching & stacking | Focus stacking, layers, healing tools | Subscription |
| Capture One Pro | Professional color grading | Precise color control, tethered capture | Subscription |
| Affinity Photo | Affordable all-in-one option | Focus stacking, layers, retouch tools | One-time purchase |
| Helicon Focus | Dedicated focus stacking | Automated stacking and alignment | One-time purchase |
| ON1 Photo RAW | All-round editing & effects | Non-destructive workflow, textures | Subscription/One-time |
Beginner Recommendation:
Start with Lightroom for global edits, then move to Photoshop or Helicon Focus for specialized stacking and retouching.
3. Step-by-Step Editing Workflow
Let’s break down a professional micro lens photography editing workflow from import to export.
Step 1: Import and Organize
- Import your RAW files into Lightroom or Capture One.
- Rename files logically (e.g., flower_macro_001.cr2).
- Use keywords (like “insect,” “texture,” “dew drop”) for easy searching later.
Pro Tip:
Group images from focus stacking sequences into dedicated folders — it keeps your workflow efficient and organized.
Step 2: Basic Adjustments
In Lightroom or any RAW editor:
- White Balance: Correct color temperature (micro shots often shift warm or cool).
- Exposure: Slightly underexposed RAWs are ideal — recover highlights easily.
- Contrast and Clarity: Increase gently to enhance depth.
- Texture and Dehaze: Reveal fine detail in surfaces like petals or metals.
- Highlights/Shadows: Balance light areas without flattening the image.
| Adjustment | Typical Range | Effect |
| Contrast | +10 to +20 | Adds punch and depth |
| Clarity | +5 to +15 | Enhances mid-tone details |
| Texture | +10 to +25 | Brings out surface realism |
| Vibrance | +5 to +10 | Natural color boost without oversaturation |
Step 3: Crop and Straighten
Micro shots benefit from precise framing:
- Crop out distractions at the edges.
- Maintain strong composition using the rule of thirds or center symmetry.
- Straighten lines for products, coins, or scientific images.
Aspect Ratios:
- 3:2 for prints
- 4:5 for Instagram
- 16:9 for desktop backgrounds
Step 4: Noise Reduction and Sharpening
Micro photography often involves high ISO or cropped areas, which amplifies noise.
- Luminance Noise Reduction: Smooths grain without losing texture.
- Color Noise Reduction: Removes colored specks in shadows.
- Sharpening: Apply selectively (eyes, textures, or edges).
Pro Technique:
In Lightroom:
- Use the Detail Panel → Masking Slider (hold Alt/Option).
- Apply sharpening only to edges — avoid smooth backgrounds.
Step 5: Color Grading and Tone Control
Subtle color adjustments make your micro photos feel alive and balanced.
Tools:
- HSL Panel: Adjust individual color tones (great for petals, leaves, and metallic hues).
- Split Toning / Color Grading: Add warmth to highlights or cool tones to shadows.
- Curves: Fine-tune contrast for dimensional depth.
Example:
For flower macro shots — lower yellow saturation slightly and increase magenta vibrance for a natural, pleasing palette.
Step 6: Retouching and Cleanup
At this magnification, every speck of dust is visible.
Use Photoshop’s Spot Healing Brush or Clone Stamp Tool to remove:
- Dust spots
- Sensor marks
- Stray hairs or fibers
- Small background blemishes
Pro Workflow:
Zoom in to 100% — clean systematically from top-left to bottom-right. This ensures no detail is missed.
Step 7: Focus Stacking (for Maximum Sharpness)
One of the most powerful editing techniques in micro lens photography is focus stacking — merging multiple images taken at different focus points into one crisp composite.
How to Focus Stack in Photoshop:
- Import your image sequence into Photoshop.
- Select all layers → Edit > Auto-Align Layers.
- Then go to Edit > Auto-Blend Layers → Stack Images.
- Check “Seamless Tones and Colors” and “Content Aware Fill Transparent Areas.”
- Merge and retouch final composite as needed.
Alternative Software:
- Helicon Focus: Fast, automatic alignment and blending.
- Zerene Stacker: Great for scientific or extreme macro work.
Pro Tip:
Shoot stacking sequences with a tripod and manual focus rail for perfect alignment and minimal blur.
Step 8: Final Touches and Export
Once your image is complete:
- Apply a vignette to subtly draw attention to the center.
- Add local contrast using the brush tool around your subject.
- Review for color balance consistency across your series.
Export Settings:
| Platform | File Type | Resolution | Sharpening |
| Web / Social Media | JPEG | 2048 px on longest side | Standard |
| TIFF | 300 DPI | Low | |
| Archive | RAW / DNG | Original | None |
Pro Tip:
Add keywords and metadata (title, description, copyright) before export — this improves SEO if you publish online.
4. Before-and-After Editing Comparison
| Editing Stage | Description | Visible Change |
| RAW Image | Straight out of camera | Flat colors, low contrast |
| After Basic Adjustments | Exposure, contrast, WB | Balanced tones |
| After Color Grading | HSL and curves applied | Rich, dynamic hues |
| After Focus Stacking | Multiple focus layers merged | Full depth, razor-sharp details |
| Final Image | Retouched and exported | Clean, professional result |
5. Batch Editing and Preset Workflow
If you shoot many similar images:
- Create custom presets for color, contrast, and sharpening.
- Apply them in bulk for consistent editing across a series.
- Adjust individually as needed for lighting or subject changes.
Pro Insight:
Consistency in editing style helps build a recognizable visual identity — crucial for photographers growing a brand or portfolio.
6. When to Stop Editing
A common mistake in micro lens photography is over-editing. Overuse of clarity or saturation can make textures look artificial.
Use the “blink test” — look away for a few seconds, then glance back.
If the colors feel too strong or textures too crunchy, tone it down.
Golden Rule:
Edit to enhance what’s real, not to create what wasn’t there.
Key Takeaway
Post-processing in micro lens photography is about refinement, not reinvention.
Your goal is to preserve realism while amplifying the natural beauty of the micro world.
With the right tools and workflow, you can turn a simple close-up into a gallery-quality image — sharp, balanced, and emotionally engaging.
Quote to Remember:
“The camera captures the moment, but the edit reveals the story.”
Common Mistakes and How to Avoid Them in Micro Lens Photography
Even experienced photographers struggle with the unique challenges of micro lens photography. Because you’re working at extreme magnifications, even the smallest vibration, lighting error, or focus shift can ruin an otherwise perfect shot.
The key to mastering micro photography is knowing what mistakes to watch for — and how to fix them before they happen.
Below are the most common issues and proven solutions that will help you take cleaner, sharper, and more compelling close-up photos.
1. Motion Blur and Camera Shake
The Problem:
At close distances, even the slightest movement (your hand, wind, or shutter vibration) can create motion blur. This is one of the biggest challenges in micro photography.
How to Fix It:
- Always use a tripod or macro focusing rail for stability.
- Use a remote shutter release or your camera’s self-timer.
- Enable mirror lock-up mode (for DSLRs) to reduce vibration.
- If handheld, increase shutter speed — ideally 1/200 sec or faster.
- Use optical or in-body image stabilization if your lens supports it.
Pro Tip:
For outdoor macro shots, wait for moments of still air or shield your subject from the wind with your hand or a small card.
2. Shallow Depth of Field (Too Little Focus Area)
The Problem:
Even with small apertures, the area in focus (depth of field) is razor-thin in micro lens photography. Often, only a fraction of your subject is sharp.
How to Fix It:
- Use a smaller aperture (f/8–f/16) to increase depth of field.
- Use focus stacking for perfect sharpness across your subject.
- Make sure your camera sensor plane is parallel to your subject when possible.
- Increase your working distance slightly — a small move back can double your focus zone.
Pro Tip:
Avoid going beyond f/16, as diffraction can reduce overall sharpness.
3. Poor Lighting and Harsh Shadows
The Problem:
Because you’re so close to your subject, your lens or camera often blocks light, creating dark areas or uneven illumination.
How to Fix It:
- Use ring lights, LED panels, or diffusers to soften shadows.
- Add reflectors to bounce light into shadowed areas.
- Position your light source at 45° angles instead of head-on.
- Use backlighting for translucent subjects (like petals or insects’ wings).
Lighting Hack:
A simple white plastic bottle cut into a ring can serve as a DIY light diffuser — perfect for soft, even lighting on the go.
4. Missed Focus or Soft Images
The Problem:
At macro distances, autofocus often struggles to lock precisely on your desired point, especially with small moving subjects.
How to Fix It:
- Switch to manual focus for precise control.
- Use focus peaking (available on many mirrorless cameras).
- Magnify your viewfinder or live view screen to fine-tune focus.
- Use a focusing rail to adjust in micro increments.
- For moving subjects, pre-focus on an area and wait for them to enter your plane of focus.
Pro Tip:
Focus on the most important detail — such as the insect’s eyes or the center of a flower — and let the rest fall off naturally.
5. Overexposed Highlights or Blown-Out Areas
The Problem:
Because light intensity increases with magnification, it’s easy to overexpose reflective or white surfaces, losing fine detail.
How to Fix It:
- Lower your exposure compensation (-0.3 to -1.0 EV).
- Use a diffuser to soften light sources.
- Check your histogram — avoid spikes on the far right.
- Shoot in RAW so you can recover highlights later in post-processing.
| Lighting Situation | Recommended Fix |
| Bright daylight macro | Use diffuser or shade |
| Flash too harsh | Add softbox or bounce light |
| Reflective subjects | Adjust angle or polarization filter |
Pro Insight:
Use a polarizing filter to reduce glare from shiny surfaces like metal, glass, or water droplets.
6. Distracting Backgrounds
The Problem:
Busy or bright backgrounds can pull attention away from your subject — especially problematic in close-up photography where framing is tight.
How to Fix It:
- Simplify by using a plain backdrop (black, white, or complementary color).
- Use a wide aperture (f/2.8–f/5.6) to blur the background.
- Change your shooting angle for better separation.
- Keep backgrounds a few inches behind your subject to maximize blur.
Pro Tip:
Carry a few colored cards or paper sheets — they’re lightweight and instantly improve composition.
7. Dust, Dirt, and Sensor Spots
The Problem:
At high magnification, even tiny dust particles or smudges become glaringly visible in your photos.
How to Fix It:
- Clean your lens and sensor regularly using proper tools.
- Use a blower before every shoot.
- Inspect images at 100% zoom during post-processing for unnoticed dust.
- Keep subjects clean (especially for product or food photography).
Pro Tip:
Avoid wiping lenses with random fabrics — use a microfiber cloth and lens cleaning fluid designed for optics.
8. Incorrect White Balance
The Problem:
Different light sources (LEDs, sunlight, flash) can mix color temperatures, giving your photo a blue or orange tint.
How to Fix It:
- Use a gray card to set custom white balance before shooting.
- In RAW, adjust the temperature slider (e.g., 5000K for daylight, 3200K for LED).
- Avoid auto white balance when shooting under mixed lighting.
Pro Tip:
Consistent color temperature across your portfolio enhances your brand identity and makes your work look more professional.
9. Ignoring Composition
The Problem:
Many beginners get so focused on magnification that they forget about composition — the balance, framing, and storytelling that make a photo compelling.
How to Fix It:
- Apply traditional rules like Rule of Thirds, Leading Lines, and Negative Space.
- Experiment with diagonal compositions for dynamic energy.
- Frame your subject with surrounding textures (like petals or glass).
- Avoid centering everything — let the subject “breathe.”
Creative Tip:
Composition in micro photography is about visual rhythm — every shape and shadow contributes to the viewer’s experience.
10. Overediting or Oversharpening
The Problem:
It’s tempting to push clarity and sharpening too far, which creates harsh textures and color halos that look unnatural.
How to Fix It:
- Apply sharpening only to areas of focus (mask it in Lightroom).
- Keep Texture and Clarity under +25.
- Zoom out occasionally during editing to maintain perspective.
- Avoid over-saturation — detail should look alive, not artificial.
Pro Insight:
Subtle edits usually look more professional. Your goal is to enhance natural realism, not exaggerate it.
11. Lack of Patience
The Problem:
Micro photography requires precision and timing. Rushing leads to blurry, misaligned, or underexposed images.
How to Fix It:
- Slow down your process — plan lighting, focus, and composition carefully.
- Take multiple shots with minor adjustments in each.
- Be prepared to spend several minutes (or more) on a single image.
Quote:
“Patience isn’t optional in micro photography — it’s the most powerful tool in your kit.”
12. Ignoring Post-Processing Workflow
The Problem:
Some photographers assume a great shot straight out of the camera doesn’t need editing — but micro images almost always benefit from fine-tuning.
How to Fix It:
- Clean up dust and improve exposure in Lightroom or Photoshop.
- Stack focus layers for full detail.
- Maintain consistent tones across your portfolio.
- Use presets for efficiency, but tweak per image.
Checklist: Pre-Shoot and Post-Shoot Quality Control
| Stage | What to Check | Why It Matters |
| Before Shooting | Clean lens, adjust white balance, test light | Ensures clarity and color accuracy |
| During Shooting | Focus accuracy, background simplicity | Prevents wasted frames |
| After Shooting | Review sharpness, check exposure, note errors | Speeds up improvement and editing |
Key Takeaway
Every photographer makes mistakes — what separates beginners from experts is how they correct and learn from them.
In micro lens photography, small improvements in focus, light, and patience lead to dramatic gains in quality. Over time, these lessons turn into instinct — and your images begin to tell richer, sharper, and more intentional stories.
Final Thought:
“Mistakes are the stepping stones to mastery — especially when your world is viewed one millimeter at a time.”
How to Build a Portfolio and Share Your Micro Lens Photography Online
Building a strong, visually stunning micro lens photography portfolio is just as important as mastering the technique itself. A great portfolio not only displays your best work — it tells a story about your style, technical skill, and creative vision. When shared strategically online, it can open doors to clients, galleries, collaborations, and income opportunities.
This section walks you through every step of creating, optimizing, and promoting your micro lens photography portfolio for maximum impact.
1. Choose Your Portfolio Platform
Before uploading your first image, choose a platform that fits your goals. Whether you’re building a personal website or using a portfolio service, it should be fast, mobile-friendly, and visually clean.
Recommended Platforms
| Platform | Best For | Key Features |
| Squarespace | All-around photographers | Sleek templates, SEO tools, e-commerce |
| Pixpa | Photography-focused websites | Client galleries, proofing, digital sales |
| SmugMug | Professionals selling prints | Unlimited storage, watermarking |
| Adobe Portfolio | Creative Cloud users | Free with Adobe subscription |
| 500px / Flickr | Community exposure | Global reach, discovery by brands |
| Instagram / Threads | Social reach | Fast audience growth, hashtags for discovery |
Pro Tip:
Start simple — a clean layout that highlights your photos is better than one overloaded with effects or text.
2. Curate, Don’t Just Collect
A common mistake is uploading every photo you’ve taken. The best portfolios are carefully curated — showing only your strongest and most cohesive work.
Curation Checklist
- Select 15–25 images that best represent your range.
- Ensure every image has consistent editing style and tone.
- Organize by theme or subject, not by date (e.g., “Textures in Nature,” “Insect Portraits,” “Micro Textures”).
- Lead with your most striking image — it sets the tone for the viewer’s experience.
Quote:
“A portfolio is only as strong as its weakest image — every photo should earn its place.”
3. Optimize Images for SEO and Speed
A beautiful image is useless if no one finds it. Optimizing your micro lens photography for search engines helps your work appear in Google Images and portfolio searches.
SEO Optimization Tips
- Rename files with descriptive keywords:
Example: butterfly-wing-macro-lens-photography.jpg - Add alt text like:
“Close-up of butterfly wing showing scale texture captured with micro lens.” - Use compressed file formats (JPEG, WebP) to reduce load time.
- Keep image sizes below 300 KB for web display.
- Add metadata — title, description, copyright info, and camera details.
Pro Insight:
Fast-loading, well-labeled images improve both SEO ranking and viewer retention, especially on mobile.
4. Include Behind-the-Scenes or Process Shots
People love seeing how an image was created. Sharing the behind-the-scenes of your setup — lighting diagrams, camera rigs, or post-processing — builds trust and credibility.
Ideas for BTS content:
- A side-by-side of your setup vs. final shot
- Short clips showing focus stacking or lighting adjustments
- Before-and-after edits (RAW vs. final retouched photo)
This kind of content performs exceptionally well on platforms like YouTube Shorts, Instagram Reels, and TikTok, giving your photography a human touch.
5. Write Meaningful Captions and Descriptions
A photo might capture attention — but words create connection. Add short, thoughtful captions that provide context, emotion, or insight.
Example:
“Captured using a 100mm micro lens at 1:1 magnification. I wanted to show how dew droplets act like tiny mirrors reflecting an entire world within them.”
Captions with descriptive language help with SEO indexing and make your portfolio feel intentional rather than random.
6. Build Themed Collections or Series
Organize your portfolio into cohesive themes. This helps tell a story and appeals to both casual viewers and professional clients.
Collection Ideas for Micro Lens Photography
- Textures of Nature: Leaves, bark, soil, ice, and minerals
- Tiny Creatures: Insects, arachnids, and aquatic life
- Everyday Objects Up Close: Fabrics, metal, food textures
- Scientific Macro: Crystals, cells, mechanical parts
- Creative Abstracts: Water droplets, light refractions, colors
Pro Tip:
Name your collections with SEO-friendly titles like “Abstract Micro Lens Photography: Exploring Color and Light.”
7. Showcase Technical Details
Include camera data and gear info for educational or professional credibility.
| Example | Description |
| Camera: Canon EOS R6 | Full-frame mirrorless |
| Lens: 100mm f/2.8L Macro | True 1:1 magnification |
| Settings: ISO 200, f/8, 1/125s | Balanced sharpness and depth |
| Lighting: Ring flash with diffuser | Even illumination |
This appeals to fellow photographers, students, or brands looking for technical expertise.
8. Promote Your Portfolio Strategically
Once your portfolio is ready, start promoting it across platforms where visual content thrives.
Where to Share
- Instagram: Use hashtags like #microlensphotography, #macroshot, #closeupmagic.
- Pinterest: Great for evergreen image discovery.
- 500px / Behance: For professional community exposure.
- LinkedIn: Showcase your technical skill for potential commercial or research collaborations.
- Your Blog: Write SEO-optimized posts (like this one!) linking to your portfolio.
Engagement Tip:
Reply to comments, collaborate with other photographers, and join niche groups (e.g., Macro Photography Community on Reddit). Engagement builds long-term visibility.
9. Sell or License Your Work
Monetize your micro lens photography through print or licensing opportunities.
Ways to Earn
- Stock Photography: Submit to Adobe Stock, Shutterstock, or Alamy.
- Print Sales: Offer fine-art prints via Etsy, SmugMug, or your website.
- Brand Collaborations: Work with jewelry, science, or nature-based brands needing close-up content.
- Workshops & Tutorials: Teach your process through courses or live sessions.
Fact:
According to Photography Business Journal (2024), photographers specializing in niche subjects like macro and micro photography earn 40% higher rates for licensed imagery compared to general stock photos.
10. Maintain and Evolve Your Portfolio
A portfolio is a living document. Update it regularly as your skills and style evolve.
Maintenance Tips:
- Refresh your homepage every 3–6 months.
- Remove weaker or outdated shots.
- Track analytics (via Google Search Console or Squarespace Insights).
- Add a blog section or “Recent Work” to keep your site active.
Pro Insight:
Active portfolios rank higher on search engines because Google prioritizes fresh, updated content.
Key Takeaway
Your micro lens photography portfolio is more than a gallery — it’s your brand identity, creative statement, and marketing tool.
By curating intentionally, optimizing for SEO, and engaging with your audience, you’ll position yourself as a trusted expert in a fascinating niche of photography. Over time, your online presence can attract opportunities that match your passion and skill.
Final Thought:
“Don’t just post pictures — build a visual universe that tells the story of your microscopic world.”
Future Trends in Micro Lens Photography and AI Integration
The future of micro lens photography is being shaped by the convergence of AI, computational imaging, and hardware innovation. What was once the realm of scientific labs and high-end studios is now accessible to hobbyists with smartphones — and the next decade promises even more groundbreaking shifts.
Let’s explore the most exciting trends transforming this fascinating field.
1. AI-Powered Autofocus and Image Enhancement
AI is revolutionizing the way photographers capture and refine microscopic detail. Traditional autofocus struggles at extreme magnifications, but AI-assisted systems can now predict subject movement and focus with pixel-level precision.
Examples of AI Autofocus Innovations
| Brand | Feature | Description |
| Sony | Real-Time Eye AF | Detects and tracks insect eyes or small features even in motion |
| Canon | Deep Learning Autofocus | Recognizes subject types (like flowers, birds, insects) automatically |
| Nikon | 3D Tracking | Uses AI pattern recognition for precise focus across frames |
AI not only improves focus but also enhances color, clarity, and noise reduction in post-processing. Tools like Adobe Sensei, Topaz AI, and Luminar Neo can now:
- Upscale low-res macro images while preserving detail.
- Remove noise intelligently without blurring textures.
- Sharpen only in-focus areas for natural results.
Pro Insight:
AI doesn’t replace skill — it amplifies precision, making challenging micro shots more achievable and consistent.
2. Computational Photography and Focus Stacking Automation
Focus stacking — once a tedious manual process — is being fully automated through computational imaging. Cameras and smartphones now combine multiple shots into one perfectly sharp composite.
Emerging Tools
- Helicon Focus and Zerene Stacker: Pro-level software automating hundreds of focus layers.
- Apple’s Computational Macro Mode (on iPhone 15 Pro): Merges focus data instantly in-camera.
- Lightroom AI Focus Merge (in testing): Uses depth maps to auto-stack RAW files.
These technologies save hours in editing and make micro lens photography faster, smoother, and more accessible to beginners.
3. Smartphone Micro Lenses and Sensor Advancements
Smartphones are quickly closing the gap between consumer and professional gear. Today’s mobile devices can capture astonishing detail at microscopic levels, often aided by attachable micro lenses.
Breakthrough Smartphone Features
| Phone | Feature | Magnification | AI Role |
| Samsung Galaxy S24 Ultra | Macro Mode + 200MP Sensor | 1:1 | Scene optimization |
| iPhone 15 Pro Max | Macro & Computational Fusion | 1.5x | Smart HDR and stacking |
| Xiaomi 14 Ultra | Leica lens collaboration | 5x macro zoom | AI texture enhancement |
Pro Tip:
With clip-on micro lenses under $50, even budget smartphones can achieve professional-quality close-ups with proper lighting and stability.
4. Integration of AR and Mixed Reality (MR) for Training
One of the most exciting future trends is the integration of augmented reality (AR) and mixed reality (MR) for real-time learning and feedback in photography.
Imagine wearing AR glasses that overlay:
- Live focus guides and depth maps in your viewfinder.
- Real-time lighting simulations to adjust exposure.
- Interactive tutorials while shooting microscopic scenes.
Companies like Canon, Sony, and Meta are already experimenting with MR overlays to improve training and field learning for photographers and researchers alike.
5. AI-Powered Editing and Curation
Editing will soon be guided by AI that understands both technical and aesthetic principles. Advanced algorithms can already:
- Suggest optimal cropping for balance and focus.
- Automatically tag and organize images by subject (e.g., “insects,” “flower stamens,” “textures”).
- Rate photos based on sharpness, exposure, and composition.
Example:
Adobe’s Sensei AI can now analyze entire libraries and recommend your top 10 macro shots — saving hours of manual review time.
Statistic:
According to AI Imaging Trends Report 2025, 68% of photographers now use some form of AI-driven editing or curation in their workflow.
6. New Optical Materials and Smart Lenses
Future lenses will use liquid and adaptive optics, allowing instant focus shifts and magnification changes — no mechanical movement needed. This tech, already in testing by Meta Materials Inc., could redefine how micro lenses are built.
Potential Benefits
- Zero focus lag.
- Compact, lightweight lenses.
- Dynamic magnification control.
- Better optical performance under variable lighting.
This means photographers will soon capture micro-to-macro transitions seamlessly in a single frame — something currently impossible without changing lenses.
7. AI Image Reconstruction and Synthetic Microscopy
In research photography, AI is also transforming synthetic imaging — using algorithms to reconstruct images beyond optical limits.
For example:
- DeepMind’s AI Microscopy Project can reconstruct cellular structures from partially blurred images.
- NVIDIA’s Neural Radiance Fields (NeRF) generate 3D micro environments from multiple 2D photos.
For artistic photographers, this means exploring microscopic 3D storytelling — combining real and synthetic visuals for hyper-detailed creative projects.
8. Sustainability and Eco-Friendly Innovation
As gear evolves, manufacturers are increasingly focusing on eco-conscious materials and energy-efficient designs.
New innovations include:
- Solar-powered lighting rigs for field macro photography.
- Recycled aluminum and bio-based plastics for lenses.
- Low-consumption AI processors in mirrorless cameras.
Insight:
Photographers can also contribute by using rechargeable battery packs, reducing plastic accessories, and supporting sustainable manufacturers.
9. AI-Driven Education and Skill Development
The future of learning micro lens photography will rely heavily on AI-driven mentorship. Platforms like Photolearn AI and Skillshare Labs are developing personalized assistants that:
- Analyze your photos.
- Detect common mistakes.
- Offer improvement tips based on focus, exposure, or composition.
This creates a 24/7 personal photography coach, adapting to your unique skill level.
10. The Merging of Art and Science
Micro lens photography is becoming a bridge between artistic expression and scientific discovery. Artists, biologists, and technologists are collaborating to explore:
- Bioluminescent imagery.
- Molecular-level landscapes.
- AI-generated micro textures for digital art.
This multidisciplinary fusion is expanding what’s possible — turning micro worlds into macro stories that blend curiosity, beauty, and innovation.
Key Takeaway
The next generation of micro lens photography will be defined by AI intelligence, automation, and accessibility. Photographers will spend less time struggling with focus or lighting and more time creating, experimenting, and storytelling.
Final Thought:
“Artificial intelligence won’t replace human creativity — it will magnify it. The future of micro photography belongs to those who can merge technology with imagination.”

